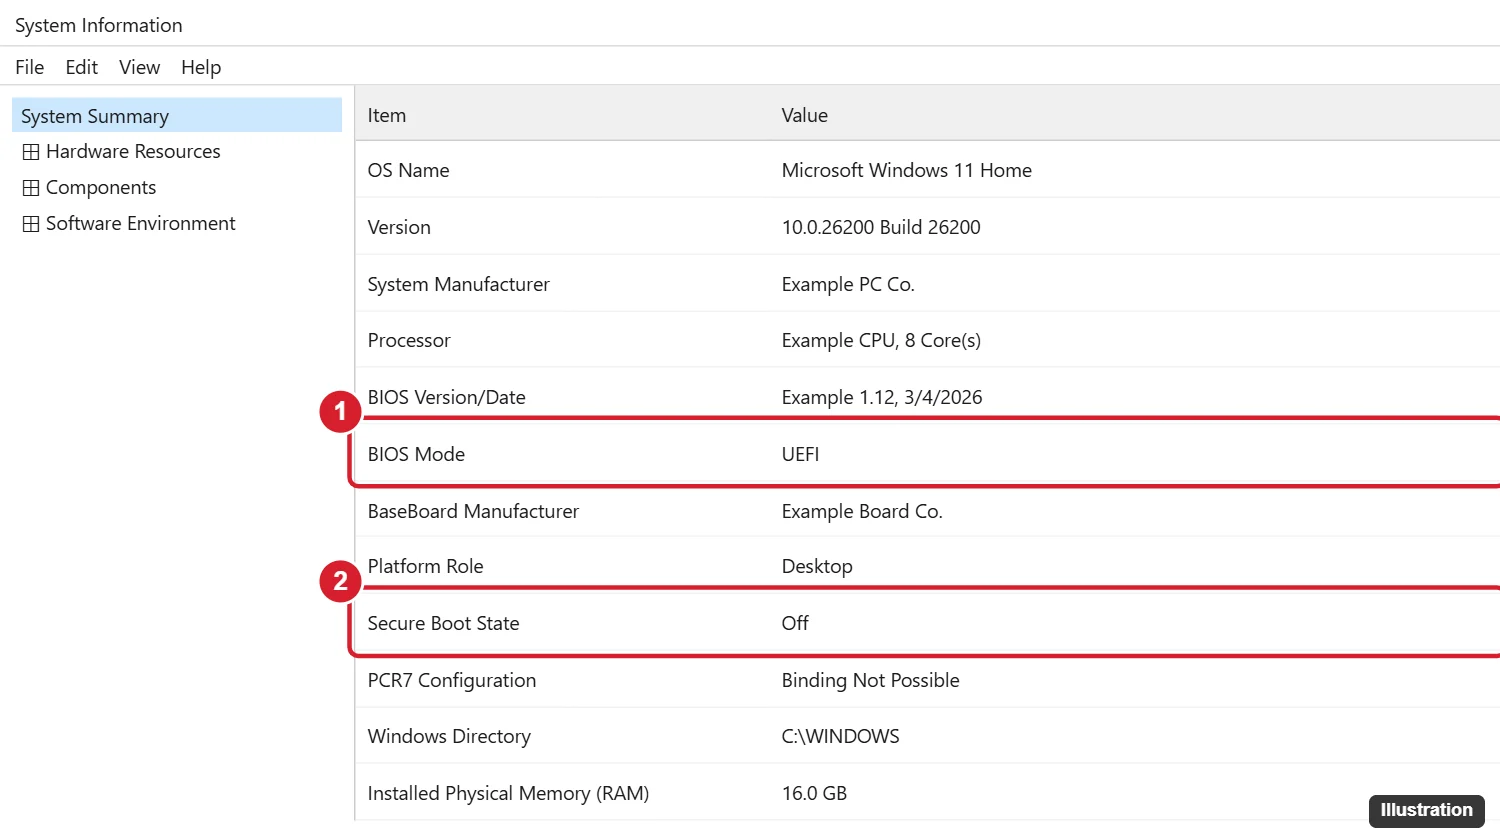
If Windows 11 setup, PC Health Check or a game says Secure Boot must be on, first press Windows key + R, run msinfo32, and note BIOS Mode and Secure Boot State. If they read UEFI and Off, open Settings > System > Recovery, choose Restart now beside Advanced startup, then Troubleshoot > Advanced options > UEFI Firmware Settings > Restart, set Secure Boot to Enabled, and save.
What your System Information reading means
Secure Boot lives in the PC’s firmware (the UEFI menu that runs before Windows), not in Windows itself. So the first job is to learn what the firmware is doing right now. In current versions of Windows 11, open System Information and stay on System Summary; the two rows you need are near the top of the right pane.
- Press Windows key + R, type msinfo32, and press Enter.
- With System Summary selected, read the BIOS Mode and Secure Boot State values.
- Match them to the table below.
| Your reading | What it means | Where to go |
|---|---|---|
| Secure Boot State: On | Already enabled. A game or app that still complains has a different problem (often TPM or its own anti-cheat check). | Nothing to change here; see the TPM question near the end. |
| BIOS Mode: UEFI, Secure Boot State: Off | The PC can use Secure Boot; it is simply switched off. | The firmware steps in the next section. |
| BIOS Mode: Legacy | Windows was installed in the old BIOS (CSM) style on an MBR disk. Secure Boot can’t run until the disk and firmware use UEFI. | The Legacy-to-UEFI section first, then the firmware steps. |
| Secure Boot State: Unsupported | Usually seen when the PC is booting in Legacy mode; on very old hardware the firmware may have no Secure Boot at all. | Check BIOS Mode. If it says Legacy, follow that row. |
Prefer a command? Open PowerShell as administrator and run Confirm-SecureBootUEFI. Per Microsoft’s reference for the cmdlet, it returns True when Secure Boot is on and False when it is off on a UEFI PC.
This is the path for the UEFI + Off reading. Microsoft documents the Windows side on its Windows 11 and Secure Boot page; the firmware screens come from your PC or motherboard maker, so the tab names below are the common ones rather than a promise.
- Save your work and close open apps. If BitLocker is on, have the recovery key ready first (see the checklist below), because a firmware change can trigger the recovery prompt.
- Go to Settings > System > Recovery and select Restart now next to Advanced startup.
- On the blue menu, choose Troubleshoot > Advanced options > UEFI Firmware Settings, then Restart. The PC opens the firmware menu instead of Windows.
- Look for Secure Boot on the Boot, Security or Authentication tab. Some boards hide it until you switch to an advanced view.
- Check that CSM or Legacy support is disabled and the boot mode is UEFI only (or UEFI first). Microsoft names this as the change to make when the PC is set to Legacy.
- Set Secure Boot to Enabled. If the menu also offers a mode choice, the factory or standard mode is the usual pick for a Windows PC.
- Save and exit. Many menus use F10 for this, but follow the key shown on screen.
- When Windows is back, run msinfo32 again. Secure Boot State should now read On.
If the Advanced startup tile doesn’t offer UEFI Firmware Settings, you can press the firmware key while the PC powers on instead. Common keys are Esc, Delete, F1, F2, F10, F11 and F12; there are other ways to reach the BIOS on Windows 11 as well.
Two makers document their keys: Dell says to tap F2 at the Dell logo and that Secure Boot is typically in the Boot Configuration area; ASUS says to press F2 (Delete on some older desktops), F7 for Advanced Mode, and to look on the Boot tab on desktops or the Security tab on laptops. For other brands, the Windows 11 and Secure Boot page linked above points to each maker’s own instructions.
Before you touch the firmware
- BitLocker. Firmware changes can make Windows ask for the BitLocker recovery key at the next start. First check whether BitLocker is on, and if it is, make sure you can get to the key before you restart.
- Power. Plug a laptop into its charger so it can’t shut down mid-change.
- Notes. Photograph or write down any screen you change, and change one setting at a time. That way you can put things back if the PC won’t start.
When the Secure Boot setting is greyed out
A setting you can see but can’t select almost always has a reason further up the menu. Work through these in order, because each one is more effort than the last.
- CSM or Legacy boot is still on. Most firmware locks Secure Boot while CSM is enabled. Disable CSM, save, re-enter the menu, and look again. Do this only if msinfo32 already says UEFI, or Windows won’t start.
- The Secure Boot keys are missing. If the keys were cleared, look for an option such as Restore Factory Keys or Install default Secure Boot keys in the Secure Boot submenu. Restoring defaults puts back the keys the PC shipped with.
- A supervisor or admin password is required. Some business laptops lock security settings until a firmware password is set or entered. On a work PC, that password belongs to IT, so ask them.
- The firmware is old. A firmware update from the PC maker can add or fix the option. These steps to update the BIOS on Windows 11 safely cover the precautions.
You may see advice to flip a registry value or run a PowerShell command to enable Secure Boot “without the BIOS.” Skip it: Microsoft’s boot process documentation says software can’t change Secure Boot settings; only the person at the firmware menu can.
Switching a Legacy install to UEFI without reinstalling
If BIOS Mode says Legacy, turning on UEFI by itself leaves Windows unable to start, because the system disk is MBR. Microsoft’s MBR2GPT tool converts the disk to GPT in place. Read the warnings first: per Microsoft’s MBR2GPT page, the conversion can’t be undone, it works only on the system disk, BitLocker protection must be suspended first, and the disk can have no more than three primary partitions and no extended partition, and the PC must support UEFI.
- Back up your files to an external drive or cloud storage.
- If BitLocker is on, suspend protection. Microsoft notes that afterward you delete and recreate the BitLocker protectors to turn protection back on.
- Open Command Prompt as administrator and run
mbr2gpt /validate /allowFullOS. The/allowFullOSswitch lets the tool run from inside Windows instead of Windows PE. - If validation succeeds, run
mbr2gpt /convert /allowFullOS. If it fails, stop and read the message; don’t force it. - Restart into the firmware, switch the boot mode from Legacy or CSM to UEFI, save, and let Windows start.
- Confirm msinfo32 shows BIOS Mode: UEFI, then go back and enable Secure Boot as described above.
The full conversion, including what to do when validation fails, is covered in changing BIOS mode from Legacy to UEFI in Windows 11.
The 2026 certificate change, and why to leave Secure Boot on
Secure Boot relies on Microsoft certificates stored in firmware. According to Microsoft’s page on Secure Boot certificate expiration, the original 2011 certificates begin expiring in June 2026 and are being replaced with a 2023 set. Most PCs on supported versions of Windows receive the update automatically. A PC that misses it keeps booting but stops receiving new boot-level protections, and some PCs may also need a firmware update from the maker. Work PCs follow their organization’s rollout. Microsoft is clear that turning Secure Boot off is not a fix for any of this.
Turning it back off, and when that is reasonable
Some rescue disks, older graphics cards and Linux setups won’t start with Secure Boot on. Microsoft’s guidance is that you can turn it off temporarily for something like that and switch it back on afterward. If Windows won’t start after enabling it, return to the firmware, disable Secure Boot again, and recheck that BIOS Mode is UEFI and the disk is GPT. The reverse steps for this version are in turning off Secure Boot on Windows 11; if the PC still runs Windows 10, see disabling Secure Boot in Windows 10.
Building a PC from scratch? With Secure Boot on, you can install Windows 11 on the new PC from a USB drive.
Secure Boot questions
Is Secure Boot the same as TPM 2.0?
No. Secure Boot checks what starts the PC; TPM 2.0 is a security chip (or firmware feature) that stores keys. Windows 11 lists both as requirements, and some anti-cheat tools check both, so a game can still complain after Secure Boot reads On.
Why does Confirm-SecureBootUEFI say “Cmdlet not supported on this platform”?
Microsoft documents that message for BIOS (non-UEFI) PCs and for PCs that don’t support Secure Boot. Check BIOS Mode in msinfo32; it will most likely say Legacy. “Access was denied” means PowerShell wasn’t opened as administrator.
Does upgrading from Windows 10 need Secure Boot turned on?
Microsoft says the upgrade needs a PC that is Secure Boot capable, and recommends having it on. Running Windows 11 with Secure Boot enabled is still the better state for security.
Should I recheck after a firmware update or reset?
Yes. A firmware reset can return settings to defaults, so run msinfo32 afterward. If you see a BitLocker prompt at that point, this help for when you can’t find your BitLocker recovery key lists where it’s usually stored.
Once msinfo32 shows Secure Boot State: On, rerun the check that sent you here (PC Health Check, setup or the game) to confirm it now passes.

Kermit Matthews runs Live2Tech from just outside Philadelphia. He is an IT specialist with over 20 years of experience, from a university help desk to small-business IT, IT management and his own consulting practice, and has written tech guides full time since 2020. Steps are checked against the current software on a real device or the maker’s official documentation. More about Kermit.