If your Word document suddenly shows the same file in two stacked panes, or two windows side by side, you’ve turned on one of Word’s split or comparison views. Each one is useful for referencing one part of a document while editing another, but annoying if you didn’t mean to turn it on. This guide shows how to identify which view you’re in and return to a single normal window in Word for Windows and Mac. The steps are the same in Word 2013 through Microsoft 365.
Quick Answer
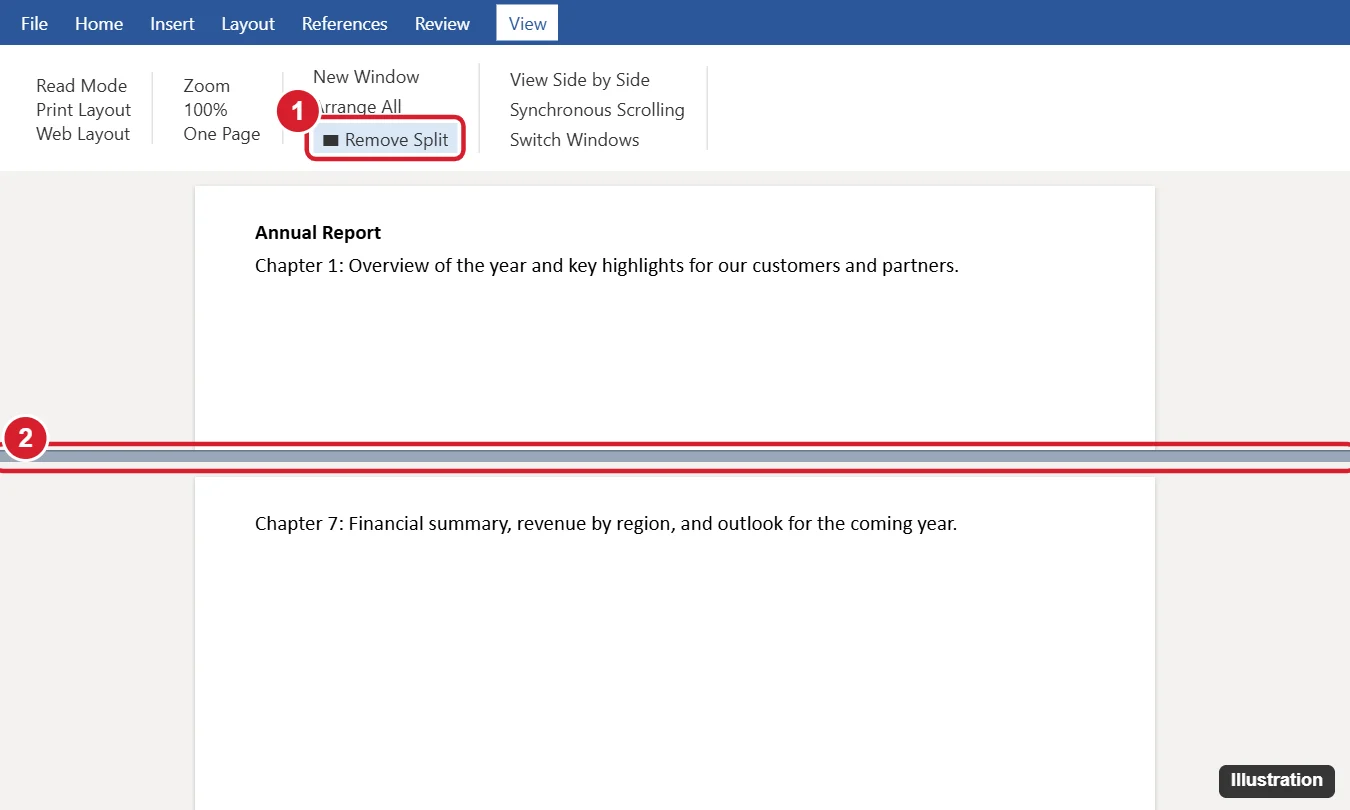
Go to the View tab and click Remove Split, or double-click the gray split bar between the two panes. If you see two separate windows side by side, click View Side by Side again to turn it off, and close the extra window (its title ends in “:2”).
Which “Split Screen” Do You Have?
| What you see | Cause | How to fix |
|---|---|---|
| One window, two panes (top and bottom) with a gray bar | Split | View > Remove Split, or double-click the bar |
| Two windows next to each other that scroll together | View Side by Side | Click View Side by Side again |
| Two windows of the same file, titled “Name:1” and “Name:2” | New Window | Close one window |
| Two pages shown next to each other | Multiple Pages zoom or Side to Side | View > One Page, or Vertical |
| Word and another app sharing the screen | Windows Snap | Maximize Word (Windows + Up arrow) |
Remove a Split
- Click the View tab.
- In the Window group, click Remove Split. When there’s no split, the button says Split.
Other ways: double-click the split bar, drag it to the very top or bottom of the window, or press Alt + Shift + C.
Turn Off View Side by Side
- Click the View tab in either window.
- Click View Side by Side to turn it off.
- Close the document you no longer need, or maximize the one you want.
Close an Extra Window (New Window)
If the title bar shows the document name followed by :1 or :2, New Window created a second view of the same file. Close either window with its X. The document stays open in the other, and nothing is lost.
Show One Page Instead of Two
- Go to View > One Page, or Page Width, and set zoom to 100%.
- If Side to Side page movement is selected, choose Vertical in the Page Movement group.
Word for Mac
- Split: View > Split toggles the split on and off. You can also use the Window menu, or drag the split bar.
- Side by side: choose Window > Compare Side by Side again to turn it off.
- Exit full screen or Split View with the green button in the window’s corner.
Frequently Asked Questions
Why would I use Split?
Split lets you view two parts of a long document at once, for example a table at the start while writing the conclusion.
Does removing the split change my document?
No. Splits and windows only change the view, not the content.
Summary
- Click View > Remove Split, or double-click the split bar.
- Click View Side by Side again to turn off side-by-side windows.
- Close extra “:2” windows created with New Window.
- Use View > One Page if two pages show at once.

Kermit Matthews is a freelance writer based in Philadelphia, Pennsylvania with more than a decade of experience writing technology guides. He has a Bachelor’s and Master’s degree in Computer Science and has spent much of his professional career in IT management.
He specializes in writing content about iPhones, Android devices, Microsoft Office, and many other popular applications and devices.