Your PC keeps crashing, runs slowly, refuses an update or won’t start, and you’d rather not wipe it. Work up the ladder from the gentlest fix: restart and install updates, run the Get Help troubleshooters, repair system files with DISM and SFC, then try Startup Repair or System Restore. Before any clean install, use Fix problems using Windows Update or Reset this PC with Keep my files. These steps cover current versions of Windows 11.
Pick a starting point by symptom
You don’t have to start at step one every time. Find the row closest to what you’re seeing, start there, and move down the ladder only if the problem stays.
| What’s happening | Try first | If that fails |
|---|---|---|
| One app, the taskbar or Wi-Fi misbehaves | Restart, then the matching troubleshooter | System file repair (DISM and SFC) |
| Problems began right after an update or driver install | Uninstall that update or roll back the change | System Restore or point-in-time restore |
| Random crashes, error messages, settings that won’t open | DISM then SFC | Reinstall now (Fix problems using Windows Update) |
| Windows Update keeps failing | Windows Update troubleshooter | Reinstall now, then Reset this PC |
| Pop-ups, a slow PC and unknown programs | A malware scan | Reset this PC |
| Windows won’t start or loops on boot | Windows Recovery Environment (Startup Repair) | System Restore, uninstall updates, Reset this PC from recovery |
Before you start: protect your files
Most of the early steps change nothing you’d miss. The later ones (System Restore, Reset this PC, a clean install) can remove apps or files, so a few minutes of prep is worth it.
- Back up anything important. Copy documents and photos to an external drive or make sure OneDrive has finished syncing.
- Find your BitLocker recovery key. If your drive is encrypted, recovery tools and resets can ask for it. It’s usually saved to the Microsoft account you used to set up the PC. Write it down before you need it.
- Plug in a laptop. Repairs and resets can take a while, and a dead battery partway through causes new problems.
- Note what changed. If the trouble started after a new app, driver or update, that tells you which step to try first.
Step 1: Restart and install updates
A full restart clears stuck processes and finishes updates that were waiting. It fixes more than people expect, so do it first even if it feels too simple.
- Save your work, then open Start, select the power button and choose Restart (not Shut down).
- Unplug external devices you don’t need, such as USB drives, docks and printers, in case one is causing the problem.
- Open Settings > Windows Update and select Check for updates.
- Install what’s offered, including optional driver updates if your problem involves a device, and restart again if asked.
If only the taskbar or Start menu froze, you can often skip the full restart and restart the taskbar in Windows 11 instead.
Step 2: Run a troubleshooter
Troubleshooters check common causes for one area, such as audio, network, printing or Windows Update, and fix what they can. In current versions of Windows 11 they open in the Get Help app, because Microsoft is retiring the older built-in troubleshooters and redirecting many of them to Get Help.
- Open Settings > System > Troubleshoot.
- Select Other troubleshooters.
- Find the area that matches your problem (for example Windows Update under Most frequent) and select Run.
- Follow the prompts in Get Help. When it finishes, restart and test.
You can also open Get Help directly: open Start, type get help and select the app, then describe the problem. For update failures specifically, see running the Windows Update troubleshooter.
Rule out malware
Many “Windows is broken” symptoms come from unwanted software. Run a full scan before deeper repairs, since repairing system files won’t remove an infection. See how to check for malware and viruses in Windows 11, and if something turns up, how to remove a trojan virus from Windows 11.
Step 3: Repair system files with DISM and SFC
When Windows files are damaged, you see crashes, errors and features that stop working. Two built-in tools fix this without touching your personal files. DISM repairs the Windows image that SFC uses as its reference, so Microsoft has you run DISM first.
- Open Start, type cmd, right-click Command Prompt and select Run as administrator. Select Yes if asked.
- Type
DISM.exe /Online /Cleanup-image /Restorehealthand press Enter. This can take several minutes and may seem to pause. Let it finish. - Type
sfc /scannowand press Enter. Leave the window open until verification reaches 100%. - Read the result and restart the PC.
SFC ends with one of four kinds of message:
- Did not find any integrity violations: system files are fine. Move to Step 4.
- Could not perform the requested operation: run the scan again from Safe Mode.
- Found corrupt files and successfully repaired them: restart and test.
- Found corrupt files but was unable to fix some of them: you can save the details with
findstr /c:"[SR]" %windir%\Logs\CBS\CBS.log >"%userprofile%\Desktop\sfcdetails.txt", or simply move on to Reinstall now in Step 5, which replaces system files for you.
If DISM can’t reach Windows Update, Microsoft also documents a version of the command that points to a repair source (such as mounted installation media) with /Source and /LimitAccess. For reading the SFC log and more detail, see how to run an SFC scan, and Microsoft’s System File Checker page.
Check the drive with CHKDSK
Disk errors can look like file corruption. In the same administrator Command Prompt:
- Type
chkdsk C: /scanand press Enter. This scans the drive online while Windows keeps running. - If it reports errors, run
chkdsk C: /f. Because the system drive is in use, CHKDSK offers to run at the next restart. Type Y and restart. - Add
/rinstead of/fif you suspect bad sectors. It takes much longer.
Microsoft’s chkdsk reference lists every switch.
Step 4: Undo a recent change
If the trouble started on a specific day, undoing whatever changed that day is often the quickest real fix.
Uninstall a recent update
- Open Settings > Windows Update, and under More options select Update history.
- Under Related settings, select Uninstall updates.
- Find the update installed just before the problem began and select Uninstall.
- Restart when asked.
Some updates can’t be uninstalled. Windows may also reinstall the update later, so check whether a newer fix is available before blocking it.
Roll back a driver
If a device stopped working after a driver update, open Device Manager (right-click Start and select Device Manager), right-click the device, select Properties, and look on the Driver tab for Roll Back Driver. The button is unavailable when there’s no earlier driver to go back to.
Restore to an earlier point
Windows offers two ways to rewind system settings, apps and drivers without touching your documents.
- System Restore uses restore points that Windows creates before big changes (or that you create yourself). Open it with Windows + R, type
rstrui.exeand press Enter, or go to Control Panel > Recovery > Open System Restore. Select Next, pick a restore point dated before the problem (check Show more restore points for older ones), use Scan for affected programs to see which apps will be removed, then select Next and Finish. Apps installed after that point will need reinstalling. - Point-in-time restore is a newer option. You check its schedule at Settings > System > Recovery and run the restore from the Windows Recovery Environment (Troubleshoot > Point-in-time restore, see below). Microsoft says it is on by default for devices not managed by an organization that have a system drive of 200 GB or larger, creates restore points about every 24 hours and keeps them for up to 72 hours. It restores the whole system drive to that moment, so anything saved locally after that time is lost, though OneDrive files aren’t affected. Use it only for very recent problems.
If System Restore shows no restore points, protection was off. Turn it on for the future: search Start for Create a restore point, select your system drive on the System Protection tab, select Configure and turn on system protection. You can make a manual restore point any time with Create. Microsoft’s System Restore page covers both.
Step 5: Reinstall Windows with Windows Update
This is the biggest repair that still keeps your apps, files and settings. Windows downloads a repair version of the last successful update and reinstalls it over the current system, replacing damaged system files.
- Plug in the PC and make sure it’s online.
- Open Settings > System > Recovery.
- Under Fix problems using Windows Update, select Reinstall now.
- Choose whether the PC should restart automatically 15 minutes after the install finishes, then select OK.
- Keep working or leave it alone while it downloads and installs, then let it restart.
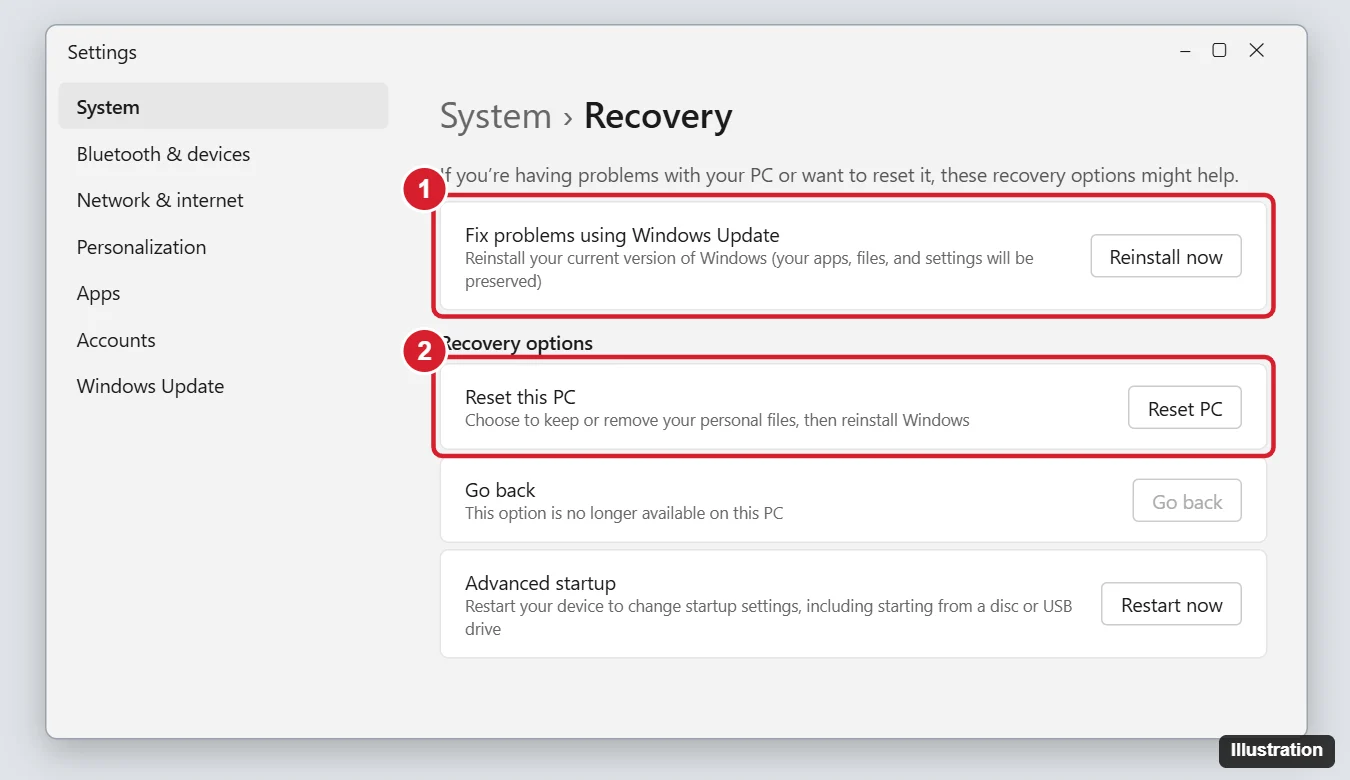
Don’t see Reinstall now? Microsoft lists three requirements: Windows 11 version 22H2 (build 22621) or later with the February 2024 optional update or a newer one installed, a PC that isn’t managed by a work or school organization, and an internet connection. Windows Update can also offer Reinstall now on its own after an update fails. Microsoft’s reinstall the current version of Windows page has the full details.
An older route that does a similar job is an in-place upgrade: you run setup from Windows 11 installation media while signed in and choose to keep personal files and apps. Reinstall now is simpler if your PC offers it.
Step 6: Reset this PC
A reset reinstalls Windows from scratch. It’s the right move when repairs haven’t worked, or the PC is full of problems you can’t trace. You choose what to keep.
- Back up first, even if you’ll choose to keep files.
- Open Settings > System > Recovery and, next to Reset this PC, select Reset PC.
- Choose Keep my files (removes apps and settings, keeps personal files) or Remove everything (removes files, apps and settings).
- Choose Cloud download (downloads fresh Windows files, useful when local files are damaged) or Local reinstall (uses files already on the PC).
- Review the settings. With Keep my files you can turn Restore preinstalled apps on or off. With Remove everything, Clean data wipes the drive more thoroughly, which matters if you’re giving the PC away.
- Select Reset and wait. Microsoft notes the screen can stay black for 15 minutes or more. Don’t restart the PC during this time.
After the reset, reinstall your apps and run Windows Update. For a walkthrough with screenshots of each choice, see how to factory reset Windows 11 or 10.
Cloud rebuild, if your PC offers it
Microsoft has added a cloud rebuild option to Windows 11 for PCs with the October 2026 non-security update or later. If you see Rebuild this PC in Settings > System > Recovery, selecting Rebuild PC reinstalls Windows from the cloud and deletes everything on the device, including accounts and apps. Files stored in OneDrive or other cloud storage stay in the cloud. Think of it as a stronger version of Remove everything, not a gentler repair.
If Windows won’t start
When the PC can’t reach the desktop, the repairs move to the Windows Recovery Environment (WinRE), a separate mini system built into Windows 11.
Get into WinRE
- From a working desktop: open Settings > System > Recovery and select Restart now next to Advanced startup. Or hold Shift while you select Restart.
- From the sign-in screen: hold Shift, select the power icon and choose Restart.
- When Windows won’t load: Microsoft says to interrupt startup twice in a row by holding the power button as Windows starts. On the third start, Windows opens Automatic Repair. Select Advanced options to reach WinRE.
For other ways in, see how to enter recovery mode in Windows 11.
Repair tools in WinRE
Select Troubleshoot > Advanced options. Work through these roughly in this order:
- Startup Repair scans for problems that stop Windows from loading and fixes them. Steps are in running Startup Repair in Windows 11. If it reports that it couldn’t repair the PC, what to do when Startup Repair can’t repair your PC covers next moves.
- Uninstall Updates removes the latest quality or feature update, which is the fix when a startup failure followed an update.
- System Restore, as described in Step 4. (Point-in-time restore is not on this list: it sits one level up, at Troubleshoot > Point-in-time restore.)
- Startup Settings lets you start in Safe Mode, where you can run DISM and SFC or remove a bad driver. See how to boot into Safe Mode in Windows 11.
- Command Prompt for running CHKDSK or other commands without starting Windows.
Reset this PC is also in WinRE under Troubleshoot > Reset this PC, with the same Keep my files and Remove everything choices.
Windows 11 also includes Quick machine recovery, which Microsoft describes as a cloud-based fix that builds on Startup Repair and can run automatically after repeated boot failures. You can check its switch at Settings > System > Recovery, and run it manually from WinRE under Troubleshoot > Advanced options. More is in how to use quick machine recovery in Windows 11.
If WinRE itself won’t load, you can start the PC from a Windows 11 USB installation drive and select Repair my PC on the setup screen. See repairing Windows 11 from a USB drive.
What each fix keeps and removes
| Fix | Personal files | Installed apps | Settings |
|---|---|---|---|
| Restart, updates, troubleshooters | Kept | Kept | Kept (the troubleshooter may change the one it fixes) |
| DISM, SFC, CHKDSK | Kept | Kept | Kept |
| Uninstall update or roll back driver | Kept | Kept | Kept |
| System Restore | Kept | Apps installed after the restore point removed | Rolled back |
| Point-in-time restore | Local changes after that point lost (OneDrive unaffected) | Rolled back | Rolled back |
| Reinstall now | Kept | Kept | Kept |
| Reset this PC, Keep my files | Kept | Removed | Reset |
| Reset this PC, Remove everything | Removed | Removed | Reset |
| Cloud rebuild or clean install | Removed from the PC | Removed | Reset |
The last resort: a clean install
A clean install erases the drive and installs Windows 11 from installation media. It rarely fixes anything that Reset this PC with Remove everything can’t, but it’s the answer when the recovery partition itself is damaged or you want a fully fresh start. Back up everything, gather your app installers and licenses, then follow how to reinstall Windows 11. Microsoft’s reset your PC page explains how a reset compares.
Windows 10 differences
Windows 10 reached end of support on October 14, 2025, and consumer Extended Security Updates run through October 12, 2027. The same tools exist, but they live in different places: updates and recovery are under Settings > Update & Security, and the Fix problems using Windows Update option described in Step 5 is a Windows 11 feature. DISM, SFC, CHKDSK, System Restore and WinRE work the same way.
Windows 11 repair questions
Will these repairs delete my files?
Steps 1 through 5 keep your personal files. Point-in-time restore can lose local changes made after the restore point. Reset this PC keeps files only if you pick Keep my files, and Cloud rebuild or a clean install removes them from the PC. Back up before Step 4 either way.
Should I run SFC or DISM first?
Microsoft’s instructions run DISM first, then SFC. DISM fixes the source copy that SFC repairs from, so the order makes SFC more likely to succeed.
Why is Reinstall now missing from my Recovery page?
The PC is probably missing the required update, is managed by a work or school organization, or is offline. Install all updates, including optional ones, and check again.
Do I need a USB drive to repair Windows 11?
Usually not. Everything up to Reset this PC runs from Windows or WinRE. A USB drive is only needed when WinRE won’t load or for a clean install.
Will Windows need to be activated again after a reset?
Windows on a PC that was already activated usually activates again on its own once it’s online. If it doesn’t, check Settings > System > Activation.
Start at the rung that matches your symptom, test after each fix, and stop as soon as the problem is gone. The fewer changes you make, the easier it is to tell what actually solved it.

Kermit Matthews runs Live2Tech from just outside Philadelphia. He is an IT specialist with over 20 years of experience, from a university help desk to small-business IT, IT management and his own consulting practice, and has written tech guides full time since 2020. Steps are checked against the current software on a real device or the maker’s official documentation. More about Kermit.