While it’s pretty reasonable to input your passcode wrong once or twice, it’s pretty unlikely that it would happen 10 times. This is why you can enable an iPhone setting that will erase the device when the passcode it entered wrong 10 times.
You can turn off the failed passcode data protection feature by going to Settings > Face ID/Touch ID & Passcode > then changing the Erase Data setting.
The best reason to use a passcode on your iPhone is to prevent thieves or unwanted individuals with access to your phone from obtaining any of the sensitive material that might be accessible through the device.
You can even enable a setting on your iPhone that will cause all of the data on the device to erase if the passcode is incorrectly entered ten times in a row.
But if you have a child that likes to play with your phone, then it’s possible that you are concerned that the child could inadvertently erase all of the data on your phone.
Therefore, disabling this feature is a good way to prevent the inevitable headache that can come from needing to restore your entire device because your child was having fun pressing buttons. Our guide below will show you how to find and turn off this setting.
How to Turn Off the “Failed Passcode” Data Protection iPhone Setting
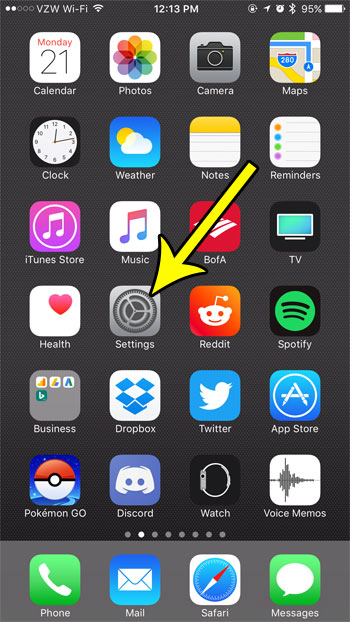
- Open Settings.
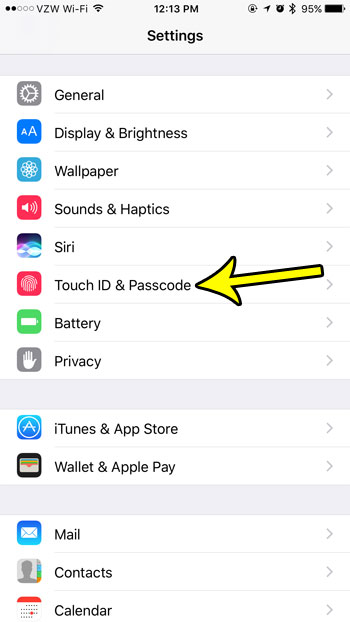
- Choose Face ID & Passcode.
- Enter the current passcode.
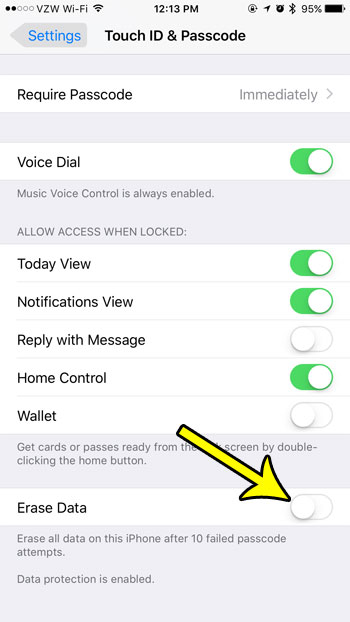
- Turn off the Erase Data option.
Our guide continues below with additional information on how to stop your iPhone from erasing after ten failed passcode attempts, including pictures of these steps.
How to Stop Your iPhone from Erasing Data If the Passcode is Entered Incorrectly 10 Times (Guide with Pictures)
The steps in this article were performed on an iPhone 7 Plus in iOS 10.3.3. These steps are meant to be preventive. This will not help you if this setting is enabled, and the passcode has already been entered incorrectly 10 times.
Step 1: Open the Settings menu.

Step 2: Select the Touch ID & Passcode menu.
On iPhone models that utilize Face ID technology this menu will say “Face ID & Passcode” instead.

Step 3: Enter the current device passcode.

Step 4: Scroll to the bottom of the screen and turn off the Erase Data option.
Your iPhone will not erase all of its data after 10 failed passcode attempts when there is no green shading around the button. I have turned off the Erase data option in the picture below.

Our tutorial continues below with additional discussion on the iPhone data erasing feature.
More Information on How to See If Data Protection is Enabled on the iPhone
Regardless of if you have the “Erase Data” setting turned on or off on your iPhone, you may see the “Data protection is enabled” line of text at the bottom of the screen and be wondering what that means.
Your iPhone displays that information when there is a passcode enabled on the iPhone. If you elect to turn off the passcode, then that line is removed. While you may be considering turning off your passcode if you find it to be inconvenient, it can be a bad idea from a data security standpoint, as anyone with physical access to your device would be able to view emails and see other information that you save on your iPhone in an unencrypted way.
Some other data protections settings that you may want to check include your backup settings and your Find My iPhone settings. You can check to see if you have backups enabled by going to Settings > tapping your Apple ID > iCloud > iCloud Backup.
You can check for the Find My iPhone settings by going to Settings > selecting your Apple ID > Find My > then adjusting the settings there.
Using the backup feature not only allows you to preserve your data if the device is lost or stolen, it also makes it much easier to set up a new iPhone in the future. The Find My iPhone feature is a great way to locate a lost iPhone (or another Apple device like an iPad, Airpods, or Macbook) as it can show you the last location where it was online.
Would you like to have an iPhone passcode that uses letters instead of numbers? Learn how to change the iPhone passcode type and give yourself a lot more potential options for device passcodes. It’s a little more inconvenient to enter a passcode this way, but it gives potential thieves a much harder time.

Kermit Matthews is a freelance writer based in Philadelphia, Pennsylvania with more than a decade of experience writing technology guides. He has a Bachelor’s and Master’s degree in Computer Science and has spent much of his professional career in IT management.
He specializes in writing content about iPhones, Android devices, Microsoft Office, and many other popular applications and devices.