Open Device Manager, expand Sound, video and game controllers, right-click your audio device and select Uninstall device, then restart: Windows reinstalls the audio driver when it starts. Tick Attempt to remove the driver for this device only when the driver itself is the suspect, for example when sound broke right after a driver update; otherwise leave it clear.
The steps follow Microsoft’s current audio help for Windows 11.
Write down two details first
A reinstall usually goes smoothly, but if Windows can’t find a suitable driver afterward, you’ll want these to hand:
- The audio device’s name. Open Device Manager (steps below), expand Sound, video and game controllers and note the exact name of the sound device. A name containing a chip maker’s brand is common.
- Your PC or motherboard model. It’s on the label underneath a laptop, on the box, or in your purchase records. You’ll need it if you have to fetch the driver from the maker’s support site.
This cycle is for the sound device only. If Wi-Fi is the device acting up, the same idea is covered in reinstalling the Wi-Fi driver in Windows 11.
Signs the driver is worth reinstalling
An uninstall is a bigger step than it looks, so check that it fits the symptom first.
- Good reasons: the audio device shows a warning icon in Device Manager, sound vanished right after a driver or Windows update, or no output device is offered at all even though the speakers are connected.
- Probably not the driver: one app is silent while others play, the wrong speakers or headset is selected, or the volume is muted. Fix those in the taskbar sound controls before touching drivers.
Uninstall the audio device in Device Manager
These steps match Microsoft’s fix sound or audio problems page. You need to be signed in as an administrator.
- In the search box on the taskbar, type device manager and select it from the results. Right-clicking Start and choosing Device Manager opens the same window.
- Select the arrow next to Sound, video and game controllers to expand it.
- Right-click (or press and hold) your sound card or audio device and select Uninstall device.
- Decide on the Attempt to remove the driver for this device check box (the next section helps), then select Uninstall.
- Restart your PC.
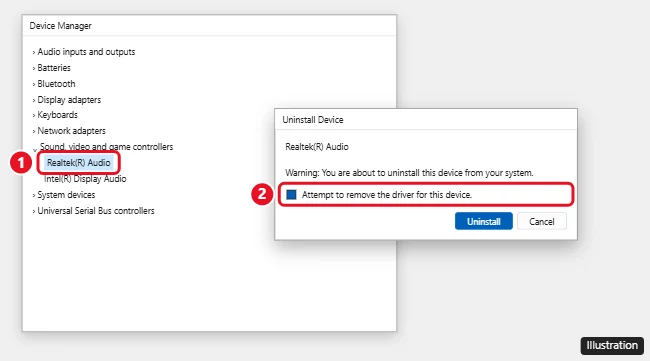
Microsoft’s page says the restart “will automatically prompt your PC to reinstall your audio driver.” Expect no sound between the uninstall and the restart; that’s normal.
Tick the driver box or leave it clear?
Microsoft’s troubleshooting steps tick Attempt to remove the driver for this device, while its update audio drivers page only says to select Uninstall device and confirm. Microsoft doesn’t explain the difference in detail, so treat the table as a practical guide rather than an official rule.
| Choice | What it aims to do | Use it when |
|---|---|---|
| Box clear | Removes the device; Windows sets it up again at restart | Sound stopped for no clear reason, or the device shows a warning and you want a quick refresh |
| Box ticked | Also attempts to remove the driver (Microsoft’s label) | Sound broke right after a driver update, or a refresh brought the same fault back |
If the same fault returns after the restart, use the roll back and maker routes below.
On some PCs the maker’s audio driver is also listed as an installed program. For example, Dell has an article for some of its PCs that lost sound after a particular audio driver update; it has you open Control Panel > Uninstall a program, uninstall the Cirrus High Definition Audio Driver or Realtek Audio Driver, restart, and install the driver Dell lists for your model.
Bring the driver back after the restart
In most cases there’s nothing to do: Windows detects the sound hardware during startup and installs a driver. If the device is still missing or still shows a warning:
- Open Device Manager again. Its Action menu has Scan for hardware changes, which looks for the device again.
- If the device appears but sound still fails, right-click it and select Update driver > Search automatically for drivers.
- Still stuck? Microsoft suggests the driver that comes with Windows: select Update driver > Browse my computer for drivers > Let me pick from a list of available drivers on my computer, choose the listed audio driver, and follow the prompts.
A first-time install on a new or freshly reset PC has more options, from Windows Update to the maker’s installer; they’re laid out in installing audio drivers on Windows 11.
Check that sound works again
- Play something. Choose the speaker icon on the taskbar and confirm the right output device is selected and not muted.
- Look at the device. In Device Manager, the audio device should show no warning icon. Right-click it, choose Properties and open the Driver tab to see which driver and version loaded.
- Run the troubleshooter. On Windows 11, Microsoft points to the automated audio troubleshooter in the Get Help app.
- Restart the audio services. Microsoft’s audio page lists Windows Audio, Windows Audio Endpoint Builder and Remote Procedure Call (RPC): right-click each in Services, select Restart, then Yes. That’s the lighter “reset” route, explained in resetting audio drivers in Windows 11.
If sound is back but the left and right channels seem swapped on headphones, that’s a settings question rather than a driver one; see switching left and right headphone audio on Windows 11.
When the same broken driver returns
If the fault started with a driver update, a fresh copy of that same driver won’t help. Work through these in order.
- Roll back. In Device Manager, right-click the audio device, select Properties, open the Driver tab and select Roll Back Driver. Follow the instructions and select Yes. If the button is unavailable, there’s usually no earlier driver to go back to. If rolling back didn’t work or wasn’t an option, Microsoft suggests restoring the PC from a system restore point; the maker’s driver below is the other route.
- Check optional driver updates. Microsoft’s Windows Update page describes opening Windows Update > Advanced options, then under Additional options selecting Optional updates. If driver updates are listed, select the audio driver and choose Download and install.
- Use the maker’s driver. Microsoft’s audio page advises visiting your device manufacturer’s website for the most recent sound driver. Search the maker’s support site with your model, download the audio driver listed for Windows 11, run it and restart.
The same uninstall, restart and roll back pattern works for other hardware; see reinstalling the Bluetooth driver on Windows 10 or the wider driver update routes in Windows 11.
Audio driver reinstall answers
The audio device disappeared after I uninstalled it. What now?
That’s expected until the restart. If it’s still missing afterward, use Action > Scan for hardware changes in Device Manager, then the maker’s driver for your model.
Do I need the maker’s driver before I uninstall?
Not for a normal reinstall, since Microsoft says Windows reinstalls the audio driver on restart. Downloading it first is a sensible backup if the box is ticked or the PC has had driver trouble before.
Which category holds my audio driver?
Microsoft’s steps use Sound, video and game controllers. Uninstall the sound card or audio device there, not a monitor or graphics entry.
Is reinstalling the same as resetting?
They overlap. A reset usually starts with lighter steps such as restarting the audio services, while a reinstall removes the device and lets Windows set it up again. Try the reset first if sound only cuts out now and then.

Kermit Matthews runs Live2Tech from just outside Philadelphia. He is an IT specialist with over 20 years of experience, from a university help desk to small-business IT, IT management and his own consulting practice, and has written tech guides full time since 2020. Steps are checked against the current software on a real device or the maker’s official documentation. More about Kermit.