The printout you’re after is called Notes Pages: each sheet of paper shows one slide on the top half and that slide’s speaker notes underneath. In PowerPoint for Microsoft 365 on Windows, go to File > Print, select the arrow next to Full Page Slides, choose Notes Pages under Print Layout, then select Print. If you’d rather have several smaller slides with notes beside them on each page, send the deck to Word instead, as shown further down.
Printing a trimmed version for a meeting? It may be simpler to save a copy and delete the slides you don’t need first.
Print slides with notes on Windows
Before you start, make sure the notes are really notes. Text typed into a text box on the slide prints as part of the slide; speaker notes are what you type in the Notes pane under the slide in Normal view. If you can’t see that pane, click Notes on the bar across the bottom of the PowerPoint window, or see where the speaker notes are in PowerPoint.
The pictures below come from PowerPoint 2013. The Print screen has gained a few options since, but the path and the Notes Pages choice are the same.
- Open the presentation and click the File tab.

Older PowerPoint version shown; current screens look different. - Select Print.
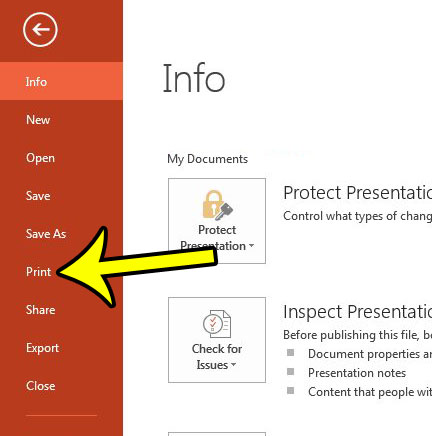
The Print option in an older version of PowerPoint. - Under Printer, choose the printer you want.
- Under Settings, select the down arrow next to Full Page Slides. Under Print Layout, select Notes Pages. Go by the name rather than the position; the order of the boxes can differ between versions.

Notes Pages under Print Layout, shown in PowerPoint 2013. - Scroll through the preview on the right. Each page should show one slide with its notes below.
- Set the number of copies and select Print.
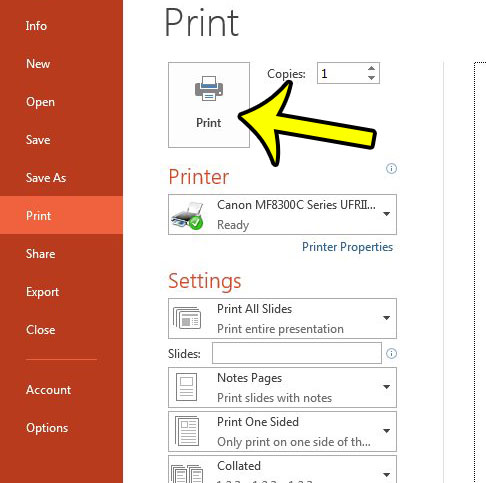
The Print button at the top of the older Print screen.
Expect one sheet per slide: a 24-slide deck prints 24 pages. Microsoft’s print speaker notes page says plainly that Notes Pages gives you only one slide and its notes per printed page.
Other settings on the same screen
- Color: choose Color, Grayscale or Pure Black and White. Grayscale keeps charts and tables crisp on a black-and-white printer. Pure Black and White drops shading and prints gray text as black, which saves toner on notes you’ll scribble on.
- Orientation: notes pages print in portrait by default. Select the arrow next to Portrait Orientation to switch.
- Collated: leave this on when you print several copies, so each set comes out in slide order.
- Sides: print on both sides if your printer supports it; a two-sided set halves the stack you carry to the lectern.
Print notes for only some slides
A presenter sharing a deck with a colleague often needs only their own section. The first box under Settings controls which slides print.
- In File > Print, open the first box under Settings (it says Print All Slides by default).
- Choose selected slides or the current slide, or type slide numbers in the Slides box, separated by commas. A range works too, for example 1,3,5-12. If you choose Custom Range from the list, enter the slides in the same box.
- Keep Notes Pages as the layout and print.
To print just selected slides, pick them first in the thumbnail pane on the left (hold Ctrl and click each one), then open Print. If the deck has hidden slides, a Print Hidden Slides option becomes available in the same list; clear it if you don’t want their notes on paper. Microsoft walks through these choices on its print handouts, notes or slides page.
Print the notes without the slide pictures
There’s no separate “notes only” layout on Windows, but you can remove the slide picture from each notes page and then print Notes Pages. This doesn’t delete the slide itself, only its picture on the notes page. Still, work on a copy of the file (File > Save As with a new name), because you have to repeat it on every page and putting the pictures back is tedious.
- On the View tab, in the Presentation Views group, select Notes Page.
- Click the slide picture at the top of the page so it’s selected, and press Delete. Be careful to select the picture, not the notes box below it.
- Move to the next page and repeat for each slide.
- Print with Notes Pages as above.
With the picture gone, the notes box can be stretched upward to fill the page, which helps when the notes are long. If the goal is fewer sheets of paper rather than bigger text, the Word route in the next section is usually quicker.
Fit several slides and their notes on one page
Handout layouts (several slides per page) are great for an audience, but they never include your speaker notes. The three-slide handout adds blank lines for writing, not your notes. To get small slides with notes beside or under them, export to Word:
- Select File > Export.
- On the Export panel, select Create Handouts, then select the Create Handouts button on the Create handouts in Word panel.
- In the Send to Microsoft Word dialog box, choose Notes next to slides or Notes below slides.
- Choose Paste to keep the Word copy unchanged if you edit the slides later, or Paste link to have changes in PowerPoint carry over. Select OK.
- Word opens with a table of slides and notes. Edit, resize or delete rows there, then print from Word.
Because several slides share a page, this makes a compact speaker crib sheet for a long talk. Microsoft notes the export uses a lot of memory, so a very large deck may be slow or fail with a message that PowerPoint couldn’t write to Microsoft Word; closing other programs or exporting a shorter copy can help. Details are on Microsoft’s edit or print handouts in Word page. For audience handouts without notes, see printing multiple slides on one page.
Make the notes page easier to read
The default notes page uses fairly small text. You can change the design for every page at once, or adjust a single page.
Change every notes page with the Notes Master
- On the View tab, select Notes Master.
- Click the border of the notes (body) box and set a bigger font size on the Home tab. Resize the slide picture or the notes box if you want more room for text.
- Add a logo or other item if you like; it appears on every printed notes page.
- Select Close Master View.
If one slide’s notes still look small after this, the text may have been formatted by hand in the Notes pane; select it there and change the size directly.
Add page numbers, a date or a footer
- On the Insert tab, in the Text section, select Header & Footer.
- Select the Notes and Handouts tab.
- Tick the items you want (date, header, page number, footer) and type any text.
- Select Apply to All, then check the result in View > Notes Page.
Page number is on by default. Microsoft’s notes header and footer page says these changes affect only printed notes pages, not the slides your audience sees. One small change in Notes Page view, such as moving the picture, applies to that page only, which is handy for a slide with unusually long notes.
Save the notes as a PDF
A PDF is the easiest way to send your notes to someone else or to a print shop.
- Windows: in File > Print, choose Notes Pages as the layout and pick a PDF printer instead of a paper printer. Windows includes one; see printing to PDF on Windows. The File > Export > Create PDF/XPS Document route also has an Options button with a Publish what list, but Microsoft’s page names handouts, comments and Outline view there, so check the list in your version before relying on it for notes.
- Mac: Microsoft’s save as PDF page says saving notes isn’t available when you save or export a PDF from PowerPoint for Mac. Microsoft doesn’t document another way to get notes into a PDF on a Mac, so print on paper from the Mac or create the PDF on a Windows PC.
- Web: File > Export > Download as PDF converts the presentation, but use the print route below if you need the notes on the page.
PowerPoint for Mac and PowerPoint for the web
Mac: on the File menu, select Print. Under PowerPoint, select Notes from the Layout drop-down, set the other options and select Print. The same drop-down holds Slides, Outline and Handouts.
Web: select File > Print, then choose the kind of pages you want; a notes page prints the slide on the upper half and its notes on the lower half. According to Microsoft’s print training page, notes printing applies to files stored on OneDrive or SharePoint. In Chrome or Edge you print straight from the print dialog; in Firefox or Safari you select Open PDF and print the PDF. For a custom notes layout or the Word export, use the desktop app. More on web printing is in printing handouts in PowerPoint for the web.
If the notes are missing or look wrong
- Pages print without notes: check the layout. Any handout layout or Full Page Slides leaves notes out. Pick Notes Pages.
- Some pages have notes, others are blank: those slides probably have no speaker notes, or the text is on the slide instead. Check the Notes pane for each one.
- A notes page is missing its notes box or picture: the layout of that page is broken. Go to View > Notes Page, right-click an empty spot on the page, select Notes Layout, leave Slide image and Body checked, and select Reapply master. Don’t uncheck Body: Microsoft’s fix broken notes pages article warns that doing so loses the notes on that slide.
- Notes are cut off at the bottom: check the preview. Enlarge the notes box or shrink the picture in Notes Page view, lower the font in the Notes Master, or use the Word export, where the table cell grows with the text.
Printing notes: what else to know
Why did my notes vanish when I picked a handout layout?
Handouts are built for the audience and never include speaker notes. Use Notes Pages, or the Word export for several slides per page.
Can I print two slides with notes on one sheet?
Not from the Print screen, where Notes Pages is fixed at one per page. The Word export with Notes below slides gets you more per sheet. Some printer drivers also offer a pages-per-sheet option, covered in the multiple-slides guide linked above, though the text gets smaller.
Do I need the notes on paper if I use Presenter View?
Not always. In Presenter View your notes show on your screen while the audience sees only the slides. Paper is still useful as a backup or when you present from someone else’s computer.
Does deleting the picture on a notes page delete the slide?
No. It removes the picture from that notes page only; the slide stays in the presentation.
What about Google Slides?
Google Slides handles this differently; see printing speaker notes in Google Slides.
Print one test page before the full run, especially after changing the Notes Master, so you catch a tiny font or a cut-off note before you’ve used a stack of paper.

Kermit Matthews runs Live2Tech from just outside Philadelphia. He is an IT specialist with over 20 years of experience, from a university help desk to small-business IT, IT management and his own consulting practice, and has written tech guides full time since 2020. Steps are checked against the current software on a real device or the maker’s official documentation. More about Kermit.