Some Outlook readers will send read receipts along with messages that they send out. These are typically attached to important messages that they want to confirm you have received. But you may not wish for people to know that you have read a message, so you can decline to send the requested read receipt.
If you frequently communicate with individuals that send read receipts with some frequency, then you might prefer to never send them whenever they are requested. Outlook 2013 has an option that allows you to choose how read receipts are handled, and you can elect to never send read receipts when they are requested. When this setting is selected you will no longer receive notification that the receipt has been requested, and it will not be sent.
How to Disable Read Receipts in Outlook 2013
- Open Outlook.
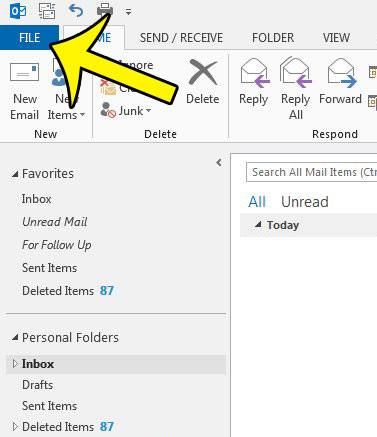
- Click File.
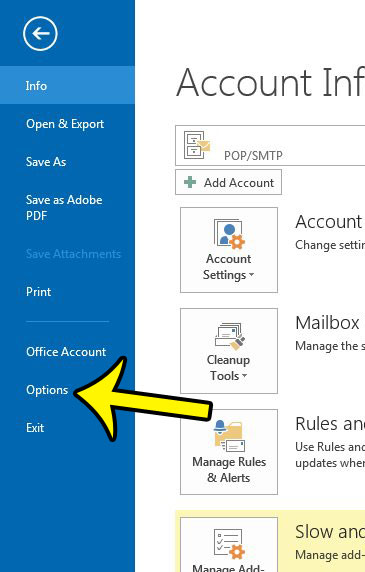
- Choose Options.
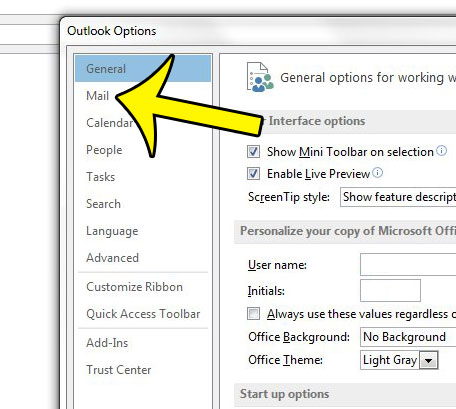
- Select the Mail tab.
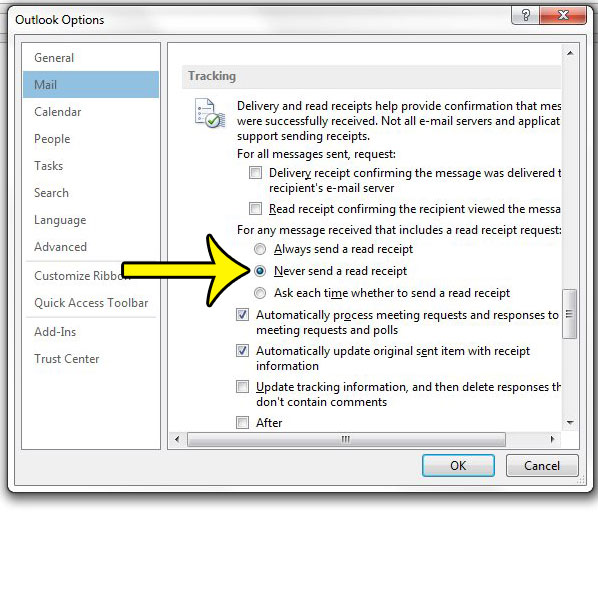
- Click the Never send a read receipt option.
- Click the OK button.
Our article continues below with additional information on turning off read receipts in Outlook 2013.
If you want to draw a line through some of your text, then this article about enabling strikethrough in Outlook can help.
How to Disable the Option to Send Read Receipts in Outlook 2013 (Guide with Pictures)
Enabling the option in the steps below will change your settings in Outlook 2013 so that you are never prompted to send a read receipt. By default, you will simply not send any read receipts when one is requested by a sender. if you need to change this setting at some point in the future, then you will need to follow these same steps and switch this setting back.
Step 1: Open Outlook 2013.
Step 2: Click the File tab at the top-left corner of the window.

Step 3: Click the Options tab in the column at the left side of the window.

Step 4: Click Mail in the left column of the Outlook Options window.

Step 5: Scroll to the Tracking section, then check the box to the left of Never send a read receipt.
This tracking group includes several options that you may want to configure concerning an email message that you receive, as well as some things that can occur when a message reaches a recipient’s mailbox.

Step 6: Click the OK button at the bottom of the window to save your changes.
Our guide continues below with additional information on working with Outlook delivery and read receipts.
How Do I Stop Requesting a Delivery Receipt in Outlook 2013?
If you have been receiving emails indicating that emails were delivered and you want it to stop, then you will need to adjust the setting that is requesting that. You can do this at:
File > Options > Mail > and turn off the Delivery receipt confirming the message was delivered to the recipient’s email server
In the picture in step 5 above you can see that the delivery receipt check box is unchecked, indicating that I won’t be requesting confirmation that my emails were delivered.
There is also an option under that one where you can configure whether you are sending read receipt requests. It is the option that says Read receipt confirming the recipient viewed the message.
In step 5 above the read receipt check box is not checked, as I do not want to request a read receipt from my message recipient.
More Information on How to Turn Off Read Receipts – Outlook 2013
The steps above were performed in Microsoft Outlook 2013, but will also work in most newer versions of Microsoft Office as well. If you discover that you don’t like the way your tracking options are currently configured, then opening the File menu and selecting Outlook Options is a great way to resolve that concern.
Electing to turn off read receipts is a pretty common practice. In fact, most people that use email aren’t going to respond to read receipt requests, and most email providers ignore them completely. If there is someone you know that requests read receipts then they aren’t going to know that you don’t have read receipts enabled, and they won’t be able to tell that you have opened their email.
One common practice for individuals and companies that send emails is to include a tracking pixel as a means to know that the email has been read or viewed. You can stop this by electing not to download pictures automatically with these steps.
- Click the File tab.
- Click Options at the bottom-left.
- Select the Trust Center tab.
- Click Trust Center Settings under Microsoft Outlook Trust Center.
- Click the box next to Don’t download pictures automatically in e-mail messages or RSS items to remove the check mark.
This is going to prevent tracking pixels that are included in images, but it is also going to prevent the download of other pictures as well. You will need to choose to download images when opening messages if you want to see them.
If you encounter a situation where you discover that you actually need to be able to send read receipts, then you will need to return to this menu and turn on read receipts in Outlook 2013 instead. You can do this by going to:
File > Options > Mail > and choose either the Always send a read receipt or Ask each time whether to send a read receipt option
Choosing the option to ask is likely preferable unless you have a lot of people sending read receipt requests and simply want to avoid needing to choose whether to send them each time.
Does it seem like Outlook is not checking your mail server for new messages often enough? You can adjust the send and receive frequency in Outlook 2013 so that the program either checks more or less frequently, based on your own preferences. You can adjust the frequency to the point where Outlook will be checking your mail server every minute.
Additional Reading

Kermit Matthews is a freelance writer based in Philadelphia, Pennsylvania with more than a decade of experience writing technology guides. He has a Bachelor’s and Master’s degree in Computer Science and has spent much of his professional career in IT management.
He specializes in writing content about iPhones, Android devices, Microsoft Office, and many other popular applications and devices.