Rotating a picture in Google Slides lets you straighten a crooked photo, turn a sideways image upright, or tilt an image for a more dynamic layout. You can rotate freely with the mouse, turn images in exact 90-degree steps, flip them, or type a precise angle. This guide covers every method on a computer and in the mobile app.
Quick Answer
Click the picture, then drag the small round handle above it to rotate. Hold Shift while dragging to snap in 15-degree steps. For exact turns, go to Arrange > Rotate and choose Rotate clockwise 90°, Rotate counter-clockwise 90°, or a flip option.
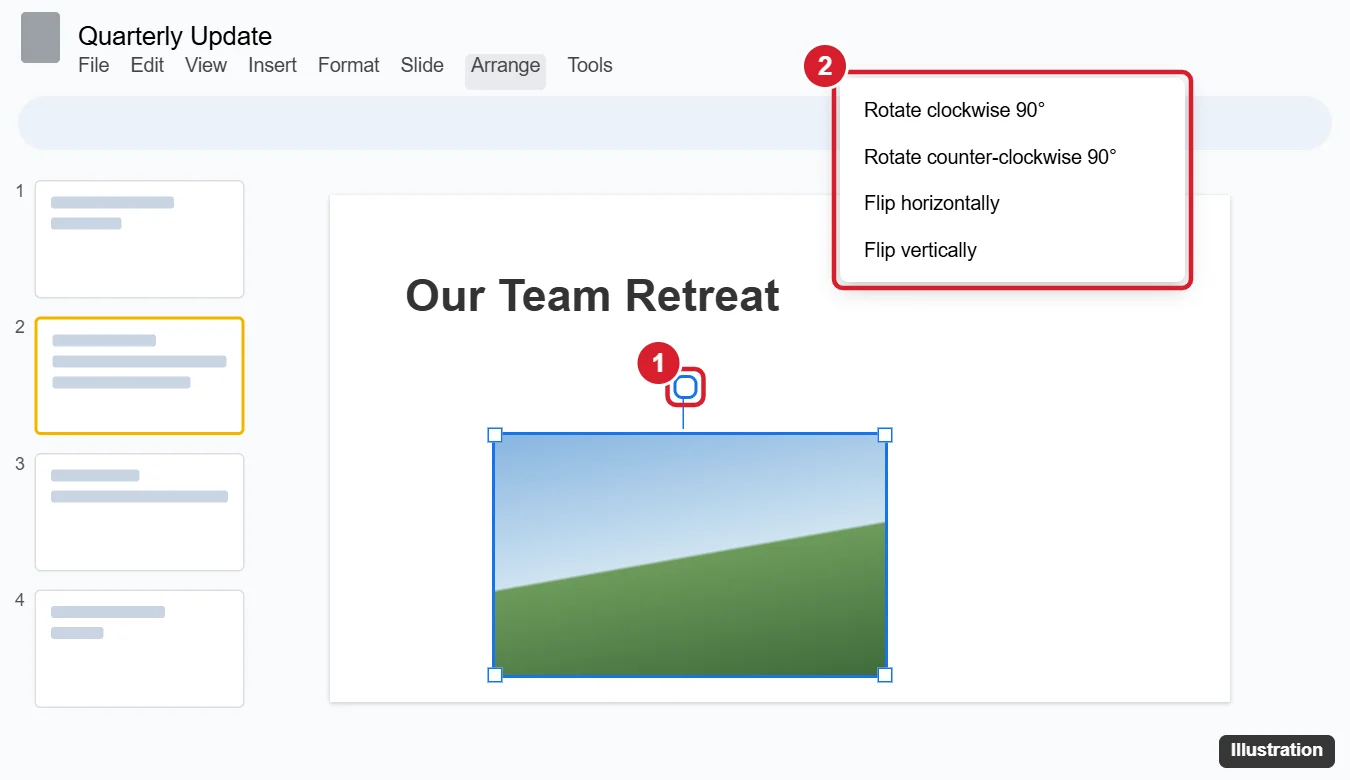
Method 1: Drag the Rotation Handle
- Click the image to select it.
- Hover over the small circle above the top edge until the pointer changes.
- Click and drag left or right to rotate.
- Hold Shift while dragging to rotate in 15-degree increments.
Method 2: Rotate 90 Degrees or Flip
- Select the image.
- Go to Arrange > Rotate, or right-click the image and choose Rotate.
- Choose an option:
- Rotate clockwise 90°
- Rotate counter-clockwise 90°
- Flip horizontally (mirror left to right)
- Flip vertically (upside down)
Tip: press Ctrl + / (Cmd + / on Mac) in Slides to see all keyboard shortcuts, including rotation shortcuts.
Method 3: Enter an Exact Angle
- Select the image.
- Click Format options in the toolbar, or right-click and choose Format options.
- Expand Size & Rotation.
- Under Rotate, type an angle (for example, 12) in the Angle box, or use the 90° and flip buttons.
Rotate an Image on Mobile
- Open the presentation in the Google Slides app and tap Edit if needed.
- Tap the image to select it.
- Drag the rotation handle above the image, or tap the Format button and use the Arrange or rotation options.
Tips
- Rotate several images at once: hold Shift and click each image, then use Arrange > Rotate.
- Rotate text boxes and shapes the same way; they have the same handle and menu.
- Straighten a tilted photo: use Format options with small angles like 1 or 2 degrees, then crop with Format options > Size & Rotation or the crop tool.
- Reset rotation: set the angle back to 0 in Format options, or right-click and choose Reset image (this also resets other adjustments).
Troubleshooting
There is no rotation handle
You may have selected a placeholder or background image, or you have view-only access. Images set as the slide background cannot be rotated in Slides; rotate them in an image editor first.
The image rotates around the wrong point
Images always rotate around their center. Move the image afterward to position it.
Frequently Asked Questions
Can I rotate an entire slide?
No, but you can change the presentation size to portrait in File > Page setup > Custom.
Does rotating reduce image quality?
No. Rotation in Slides does not change the original image.
Can I animate a rotation?
Yes. Use Insert > Animation and choose Spin.
Summary
- Drag the round rotation handle, holding Shift for 15-degree steps.
- Use Arrange > Rotate for 90-degree turns and flips.
- Type an exact angle in Format options > Size & Rotation.
- Select multiple images to rotate them together.

Kermit Matthews is a freelance writer based in Philadelphia, Pennsylvania with more than a decade of experience writing technology guides. He has a Bachelor’s and Master’s degree in Computer Science and has spent much of his professional career in IT management.
He specializes in writing content about iPhones, Android devices, Microsoft Office, and many other popular applications and devices.