Google Docs does not have a dedicated envelope tool like Microsoft Word, but you can still print envelopes by setting the page to envelope size, typing the addresses in the right places, and printing with your printer's envelope settings. For many envelopes at once, an add-on or a mail merge tool saves time. This guide covers both approaches and how to get the alignment right on the first try.
Quick Answer
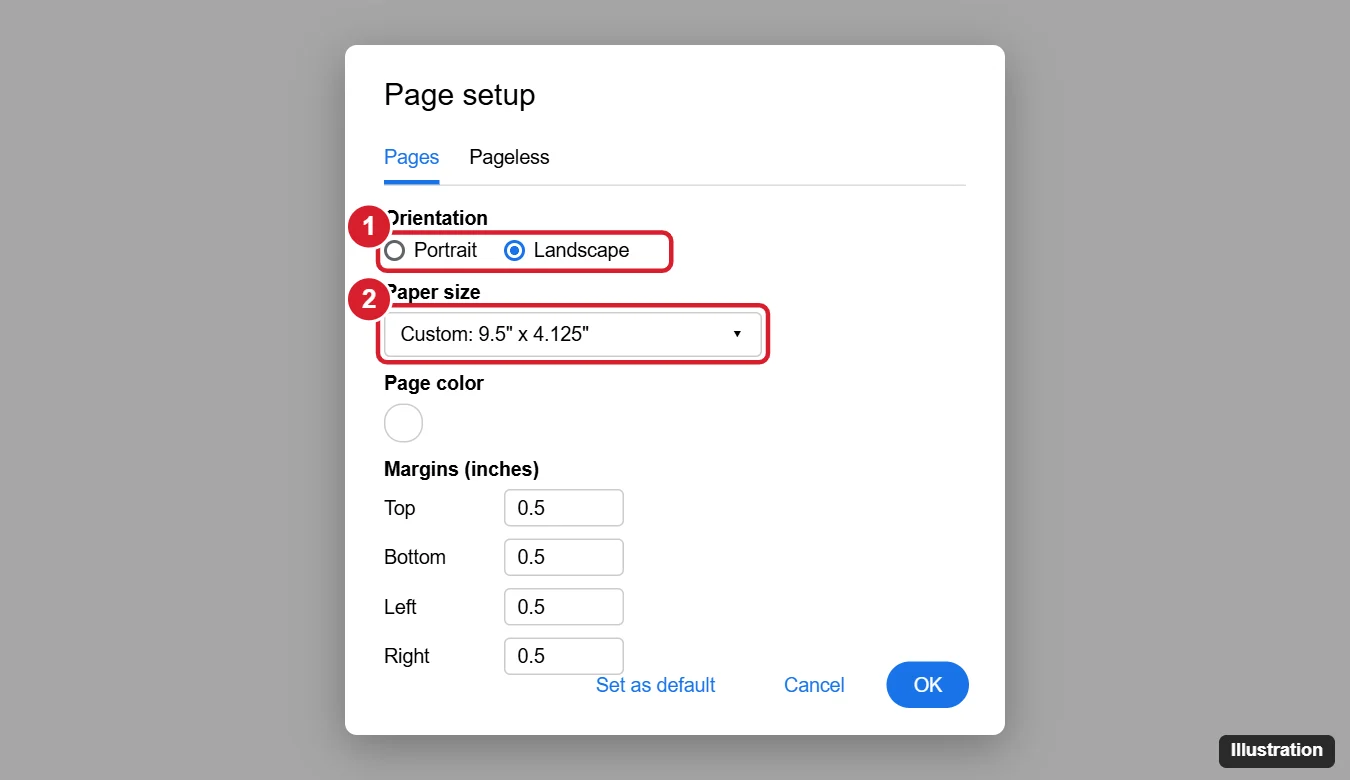
Open a new document, go to File > Page setup, choose Landscape, and set the paper size to your envelope's dimensions (a standard #10 envelope is 9.5 x 4.125 inches) with small margins. Type the return address at the top left and the recipient address near the center. Print with Ctrl + P, choose the same paper size and envelope feed in your printer settings, and test on plain paper first.
Common Envelope Sizes
| Envelope | Size (inches) | Typical use |
|---|---|---|
| #10 | 9.5 x 4.125 | Standard business letters (US) |
| #9 | 8.875 x 3.875 | Return envelopes |
| A7 | 7.25 x 5.25 | Invitations, 5 x 7 cards |
| A2 | 5.75 x 4.375 | Notecards |
| DL | 8.66 x 4.33 (220 x 110 mm) | Standard in many countries outside the US |
Method 1: Set Up an Envelope Page Manually
- Open Google Docs and create a blank document.
- Go to File > Page setup.
- Make sure the Pages format is selected (not Pageless).
- Choose Landscape.
- Set the Paper size to your envelope size. If your version of Docs does not offer a custom size, use an add-on that sets custom page sizes (search the Google Workspace Marketplace for a page size tool), or choose the closest preset and adjust margins.
- Set margins to about 0.5 inch and click OK.
- Type the return address at the top left.
- Press Enter several times to move down, then indent the recipient address to roughly the center using Increase indent or the ruler.
Tip: use a simple table with two rows and invisible borders to position the addresses more precisely.
Method 2: Use an Add-on for Envelopes
- In Google Docs, go to Extensions > Add-ons > Get add-ons.
- Search for envelope or mail merge.
- Review the add-on's permissions, ratings, and pricing, then install it.
- Follow the add-on's steps to choose an envelope size and add addresses, often from a Google Sheets list.
Many envelope and label add-ons offer free tiers with limits. Only grant access to add-ons from developers you trust.
Print the Envelope
- Press Ctrl + P (Cmd + P on Mac) or go to File > Print.
- In the print dialog, choose your printer and set the paper size to match the envelope.
- Open the printer's More settings or Print using system dialog to choose the envelope tray or manual feed, if needed.
- Check your printer manual for the correct envelope orientation (face up or down, flap side, which edge feeds first).
- Test on plain paper first: print on a sheet, hold it behind the envelope against a light, and adjust spacing before using real envelopes.
Print Many Envelopes With Mail Merge
Put names and addresses in Google Sheets with columns like Name, Street, City, State, and ZIP. Then use a mail merge add-on to create one envelope per row. Google Workspace business and education plans may include built-in mail merge features in Docs for some editions.
Troubleshooting
Text prints in the wrong place
The printer may be scaling the page. Set scaling to 100% or Actual size, and make sure the printer's paper size matches the document.
The envelope jams
Use the manual feed slot, adjust the paper guides, and avoid thick or padded envelopes your printer does not support.
Page setup options are missing
Switch from Pageless to Pages in File > Page setup.
Frequently Asked Questions
Does Google Docs have an envelope template?
There is no built-in envelope template, but you can set the page size manually or use an add-on.
Can I add a logo to the return address?
Yes. Use Insert > Image and set the image to In line next to the return address.
Is it easier in Word?
Word has a dedicated Mailings > Envelopes tool, so it can be quicker if you have it.
Summary
- Set Page setup to Landscape and your envelope size with small margins.
- Type the return address at the top left and the recipient address near the center.
- Print at 100% scale with matching paper size and envelope feed.
- Test on plain paper first, and use an add-on for many envelopes.

Kermit Matthews is a freelance writer based in Philadelphia, Pennsylvania with more than a decade of experience writing technology guides. He has a Bachelor’s and Master’s degree in Computer Science and has spent much of his professional career in IT management.
He specializes in writing content about iPhones, Android devices, Microsoft Office, and many other popular applications and devices.