Maybe the printer is still in its box, or maybe it worked last month and has now vanished from the list. Either way, Windows 11 adds printers in one place: Settings > Bluetooth & devices > Printers & scanners, then Add device. If the printer is not listed afterward, use the manual option next to “The printer that I want isn’t listed” to add it by IP address, share name or the older-printer wizard.
Pick your connection first
Windows can only add a printer it can reach, so first make sure the printer is on and connected the way you plan to use it. Match your situation to a row, then jump to that section.
| Your printer | Do this before Add device | Section |
|---|---|---|
| Connects with a USB cable | Plug it in and turn it on | USB printer |
| New Wi-Fi printer, never joined your network | Join it to Wi-Fi from its own panel or phone app | New Wi-Fi printer |
| Wi-Fi or Ethernet printer already on your network | Put the PC on the same network | Already on your network |
| Network printer that never shows up | Find its IP address | By IP address |
| Plugged into another PC | Turn on sharing on that PC | Shared printer |
| Older printer with no Windows 11 driver | Download the maker’s driver if there is one | Older printer |
| Bluetooth printer | Put it in pairing mode | Bluetooth printer |
These steps apply to current versions of Windows 11, with labels from Microsoft’s Add or install a printer in Windows page; where a button reads differently between builds, both wordings are given.
Add a USB printer
- Connect the USB cable to the printer and the PC, then turn the printer on.
- Wait a minute. Windows usually detects a USB printer on its own, shows a notification, and installs a basic driver.
- If nothing appears, press Windows + I, go to Bluetooth & devices > Printers & scanners, and check whether the printer is already in the list. If not, click Add device and wait for it to appear, then click Add device beside it.
If the printer is never detected, try another USB port or cable; an unpowered USB hub is a common cause.
Set up a new Wi-Fi printer that is not on your network yet
This is the step most new-printer setups skip. Windows cannot see a wireless printer until the printer itself has joined your Wi-Fi, and Windows cannot enter the Wi-Fi password for it. Do that first:
- On the printer’s control panel, open the wireless or network setup menu, choose your Wi-Fi network and enter its password. Printers without a screen usually use the maker’s phone app or a WPS button on the router instead; the printer’s quick-start sheet says which.
- Confirm the printer shows a steady wireless light or a connected status.
- Make sure the PC is on the same network, not a guest network or a separate extender name. If the PC is not connected yet, how to connect Windows 11 to Wi-Fi covers that.
- Continue with the next section.
Add a printer that is already on your network
- Press Windows + I to open Settings.
- Click Bluetooth & devices, then Printers & scanners.
- Next to Add a printer or scanner, click Add device.
- Wait for the search to finish. When your printer appears, click Add device next to its name.
- Windows installs the driver and adds the printer to the list. Click the printer, then Print test page, to confirm it works.
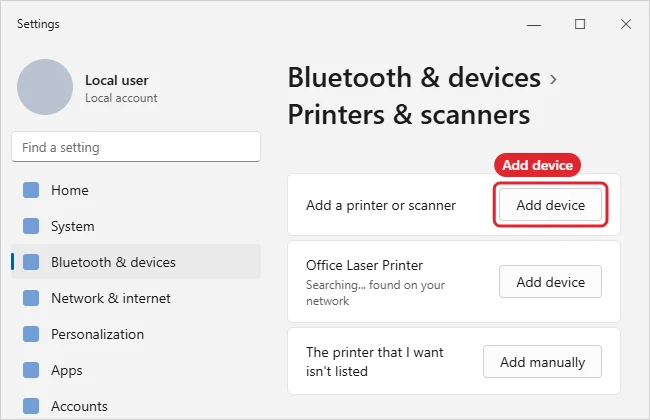
Suppose you have a Wi-Fi printer in the hallway and a laptop on the sofa. On the same home network, Add device finds the printer within seconds. If the laptop is on the router’s “Guest” network or an extender with a different name, the search comes up empty, and the fix is to move the laptop, not the printer.
Not listed? Add it by IP address or hostname
Network printers that Windows cannot discover can almost always be added by address. First find the IP address: print a network configuration page from the printer’s menu, read it on the printer’s screen, or look at the connected-devices list in your router’s app.
- In Printers & scanners, click Add device and let the search run.
- Next to The printer that I want isn’t listed, click Add manually (some builds label it Add a new device manually).
- In the Add Printer wizard, choose Add a printer using an IP address or hostname and click Next.
- Leave Device type on Autodetect, type the IP address, keep Query the printer and automatically select the driver to use ticked, and click Next.
- If Windows asks for a driver, pick the manufacturer on the left and the model on the right, or click Windows Update to load more models, or Have Disk if you downloaded one.
- Name the printer, decide whether to share it, click Next, print a test page and click Finish.
Home routers hand out addresses that can change, so reserve a fixed address for the printer in the router’s settings. A printer that keeps “going offline” after working well is often one whose address moved.
A printer plugged into one desktop PC can be used from another laptop on the network as long as the desktop is on and sharing is enabled.
On the PC with the printer: open Printers & scanners, click the printer, click Printer properties, open the Sharing tab, tick Share this printer and note the share name. In Settings > Network & internet > Advanced network settings > Advanced sharing settings, turn on network discovery and file and printer sharing for the Private profile, and make sure the network itself is set to Private.
On the other PC: click Add device, then the manual option, choose Select a shared printer by name, and type the path in the form \\DESKTOP-NAME\ShareName (or click Browse to pick it). Windows copies the driver from the host PC, which is why the host must be awake. On a standard (non-administrator) account, Windows asks for an administrator’s password before it installs that driver. If the other computer still runs Windows 10, how to add a network printer in Windows 10 covers the steps there.
Add an older printer with the manual wizard
For a printer Windows does not recognize, or one that connects through a parallel or serial port, use the wizard’s full manual route:
- Click Add device, then the manual option, then Add a local printer or network printer with manual settings, and click Next.
- Choose Use an existing port and pick the port (USB001 for a USB printer, LPT1 for parallel, or a TCP/IP port you created earlier). Click Next.
- Pick the manufacturer and model. If the model is missing, click Windows Update and wait for the longer list, or click Have Disk and point to the driver you downloaded.
- If Windows says a driver is already installed, choose Replace the current driver.
- Name the printer, choose Do not share this printer unless you want to share it, print a test page and click Finish.
Before buying adapters for a parallel-port printer, check the maker’s site for a Windows 11 driver; many older models have none.
Pair a Bluetooth printer
Bluetooth printers are added from the printer settings:
- Put the printer in pairing (discoverable) mode using its own buttons or menu.
- Make sure Bluetooth is on in Windows; how to turn on Bluetooth in Windows shows where the switch is.
- Go to Settings > Bluetooth & devices > Printers & scanners and click Add device next to Add a printer or scanner.
- When the printer appears, click Add device beside it and enter a PIN if the printer asks for one.
Microsoft’s page on how to pair a Bluetooth device in Windows gives these same Printers & scanners steps for printers and scanners.
After any of the routes above, click the printer in Printers & scanners and choose Print test page. If the page prints, the connection is good.
A Find drivers button next to a newly added printer means Windows installed a basic driver and is still looking for the full one. The printer works, but features such as duplex or scanning may be missing until the full driver arrives. Microsoft recommends Windows Update: open Settings > Windows Update, run a check, and look under Advanced options > Optional updates > Driver updates for a driver update. The alternative is the maker’s installer or Microsoft Store app. If drivers keep misbehaving, how to update drivers in Windows 11 walks through the safe methods.
Two housekeeping steps follow. If this is the printer you will use most, make it the default; how to set a default printer in Windows 11 explains the Let Windows manage my default printer switch that otherwise keeps changing it. And if an old entry for the same printer remains, remove it: how to remove a printer from Windows 11.
Printer not found or offline: fix it in this order
Work down this list and stop when printing works. It follows the order Microsoft uses in its page on how to fix printer connection and printing problems in Windows.
- Power-cycle the printer. Turn it off, unplug it, wait about 30 seconds, plug it back in and turn it on.
- Check the link. Reseat the USB cable, or confirm the printer’s wireless status and that the PC is on the same network.
- Run the printer troubleshooter. Open the Get Help app from Start, search for printer, and follow the automated checks.
- Remove and re-add. In Printers & scanners, click the printer, click Remove, confirm with Yes, then click Add device (or Refresh) and add it again.
- Update or reinstall the driver. Right-click Start, open Device Manager, expand Printers, right-click the printer and choose Update driver; if that changes nothing, choose Uninstall device and add the printer again. Microsoft’s printer not found page lists these steps.
- Reset the Print Spooler. Press Windows + R, type services.msc, press Enter, right-click Print Spooler and choose Stop. In File Explorer, open %WINDIR%\system32\spool\printers and delete every file inside. Back in Services, double-click Print Spooler, set Startup type to Automatic, click Start, then OK.
“Offline” in the printer list usually means the PC cannot reach the printer at that moment: a sleeping printer, a changed IP address or the wrong network. Steps 1, 2 and 4 clear most cases.
Work PCs and ARM or Copilot+ PCs
On a PC joined to a work domain, Add device may list printers published by IT, and some organizations block manual installs; if the manual option is grayed out, ask the help desk for the printer’s share path.
On an ARM-based PC, including Copilot+ PCs, Microsoft notes that the manufacturer’s installer may refuse to run. Use the Settings steps in this guide instead, which rely on drivers from Windows Update. To check what you have, open Settings > System > About and look at System type under Device specifications; it says “ARM-based processor” on those machines.
Printer setup questions
Should I add the printer by IP address or by name?
Use Add device and let Windows discover it first; that route sets up the right port automatically. Use the IP address when discovery fails or when the printer is on a different subnet, and use a share name only for a printer plugged into another PC.
Do I still need the manufacturer’s app once Windows has added the printer?
Not for printing. The app is useful for ink levels, scanning, firmware updates and some maintenance tasks, so install it if you use those; otherwise the Windows driver is enough.
With the printer added, print a test page and set it as the default if it is your main printer. If you only need a PDF rather than paper, Windows already includes that printer: see how to print to PDF on Windows.

Kermit Matthews runs Live2Tech from just outside Philadelphia. He is an IT specialist with over 20 years of experience, from a university help desk to small-business IT, IT management and his own consulting practice, and has written tech guides full time since 2020. Steps are checked against the current software on a real device or the maker’s official documentation. More about Kermit.