Your Apple Watch is very customizable, and over time you will fall into a routine concerning the ways that you use it.
One Apple Watch item that you will likely change is the watch face that you see when the device is turned on. This can be switched between several faces that are active by default, but there are actually many more faces that you can add to the device. Our tutorial below will show you how to add a new face from the options available in the Watch app on your iPhone.
How to Add a New Apple Watch Face
The steps in this guide were performed on an iPhone 7 Plus in iOS 12.1.2. By competing the steps in this article you will be adding a new watch face. The face that you add will become the active one on your watch, but you can always switch between watch faces by swiping left or right on the Watch screen.
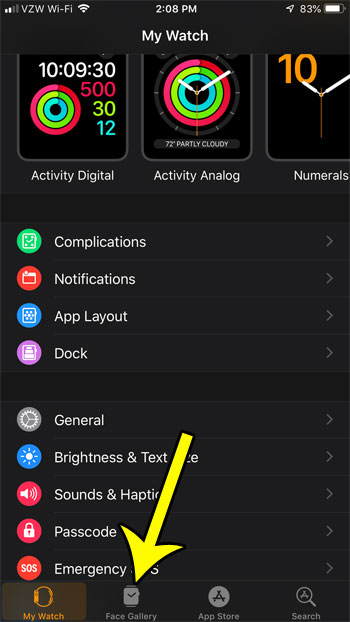
Step 1: Open the Watch app on your iPhone.

Step 2: Choose the Face Gallery tab at the bottom of the screen.

Step 3: Select the watch face that you wish to add.

Step 4: Tap the Add button near the top of the screen to make this your new watch face. Note that the current face will be replaced with the one that you select.

Did you know that you can take screenshots on your Apple Watch, much like you would on your phone or computer? Find out how to enable Apple Watch screenshots and create images of the data that you see on your watch.

Kermit Matthews is a freelance writer based in Philadelphia, Pennsylvania with more than a decade of experience writing technology guides. He has a Bachelor’s and Master’s degree in Computer Science and has spent much of his professional career in IT management.
He specializes in writing content about iPhones, Android devices, Microsoft Office, and many other popular applications and devices.