When you set up a signature in an email application like Gmail, you have the option of including that signature at the bottom of every email that you send.
This is a popular option for people that are sending work emails, as the signature is a great location to put additional contact information. Plus, the signature is added automatically, so you don’t even need to remember to do it.
Our tutorial will show you how to create an email signature in Gmail so that you can start taking advantage of this feature yourself.
How to Make a Gmail Email Signature
- Go to your Gmail inbox.
- Click the gear icon, then choose See all settings.
- Scroll down and click Create new next to signatures.
- Give the signature a name, then click Create.
- Enter the signature content.
- Choose options on the Signature defaults dropdown menus.
- Scroll down and click Save Changes.
Our guide continues below with additional information on how to create an email signature in Gmail, including pictures of these steps.
Signatures in email programs are time savers.
Most applications offer some kind of signature option (even your smartphone), and you can customize that signature to include information that you think your email conversation participants may need.
But that signature isn’t set up automatically, which means that you need to seek it out in order to start using it.
Gmail is an email provider that offers a signature option, and you are able to create your signature directly from your browser. You can even change the font of the signature or include a link or picture if you wish.
Setting Up a Gmail Signature (Guide with Pictures)
The steps in this article will show you how to create a signature for your Gmail account.
The signature that you create will be included on emails that you create and send from a Web browser.
This will not affect emails that you send from other applications, like the Mail app on your phone, or Outlook on your computer.
Step 1: Sign into your Gmail account at https://mail.google.com/mail/u/0/#inbox.
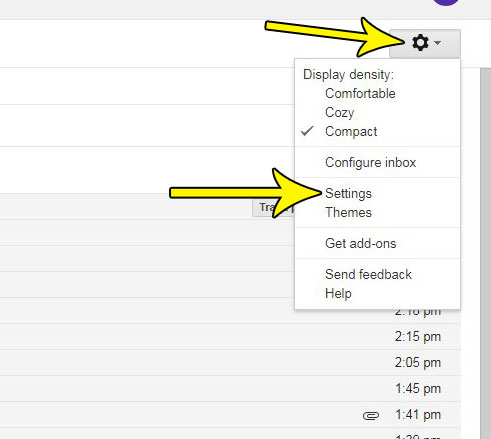
Step 2: Select the gear icon at the top-right corner of the window, then choose the Settings option.

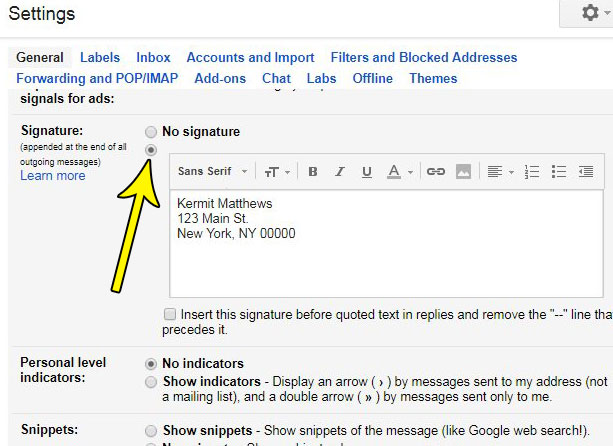
Step 3: Scroll down to the Signature section of the menu, select the bottom circle, then type the desired signature into the field.
Note that you can use the assorted tools in this section to change the font of your signature, add a link, or add a picture.

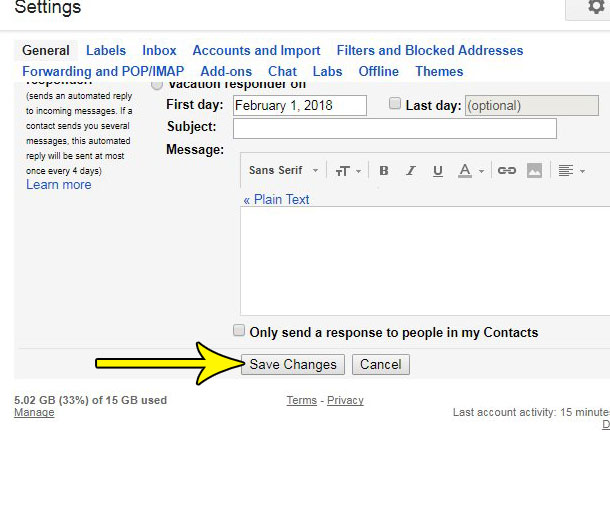
Step 4: Scroll to the bottom of the menu and click the Save Changes button.

Now that you know how to create an email signature in Gmail, you can set one up that includes important information that you want to share with your email contacts, like a phone number, website, physical address, and more.
Is Gmail choosing the wrong type of default replying option when you reply to emails?
Find out how to change the reply behavior in Gmail if you would rather use reply or reply all as opposed to what it is currently selecting.

Kermit Matthews is a freelance writer based in Philadelphia, Pennsylvania with more than a decade of experience writing technology guides. He has a Bachelor’s and Master’s degree in Computer Science and has spent much of his professional career in IT management.
He specializes in writing content about iPhones, Android devices, Microsoft Office, and many other popular applications and devices.