A report or school paper often needs page 1 to hold the title, subtitle, author and date halfway down the sheet, while everything after it starts at the top margin as usual. Word does this with the Vertical alignment setting in Page Setup, applied to the title text only, so the rest of the document is untouched. The table below matches each part of a title page to the Word setting that handles it.
What does your title page need?
| Title page need | Word setting | Where it is covered |
|---|---|---|
| Title halfway between the top and bottom margins | Page Setup > Layout tab > Vertical alignment: Center, Apply to: Selected text | Center the title text between the margins |
| Each line centered left to right | Home > Center, or Ctrl + E | Type the title lines first |
| Pages after the title stay top-aligned | Apply the setting to the selected title text, or give the title page its own section | Both centering sections |
| Title at the top, author at the bottom | Vertical alignment: Justified | Other vertical positions |
| A designed page with placeholder text | Insert > Cover Page | Start from a built-in cover page |
| No page number on the title page | A different first-page header and footer | Keep the page number off page 1 |
The steps are for Word for Microsoft 365 and Word 2016 to 2024 on Windows. Microsoft says the same vertical alignment steps apply in Word for Microsoft 365 for Mac and Word for the web; see the Mac and web section below.
Type the title lines first
Put everything that belongs on the title page at the very start of the document before you center it: the title, an optional subtitle, your name, the course or company, and the date. Press Enter once between lines, not several times. Extra empty paragraphs count as content, so they push the visible text off center once Word balances the page.
- Select all the title page lines.
- On the Home tab, in the Paragraph group, select Center, or press Ctrl + E. Each line is now centered between the left and right margins.
- Apply any font size or bold formatting now. Changing it later is fine, but it is easier to judge the page when the text is final.
Left-to-right centering of pictures and tables works differently; centering text, pages, pictures and tables in Word covers those cases.
Center the title text between the margins
This is the route Microsoft documents on its page for aligning and centering text on a page. The key is the Apply to choice: by applying the change to the selected text, you keep it on the title page instead of the whole file.
- Select the title page text (all the lines you typed above, and nothing from page 2).
- Select the Layout tab. In the Page Setup group, select the small dialog box launcher in the lower-right corner of the group.
- In the Page Setup dialog, select the Layout tab.
- In the Vertical alignment box, select Center.
- In the Apply to box, select Selected text.
- Select OK.
Check the result in Print Layout view: the title block should sit in the middle of page 1, and page 2 should start at the top as before. Microsoft describes vertical alignment as the setting for the up and down position of text between the top and bottom margins, such as the placement of a title on a section-break page. For the same control used on a whole document, a table or a text box, see vertically aligning text in Word.
Other vertical positions
The same Vertical alignment box has four choices, described on Microsoft’s Page Setup layout options page:
| Choice | Effect on the title page |
|---|---|
| Top | The normal layout: text starts at the top margin |
| Center | The block of text sits in the middle of the page |
| Bottom | The text sits just above the bottom margin |
| Justified | The paragraphs are spread evenly down the page |
Justified is useful when you want the title near the top and your name and date near the bottom without pressing Enter a dozen times.
Give the title page its own section
If the document is already long, or you plan to change margins or headers on the title page too, a section break that starts page 2 keeps the title page separate. Microsoft explains the break types on its page about inserting a section break.
- Click at the end of the last title page line.
- Go to Layout > Breaks and choose Next Page. The new section begins on the following page.
- Click anywhere on the title page.
- Open the Page Setup dialog as above, choose Center under Vertical alignment, and in the Apply to box choose the option that limits the change to the title page’s section rather than the whole document. Select OK.
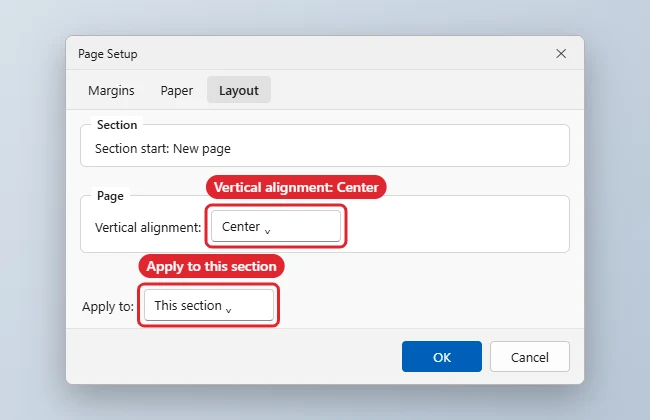
The illustration shows an older version of the Page Setup dialog; the Vertical alignment and Apply to boxes are the two settings to look for.
Check page 2 afterward. If it is centered too, the setting reached the whole document; open Page Setup on page 2, set Vertical alignment back to Top and apply it to that section.
Start from a built-in cover page
If you would rather begin with a designed page, Word’s cover pages come with placeholder text you type over. Microsoft’s page on adding a cover page in Word gives these steps:
- On the Insert tab, in the Pages group, select Cover Page.
- Choose a layout.
- Select each placeholder and type your own title, subtitle, name and date.
Microsoft notes that a cover page is always added at the beginning of the document, and that inserting a different cover page replaces the existing one. To take it out, select Cover Pages in the Pages group, then Remove Current Cover Page. A cover page already has its own layout, so you do not need the Vertical alignment steps for it.
Keep the page number off page 1
Many title pages carry no page number. Word’s headers and footers can give the first page its own header and footer, so page 1 stays blank while page 2 onward is numbered. Microsoft covers the first-page option on its page about changing the header or footer on a single page, and skipping page numbers in Word shows how to start numbering where you want it.
Word for Mac and Word for the web
Microsoft’s page on aligning text vertically lists Word for Microsoft 365, Word for Microsoft 365 for Mac and Word for the web, with one set of steps: select the text, open the Page Setup options, set the vertical alignment and apply it to the selected text. It does not give a separate Mac menu path, so if the Mac ribbon looks different, look for Page Setup on the Layout tab and use the same Vertical alignment and Apply to boxes.
Fix a title page that moved the whole document or left a blank page
- Every page is centered: nothing was selected (or too much was) when you chose Apply to. Undo with Ctrl + Z, select only the title page lines and repeat the steps with Selected text.
- The title sits a little high or low: look for empty paragraphs above or below it. Turn on formatting marks with Ctrl + Shift + 8 and delete the extra paragraph marks.
- A blank page appears after the title: there is usually an extra break, such as a page break next to a section break. With formatting marks showing, delete the extra one. Deleting a Next Page section break walks through it.
- Removing a break changed the layout of the next pages: a section break carries that section’s formatting. Removing section breaks in Word explains what happens to the formatting.
Title page centering answers
Why did the whole document end up in the middle of the page?
The Vertical alignment change was applied to more than the title. Selecting only the title page text before you open Page Setup, then choosing Selected text, keeps it to page 1.
How do I put the title at the top and my name at the bottom?
Choose Justified instead of Center in the Vertical alignment box. Word spreads the paragraphs evenly down the page, which places the first lines near the top and the last lines near the bottom.
How do I remove a cover page I inserted?
On the Insert tab, in the Pages group, select Cover Pages, then Remove Current Cover Page.
Do school paper styles use a centered title page?
It depends on the style your instructor asks for, and some styles put the heading on the first page of the paper instead of a separate title page. MLA format in Word shows how that style sets up page 1.
Once the title page looks right, scroll through the next two pages to confirm they still start at the top margin before you print or share the file.

Kermit Matthews runs Live2Tech from just outside Philadelphia. He is an IT specialist with over 20 years of experience, from a university help desk to small-business IT, IT management and his own consulting practice, and has written tech guides full time since 2020. Steps are checked against the current software on a real device or the maker’s official documentation. More about Kermit.