To use the Morph transition in PowerPoint, make a slide, duplicate it, then move, resize, rotate or recolor objects on the copy. Select the second slide and choose Transitions > Morph. PowerPoint animates every change between the two slides for you, so an object appears to glide, grow or spin into its new state with no motion paths to draw. Use Effect Options to switch between Objects, Words and Characters, and set the speed in the Duration box.
This guide covers the setup step by step, how PowerPoint decides which objects belong together, the !! naming trick that forces two objects to match, the Mac, web and mobile differences, and what to check when Morph only fades instead of moving.
What you need and which versions can use Morph
Morph is a slide transition. A transition is the effect that plays as one slide replaces the previous one, and you apply it to the slide that is coming in. That detail matters: Morph always goes on the second slide of each pair, the one that shows the ending state.
According to Microsoft’s Morph transition documentation, these versions can both create and play Morph:
- PowerPoint for Microsoft 365 on Windows (version 1511 or newer) and on Mac (version 15.19 or newer)
- PowerPoint 2024, PowerPoint 2021 and PowerPoint 2019, including the 2024 and 2021 Mac versions
- PowerPoint for the web
- PowerPoint for iPad, iPhone and Android, where creating Morph requires a Microsoft 365 subscription
PowerPoint 2016 can only play a Morph transition someone else made, and only when it is up to date. If the required updates are missing, PowerPoint 2016 shows a plain Fade instead. For PowerPoint for the web, Microsoft notes that Morph is available to Microsoft 365 subscribers working on files stored in OneDrive for work or school or SharePoint in Microsoft 365.
Morph works on text, shapes, pictures, SmartArt graphics, WordArt and tables. Charts are the exception: they cross-fade between slides rather than morph.
How Morph decides what to animate
When the second slide comes in, PowerPoint compares it with the slide before it and looks for objects that appear on both. Each matched pair is animated from its old state to its new one: position, size, rotation, color and other formatting all change smoothly at once. Objects that exist only on the first slide fade out, and objects that exist only on the second slide fade in.
The simplest way to make sure PowerPoint sees the same object on both slides is to duplicate the slide, because the copy keeps every object intact. Copying an object and pasting it onto the next slide works too. If you draw a brand new shape on the second slide instead, PowerPoint may treat it as a different object, and you get a fade rather than movement. When automatic matching picks the wrong partner, you can take control with special names, covered in the !! naming section.
Add a Morph transition in PowerPoint for Windows
These steps use PowerPoint for Microsoft 365, PowerPoint 2024, 2021 or 2019 in Normal view (View > Normal), with the slide thumbnails on the left.
Step 1: Build the starting slide
Create a slide that shows everything in its starting position. For a first try, keep it simple: one shape or picture on the left side of the slide and a title at the top. This slide is the “before” picture.
Step 2: Duplicate the slide
Right-click the slide in the thumbnail pane and choose Duplicate Slide, or select the thumbnail and press Ctrl + D. An identical copy appears right below it.
Step 3: Change the objects on the copy
Select the new slide (the second one) and change it into the “after” picture. Drag the shape to the right side, drag a corner handle to make it larger, use the circular rotate handle to turn it, or pick a new fill color on the Shape Format tab. You can make several changes to the same object, and change several objects, all on this one slide. Leave the first slide untouched.
Step 4: Apply Morph to the second slide
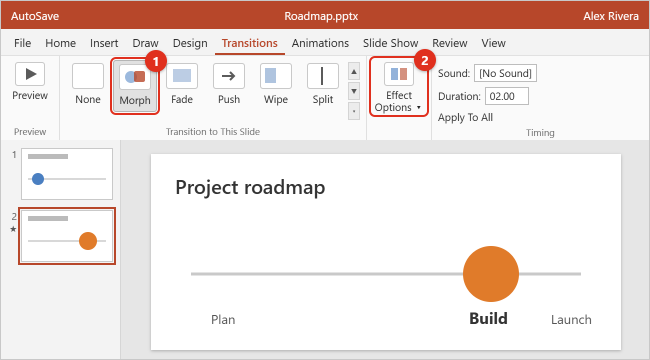
With the second slide still selected in the thumbnail pane, click the Transitions tab and choose Morph in the transition gallery. If you don’t see it, click the arrow at the right edge of the gallery to show every transition. PowerPoint plays a quick preview on the slide, and a small star icon appears next to the slide’s thumbnail to show it has a transition.
Step 5: Preview the result
Click Preview at the far left of the Transitions tab to replay the effect. You should see the shape travel from its old position to its new one, changing size, angle or color on the way. To watch it the way your audience will, select the first slide and click Slide Show > From Current Slide, then advance to the next slide.
Step 6: Adjust the speed and how the slide advances
In the Timing group on the right of the Transitions tab, type a number of seconds in the Duration box. A smaller number makes the motion faster, and a larger one slows it down. Under Advance Slide, keep On Mouse Click checked if you want to trigger the next slide yourself, or check After and enter a time to advance automatically. Avoid Apply To All unless you really want every slide in the deck to use Morph, because it replaces the transitions on all other slides.
Step 7: Repeat for each new state
To keep the motion going, duplicate the second slide, change things again on the third slide, and apply Morph to the third slide. Each new slide becomes the next step of the animation. Because a duplicated slide keeps its transition, a copy of a Morph slide already has Morph applied.
Objects, Words or Characters: choosing an effect option
Select a Morph slide and click Transitions > Effect Options to choose how PowerPoint matches content:
| Effect option | What it matches | Use it when |
|---|---|---|
| Objects | Whole objects such as shapes, pictures and text boxes | You move, resize, rotate or recolor objects. This is the usual choice. |
| Words | Individual words inside text | The same words appear on both slides in a new order, place or style, and you want each word to travel to its new spot. |
| Characters | Individual letters | You rearrange letters, for example to turn one word into an anagram of another. |
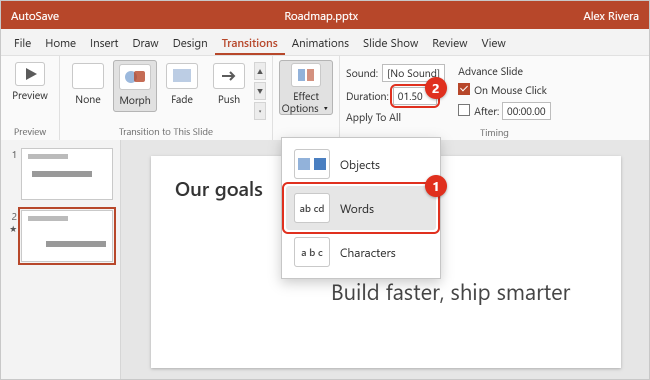
With Objects selected, a text box whose wording has changed still slides to its new position, but the old text and new text blend into each other. Switching to Words makes words that appear on both slides move on their own, while new words fade in and removed words fade out.
Force two objects to match with !! names
Automatic matching works well for duplicated slides, but sometimes you want PowerPoint to treat two different things as one. A circle on one slide and a square on the next, two different photos, or two copies of the same shape with different text are good examples. Microsoft’s Morph tips and tricks page describes a naming rule for this: give both objects the same name that begins with two exclamation points, such as !!Badge.
Step 1: Open the Selection Pane
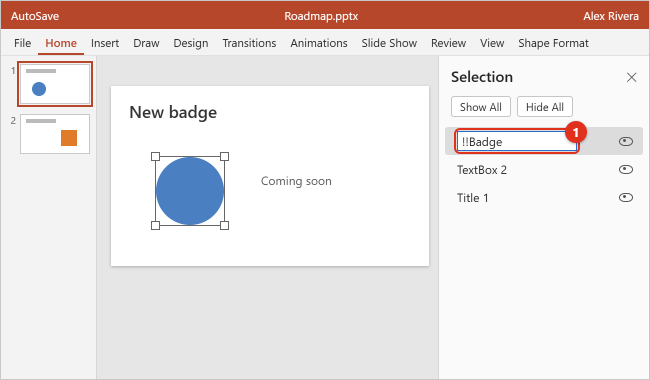
On the first slide, go to Home > Select > Selection Pane (the Select button is in the Editing group), or press Alt + F10. The pane opens on the right and lists every object on the slide with a default name such as Rectangle 3 or Picture 2. Clicking a name in the list selects that object on the slide, which helps you check which one is which.
Step 2: Rename the object
Click the object’s name once to select it, then click it again (or press F2) to edit it. Press Ctrl + A to select the whole name, type a new name that starts with !!, such as !!Badge, and press Enter.
Step 3: Give the partner object the same name
Go to the next slide, select the object you want the first one to turn into, and rename it to exactly the same name, !!Badge. Apply Transitions > Morph to this second slide and click Preview. The first object now morphs into the second, even if it is a different shape or picture.
Keep these rules in mind:
- Both objects must be the same type, for example shape to shape, picture to picture, table to table, or SmartArt to SmartArt.
- A
!!object never matches an object whose name doesn’t start with!!. - Use each
!!name only once per slide, because Morph expects one object to pair with one object. - Names without
!!work as before, so you only need to rename the objects that misbehave.
On Windows, the !! naming rule needs PowerPoint for Microsoft 365 version 1903 or later (1908 on the Semi-Annual Enterprise Channel) or PowerPoint 2019 version 1908 or later. On a Mac it needs version 16.23 or later.
Effects you can build with Morph
Every Morph effect follows the same pattern: a starting slide, a changed copy, and Morph on the copy. What you change on the copy decides the effect.
- Move: drag the object to a new place. Morph creates the path for you.
- Grow or shrink: resize the object. Hold Shift while dragging a corner to keep its proportions.
- Spin or flip: turn the object with the rotate handle, or use Home > Arrange > Rotate > Flip Horizontal or Flip Vertical.
- Change color or style: change the fill, outline, font size or font color on the copy, and the change blends smoothly.
- Fly in: on the first slide, drag the object off the edge of the slide into the gray area. On the second slide, place it where it should land. Zoom out (the zoom slider in the bottom-right corner) to make room off the slide.
- Fly out: do the opposite and drag the object off the edge on the second slide.
- Fade in or out: add a new object only to the second slide, or delete one from it.
- Zoom into a picture: on the copy, enlarge a full-slide picture so it extends past the slide edges, centered on the detail you want to show.
- Scroll: place a tall image, such as a long web page capture, so only the top shows on the first slide, then move it up on the second slide.
- 3D turn: set a starting angle with Shape Format > Shape Effects > 3-D Rotation, then pick a different 3-D rotation on the copy.
You can combine these. A single object can move, grow and change color in one transition.
Worked example: a three-slide roadmap
Here is a small project that shows the whole process. Alex Rivera wants a timeline where a colored marker travels across three project phases, and the current phase label grows as the marker arrives.
| Slide | What is on the slide | Transition |
|---|---|---|
| 1 | A horizontal line with three labels: Plan, Build, Launch. A blue circle sits over Plan, and the Plan label is bold and 28 pt. | None |
| 2 | Duplicate of slide 1. The circle moves over Build and turns orange. Plan goes back to 20 pt, and Build becomes bold and 28 pt. | Morph, Objects, 1.5 seconds |
| 3 | Duplicate of slide 2. The circle moves over Launch and turns green. A new “Go live: June” text box is added under Launch. | Morph, Objects, 1.5 seconds |
When the slide show reaches slide 2, the circle slides to the right while changing from blue to orange, and the two labels swap sizes. On slide 3 the circle moves again and the new text box fades in, because it doesn’t exist on slide 2. No animation effects were added to any object; the slide order and the Morph transition do all the work. If the circle refuses to move and fades instead, rename it !!Marker on all three slides.
Morph on a Mac, on the web and on mobile
PowerPoint for Mac
Microsoft’s Mac, iPad and iPhone Morph guide uses the same setup. Duplicate the slide (right-click the thumbnail and choose Duplicate Slide, or press Command + D), change the copy, select it in the thumbnail pane, and choose Transitions > Morph. Then click Effect Options and pick Objects, Words or Characters. To rename objects for !! matching, open Home > Arrange > Selection Pane.
PowerPoint for the web
The steps match Windows: duplicate the slide, change the copy, select it, and choose Transitions > Morph. If Morph isn’t in the transitions list, check where the file is saved, because Microsoft documents web support for files in OneDrive for work or school or SharePoint in Microsoft 365. Opening the file in the desktop app (Editing > Open in Desktop App, or the equivalent button in your version) is the quickest fallback.
iPad, iPhone and Android
On iPad and iPhone, select the second slide, then tap Transitions > Transition Effect > Morph and choose an effect option. On Android, Microsoft lists the path as Transitions > Transition Effects > Morph. Creating Morph in these apps needs a Microsoft 365 subscription, though the apps can play Morph slides in a slide show.
Troubleshooting Morph
Morph is missing from the Transitions tab
Check your version at File > Account. PowerPoint 2016 can’t create Morph at all, and older releases such as PowerPoint 2013 don’t have it. On Microsoft 365, install the latest updates from File > Account > Update Options > Update Now. In PowerPoint for the web, see the file location note in the web section.
Objects fade instead of moving
PowerPoint didn’t recognize the object as the same one on both slides. This usually happens when the second object was drawn from scratch, is a different type (for example a shape on one slide and a picture on the other), or contains different text while Objects is selected. Rebuild the second slide from a duplicate, or give both objects the same !! name.
The wrong objects pair up
If a slide holds several look-alike shapes, Morph can pair a shape with the wrong partner and send objects crossing the slide. Rename each moving object with its own !! name on both slides so every pair is explicit.
Nothing happens on the first slide
Morph needs a slide before it to compare with. Applying it to slide 1 has no visible effect, and applying it to a slide whose previous slide shares no objects only produces a fade. Put Morph on the slide that shows the ending state.
A chart or custom shape won’t morph
Charts always cross-fade. If you need a moving bar, build it from rectangles instead of a chart. For shapes you have edited point by point, Microsoft says PowerPoint can’t geometrically morph a shape with more than one hole, and that both shapes should have roughly the same number of edit points drawn in the same direction.
The audience sees a Fade on another computer
The presenting computer is likely running PowerPoint 2016 without the required updates, which plays Fade instead of Morph. Present from a current version, or update that copy of PowerPoint.
The motion is too fast, too slow or starts by itself
Change the Duration value on the Transitions tab. If slides advance on their own, uncheck After under Advance Slide.
How to change or remove Morph
A slide can only have one transition. To replace Morph, select the slide and pick another transition in the gallery. To remove it, select the slide and choose None at the start of the Transitions gallery. Choosing None and then Apply To All removes transitions from every slide, so use it only when that is what you want; Ctrl + Z undoes it right away.
Frequently Asked Questions
Is the Morph transition free?
Morph is included in PowerPoint for Microsoft 365 and in the one-time purchase versions PowerPoint 2019, 2021 and 2024. Creating Morph on iPad, iPhone and Android needs a Microsoft 365 subscription. There is no separate charge for the feature itself.
Do I apply Morph to the first or the second slide?
Apply it to the second slide, the one that shows where objects end up. A transition controls how a slide arrives, so Morph on slide 2 animates the change from slide 1 to slide 2.
What is the difference between Morph and animations?
Animations on the Animations tab act on single objects within one slide, and you set each one up by hand. Morph is a slide transition that works out the movement between two slides by comparing them. You can use both in the same presentation.
Can Morph change one shape into another?
Yes. Name the first shape and the second shape the same, starting with !!, in the Selection Pane, and Morph turns one into the other. Both objects need to be the same kind of object, such as two shapes.
Why do I need to duplicate the slide?
Duplicating keeps every object the same underneath, so PowerPoint can recognize it on both slides. Copying and pasting an object onto the next slide works too. New objects drawn from scratch may only fade.
Can I use Morph across more than two slides?
Yes. Each Morph slide animates from the slide just before it, so a chain of duplicated slides with Morph on each one produces a continuous sequence.
Does Morph work with text?
Yes. Text boxes move and resize with the Objects option. Choose Words to move matching words individually, or Characters to rearrange letters.
Next step
Start with two slides and one shape, apply Transitions > Morph to the second slide, and click Preview. Once that works, add more changes, chain more slides, and use !! names whenever PowerPoint pairs objects the wrong way. If you are adding arrows to point at moving objects, see how to add an arrow in PowerPoint.

Kermit Matthews runs Live2Tech from just outside Philadelphia. He is an IT specialist with over 20 years of experience, from a university help desk to small-business IT, IT management and his own consulting practice, and has written tech guides full time since 2020. Steps are checked against the current software on a real device or the maker’s official documentation. More about Kermit.