If a class or project tells you to compile with gcc on Windows, install MSYS2 from msys2.org, add its UCRT64 GCC package with pacman, and put C:\msys64\ucrt64\bin on your PATH; then gcc works in Command Prompt and VS Code.
The steps work on Windows 11 and on recent Windows 10 builds. If your code is meant to run on Linux instead, the next section shows when the other route fits better.
Windows .exe or Linux build: pick the route
The question that decides it is simple: should the programs you build run as normal Windows programs, or on Linux?
| MSYS2 (UCRT64) | WSL (Ubuntu) | |
|---|---|---|
| What you get | GCC that builds Windows .exe files | Linux GCC inside a Linux environment |
| Programs run | Directly in Windows, like any app | Inside WSL, not as Windows .exe files |
| Good for | Classes and projects that expect gcc on Windows, VS Code on Windows | Code meant for Linux servers, Linux-only libraries and tools |
| Windows needed | 64-bit Windows 10 version 1809 or newer, or Windows 11 | Windows 10 version 2004 (build 19041) or newer, or Windows 11 |
| Package tool | pacman |
apt |
Two examples. A student whose course says “compile with gcc and submit the .exe” wants MSYS2. A developer writing a tool that will run on a Linux web server wants WSL, so the build matches the target system.
Not sure? Start with MSYS2. You can add WSL later, and the two don’t interfere as long as you keep their folders straight on your PATH. If you need Microsoft’s own compiler (MSVC) for Visual Studio projects instead, that’s a different toolchain; installing C++ on Windows 10 covers that route.
A note for Windows 10: Microsoft says support for Windows 10 ended on October 14, 2025, and it no longer provides free software updates from Windows Update, technical assistance or security fixes. Both routes still install on supported Windows 10 builds, but Windows 11 is the safer long-term base.
Install MSYS2 and the GCC package
MSYS2 is a set of tools and a package manager for Windows. It provides GCC builds from the mingw-w64 project, which supplies the headers and libraries GCC needs to make native Windows programs. The GCC project itself doesn’t publish Windows downloads; its binaries page points Windows users to Cygwin and mingw-w64 and notes that it doesn’t create or support those builds.
- Go to msys2.org and download the installer for your PC (an x86_64 build, plus an ARM64 build for ARM PCs).
- Run it. Microsoft Defender SmartScreen may warn about it. MSYS2’s installer page says the warning is expected and that you can select More info and then Run anyway; only do this for the installer you downloaded from msys2.org.
- Keep the default installation folder, C:\msys64. MSYS2’s installer page recommends a short path made of plain ASCII characters on an NTFS drive.
- On the last screen, leave Run MSYS2 now checked and select Finish. A terminal for the UCRT64 environment opens.
- Bring the base system up to date by running
pacman -Suy. If pacman says all MSYS2 processes including this terminal will be closed, confirm with Y, then open MSYS2 UCRT64 from the Start menu and runpacman -Suyagain until it reports nothing to do. - Install GCC with
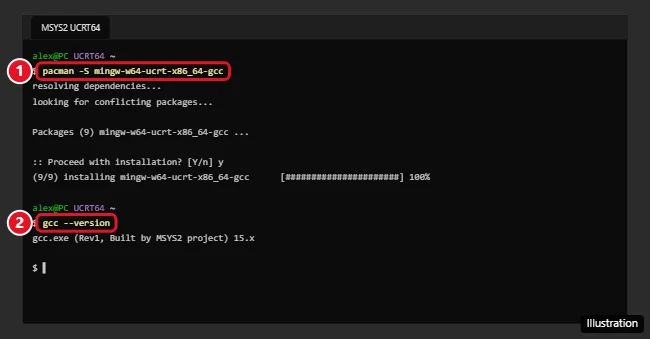
pacman -S mingw-w64-ucrt-x86_64-gcc. Press Enter at the prompt Proceed with installation? [Y/n]. - Check it with
gcc --version. The first line names the GCC version and says it was built by the MSYS2 project.
Want the debugger and the usual build helpers too? Visual Studio Code’s setup docs use pacman -S --needed base-devel mingw-w64-ucrt-x86_64-toolchain. Press Enter to accept the default set of packages in the toolchain group, then Y. This adds g++ and gdb alongside gcc.
Updating later: MSYS2 updates GCC with everything else when you run pacman -Suy in the UCRT64 shell, so there’s no separate installer to download again.
UCRT64, MINGW64 and the other shells
The Start menu gains several MSYS2 shortcuts. Each opens a different environment, and packages installed for one don’t appear in the others. MSYS2’s environments page says that if you’re unsure, go with UCRT64: it uses GCC with Microsoft’s Universal C Runtime (UCRT) and keeps its files under C:\msys64\ucrt64. That’s why the package name contains ucrt and why the PATH entry below points to the ucrt64 folder. MINGW64 uses the older MSVCRT runtime, and the plain MSYS shell holds MSYS2’s Unix-like tools.
The mingw-w64 project’s downloads page lists several other pre-built toolchains. This walkthrough sticks to MSYS2 because it installs and updates GCC through one package manager.
Make gcc work outside the MSYS2 window
Inside the UCRT64 terminal, gcc already works. To use it from Command Prompt, PowerShell or VS Code, add its folder to your Windows PATH. These steps follow Microsoft’s VS Code documentation and work on Windows 11 and Windows 10:
- In the Windows search box, search for Edit environment variables for your account and open it.
- Under User variables, select Path and select Edit.
- Select New and enter C:\msys64\ucrt64\bin (change it if you installed MSYS2 somewhere else).
- Select OK, then OK again in the Environment Variables window.
- Close any open terminals. Open a new Command Prompt and run
gcc --version,g++ --versionandgdb --version.
Terminals read PATH only when they start, which is why an old window still says gcc isn’t found. A user PATH entry affects only your account; that’s enough for most people and doesn’t need administrator rights. The same PATH editing comes up for other languages, as in setting up Java and PATH on Windows 11.
Confirm with a short C program
- Create a folder such as C:\code\hello and a file in it named hello.c containing:
#include <stdio.h>
int main(void) { printf("Hello from GCC\n"); return 0; } - Open a new Command Prompt, go to the folder with
cd C:\code\hello, and rungcc hello.c -o hello.exe. - Run
hello.exe. You should see Hello from GCC.
For C++, save the file as hello.cpp and use g++ hello.cpp -o hello.exe.
Install GCC in WSL instead
Use this route if your code targets Linux. Microsoft’s WSL installation page describes one command:
- Right-click PowerShell and choose Run as administrator.
- Run
wsl --install. It turns on the features WSL needs and installs the Ubuntu distribution. - Restart the PC when asked.
- Open Ubuntu from the Start menu and create a Linux user name and password when prompted. They’re separate from your Windows account.
- Update the package lists with
sudo apt-get update. - Install the compiler tools and debugger with
sudo apt-get install build-essential gdb. VS Code’s WSL docs note these tools aren’t installed on Ubuntu by default. - Confirm with
whereis g++andgcc --version.
Programs you build here are Linux programs. They run inside WSL, not as Windows .exe files. For more on WSL itself, see installing and using WSL on Windows 11, or, on Windows 10, the ways to run Linux on Windows 10.
Use the compiler from VS Code
VS Code is an editor, not a compiler; it calls the GCC you installed. Microsoft’s GCC with MinGW-w64 guide describes this flow:
- Install VS Code, open the Extensions view (Ctrl + Shift + X), search for C++, and install the C/C++ extension from Microsoft.
- Make sure the PATH step above is done, then restart VS Code so it sees the new PATH.
- Open your project folder and a .c or .cpp file.
- Select the play button in the top-right corner of the editor and choose Run C/C++ File or Debug C/C++ File.
- From the list of detected compilers, choose C/C++: g++.exe build and debug active file (or the gcc.exe entry for C).
VS Code saves that choice in your project’s settings, so later runs skip the question. If you write code inside WSL, VS Code has a separate WSL setup; its C++ in WSL guide covers it. Long lines in the editor are easier to read with word wrap turned on in VS Code.
Fix “gcc is not recognized” and other errors
- “gcc is not recognized as an internal or external command”: the PATH entry is missing or mistyped, or the terminal was open before you changed PATH. Recheck the folder name, then open a new terminal.
- The wrong gcc runs: another compiler folder appears earlier in PATH. Run
where gccin Command Prompt to see every copy Windows finds, in order, and remove or move down the old entry. - gcc works but gdb doesn’t: VS Code’s docs say to install the missing packages; the toolchain command above includes gdb. A VS Code message that the miDebuggerPath is invalid means the same thing.
- pacman can’t find the package: check you’re in the UCRT64 shell and that the package name starts with mingw-w64-ucrt-x86_64. Run
pacman -Suyfirst if MSYS2 hasn’t been updated in a while. - Antivirus flags or deletes your new .exe: freshly compiled programs sometimes trigger warnings. If you trust your code, exclude only the project folder, as shown in adding an exclusion to Windows Defender.
- The WSL install fails: check that Windows meets the version requirement in the table, then follow the troubleshooting links on Microsoft’s WSL page.
Prefer a walkthrough focused only on Windows 10? See installing GCC on Windows 10. Otherwise, your next step is to open the hello.c test above in VS Code and run it with the play button.

Kermit Matthews runs Live2Tech from just outside Philadelphia. He is an IT specialist with over 20 years of experience, from a university help desk to small-business IT, IT management and his own consulting practice, and has written tech guides full time since 2020. Steps are checked against the current software on a real device or the maker’s official documentation. More about Kermit.