Whether you are new to Windows 7, or you have just only had a few occasions to dive into it, there is no doubting that it is one of Microsoft’s best versions of their operating system. But users coming over from Windows XP will find that a lot of things have changed, some of which can be very important, depending upon how you are accustomed to using your computer. Fortunately most of the little new quirks can be fixed with a simple setting change, so continue reading below to find out about some of the more helpful menus in Windows 7.
Why Are Some of My Files Hidden?
Perhaps one of the biggest reasons you will encounter this problem is because you need to access something in your AppData folder. Windows 7 hides this folder by default, which can make it a little tricky to locate. But, by telling Windows 7 to show your hidden folders, you can gain access to your AppData folder and locate the files that you need.
Step 1: Click the Windows Explorer file folder icon in the taskbar at the bottom of your screen.

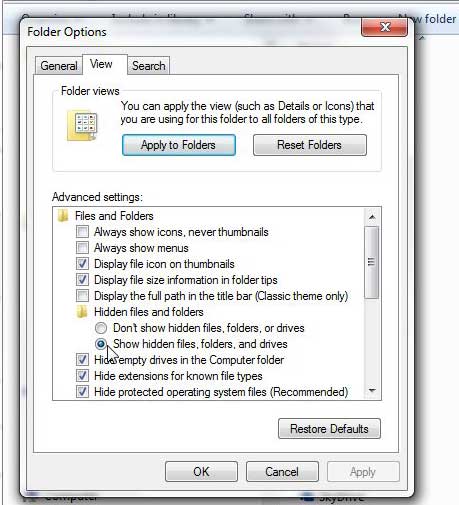
Step 2: Click Organize at the top-left corner of the window, then click Folder and Search Options. This is going to open the Folder Options window.
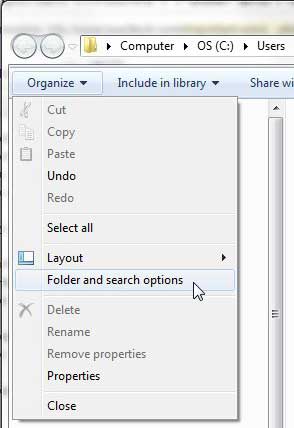
Step 3: Click the View tab at the top of the window, then check the option to the left of Show hidden files, folders and drives.
Step 4: Click the Apply button, then click the OK button and you will be able to find the hidden folder or file for which you had previously been searching.
While we are in this menu, let’s take a look at one other important setting that you may want to enable.
Displaying File Name Extensions in Windows 7
If you work with a lot of documents, spreadsheets or, especially, images, then you know how important it can be to have the right type of file. This is particularly true if you use the same file name for various versions of a certain file, such as a Photoshop, PDF or JPEG version of an image. While Windows 7 does show some file icons with your file name, it might not be good enough for someone that wants to ensure that they are opening, sharing or editing the correct version of a file. So continue reading below to see how to start showing file extensions with all of your files in Windows 7.
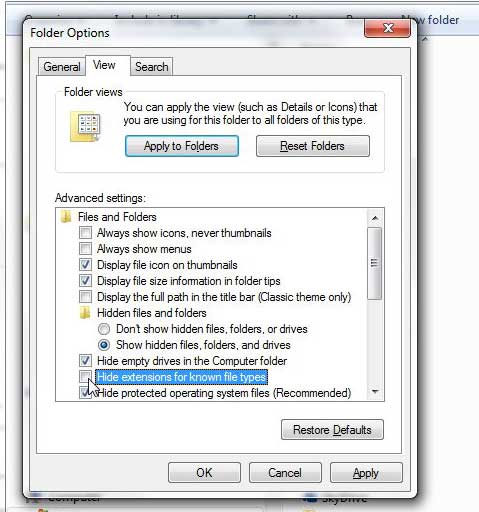
If you have closed out of the  Folder Options window that we opened in the previous section, you can read the first three steps in the section above to return to that menu.
Now all you need to do is check the box to the left of Hide extensions for known file types to clear the check mark, then click the Apply button, followed by the OK button at the bottom of the window.
With these two crucial elements taken care of, you will now be able to see all of your file types and hidden objects in the various folders on your computer.
But you might not like how the files in the folder are displayed, so you can change how the files and folders are listed to improve your usage experience.
Change Windows 7 File View
This is a point where personal preference is going to dictate your choice. I personally like to see as many files in my folder as possible, so i choose the List view option for my folders. However, I also tend to keep a lot of files in each of my folders. But if you only keep a few files in each folder and would prefer to see larger icons and previews of your files, you might opt for the Extra Large Icons option. regardless of your preference, you can follow these easy steps to choose the preferred view for a folder, then, as an added bonus, we will show you how to apply this setting as the default view for all of the folders on your computer.
Step 1: Open any folder.
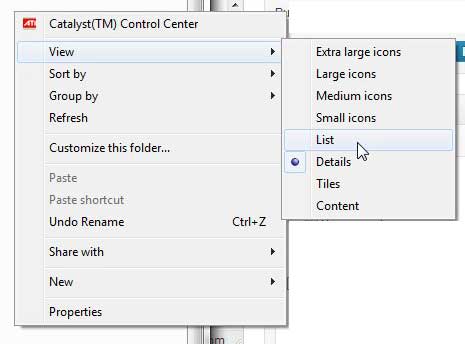
Step 2: Right-click in an open area inside the folder to display the shortcut menu. If you see the View option in the shortcut menu, then you are clicking in the correct spot.
Step 3: Click View, then choose the viewing option that you prefer.
The following steps will only apply if you want to use this setting as the default for the rest of your folders.
Step 4: Click the Organize option at the top-left corner of the window again, then click  Folder and Search Options.
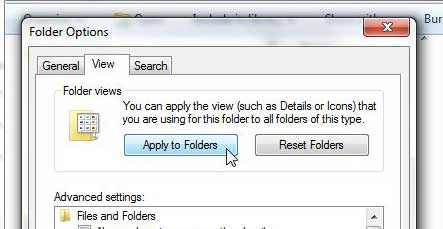
Step 5: Click the View tab at the top of the window, then click the Apply to Folders button at the top of the window.
Step 6: Click the Yes button in the pop up window.
Click the OK button to close the Folder Options window.
These are just a few of the options available to you for customizing the way that your files and folders are displayed in Windows 7, so experiment with the other options in this menu to improve your experience with Windows 7 even more.

Kermit Matthews is a freelance writer based in Philadelphia, Pennsylvania with more than a decade of experience writing technology guides. He has a Bachelor’s and Master’s degree in Computer Science and has spent much of his professional career in IT management.
He specializes in writing content about iPhones, Android devices, Microsoft Office, and many other popular applications and devices.
