Goodnotes can back up your notebooks to Google Drive automatically, so you have a copy of every notebook outside iCloud that you can open on any device, including Windows PCs and Android phones. This is a one-way backup, not two-way sync: files go from Goodnotes to Drive, but edits made in Drive don’t come back. This guide shows how to set it up in Goodnotes on iPad, iPhone and Mac, how to export individual notebooks, and how to restore from the backup.
Quick Answer
In Goodnotes, open Settings (gear icon) > Auto-backup, turn Auto-backup on, choose Google Drive, and sign in to your Google account. Pick PDF or Goodnotes as the file format. Goodnotes creates a Goodnotes folder in your Drive and keeps it updated.
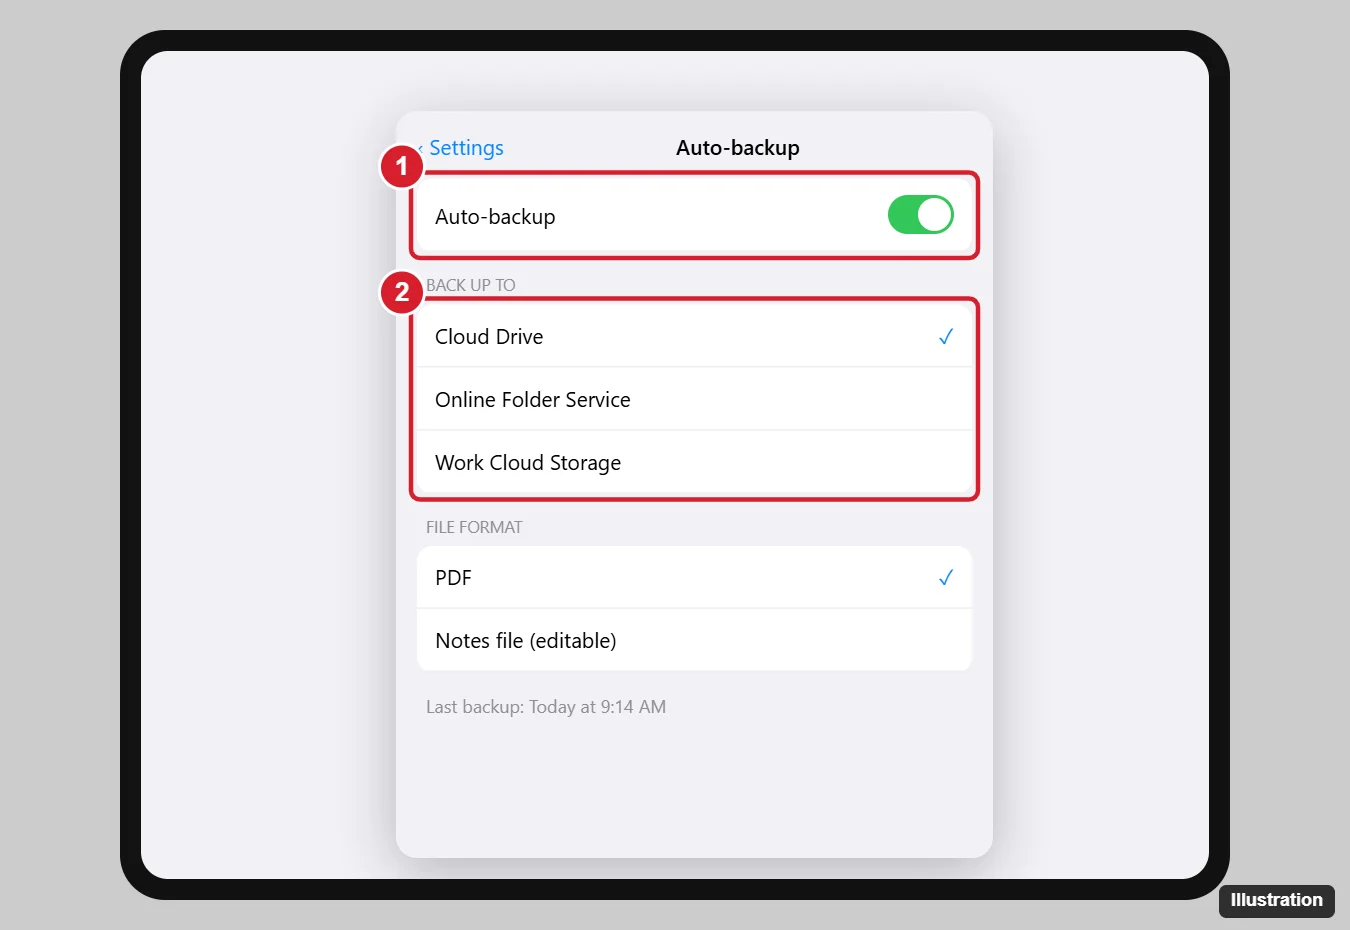
Set Up Auto-backup to Google Drive
- Open Goodnotes and go to the Documents library.
- Tap the Settings (gear) icon.
- Tap Auto-backup (in some versions under Settings > Cloud & Backup).
- Turn on Auto-backup.
- Choose Google Drive and sign in to your Google account when prompted. Allow Goodnotes to access Drive.
- Choose the file format:
- PDF: opens anywhere, but handwriting becomes flat (not editable in Goodnotes).
- Goodnotes (.goodnotes): keeps everything editable for restoring into Goodnotes.
Goodnotes backs up new and changed notebooks automatically when the app is open and connected to the internet. The first backup can take a while if you have many notebooks.
Export a Single Notebook to Google Drive
- In the library, tap the ⋯ or arrow below a notebook (or open it and tap the Share icon).
- Choose Export and pick PDF, Goodnotes or an image format.
- In the share sheet, choose Drive (requires the Google Drive app) or Save to Files > Drive.
Open Your Backups on Other Devices
- Open drive.google.com on any computer and find the Goodnotes folder.
- PDF backups open in any PDF viewer or browser.
- To edit notes on Windows or Android, Goodnotes also offers apps for those platforms (with feature and subscription differences); see our guide to syncing Goodnotes between iPad and Windows.
Restore Notebooks From Google Drive
- In Goodnotes, tap + New > Import.
- Browse to Drive (enable it under Locations in the Files browser if needed).
- Select the .goodnotes file to restore a fully editable notebook, or a PDF to import it as a PDF.
Auto-backup vs. iCloud Sync
| iCloud sync | Auto-backup to Drive | |
|---|---|---|
| Direction | Two-way between your Apple devices | One-way copy to Drive |
| Edit on another device | Yes, in Goodnotes | No (backup only) |
| Access from Windows or Android | No | Yes, as files |
| Protects against | Device loss | Device loss and iCloud problems |
Using both gives you the best protection.
Troubleshooting
- Backup not updating: open Goodnotes and leave it open on Wi-Fi for a few minutes. Check that you’re still signed in under Auto-backup.
- Google sign-in fails: sign out of Google in Auto-backup and sign in again; for work or school accounts, your admin may block third-party access.
- Drive storage full: free up Google storage or switch to PDF format, which is often smaller for text-heavy notebooks.
- Duplicate folders: changing the backup format or service can create a new folder. Remove old backups after confirming the new one is complete.
Frequently Asked Questions
Does Google Drive backup cost extra?
Auto-backup is included in Goodnotes. Google gives 15 GB free shared across Gmail, Drive and Photos.
Can I back up to OneDrive or Dropbox instead?
Yes. Auto-backup also supports other cloud services; choose the one you prefer.
Are my backups private?
They’re stored in your own Google Drive and visible only to people you share them with.
Summary
- Goodnotes > Settings > Auto-backup.
- Turn it on and choose Google Drive.
- Pick PDF or Goodnotes format.
- Restore with + New > Import from Drive.

Kermit Matthews is a freelance writer based in Philadelphia, Pennsylvania with more than a decade of experience writing technology guides. He has a Bachelor’s and Master’s degree in Computer Science and has spent much of his professional career in IT management.
He specializes in writing content about iPhones, Android devices, Microsoft Office, and many other popular applications and devices.