If Windows started misbehaving after a driver, update, or app install, System Restore can roll system files, settings, drivers, and installed programs back to an earlier date, without touching your personal files. This guide shows how to restore Windows 11 or 10 to a previous date, what gets undone, how to use System Restore when Windows won’t start, how to undo a restore, and how to make sure restore points exist before you need them.
Quick Answer
Press Windows + R, type rstrui, and press Enter. Click Next, choose a restore point from before the problem started, and optionally click Scan for affected programs. Then click Next > Finish. The PC restarts and restores, which usually takes 10 to 30 minutes.
What System Restore Does and Doesn’t Change
| Changed (rolled back) | Not changed |
|---|---|
| Installed programs and drivers added after the restore point (removed) | Documents, photos, music, and other personal files |
| Windows system files and registry settings | Emails and browser data stored in your user folders |
| Some Windows updates | Files on other drives |
System Restore isn’t a backup. It won’t recover deleted personal files, so use File History, OneDrive, or a backup drive for those.
Method 1: Restore From Windows
- Save your work and close apps.
- Press Windows + R, type
rstrui, and press Enter. You can also search Start for Create a restore point and click System Restore. - Click Next. Windows may suggest the most recent point. Choose Choose a different restore point to see all of them.
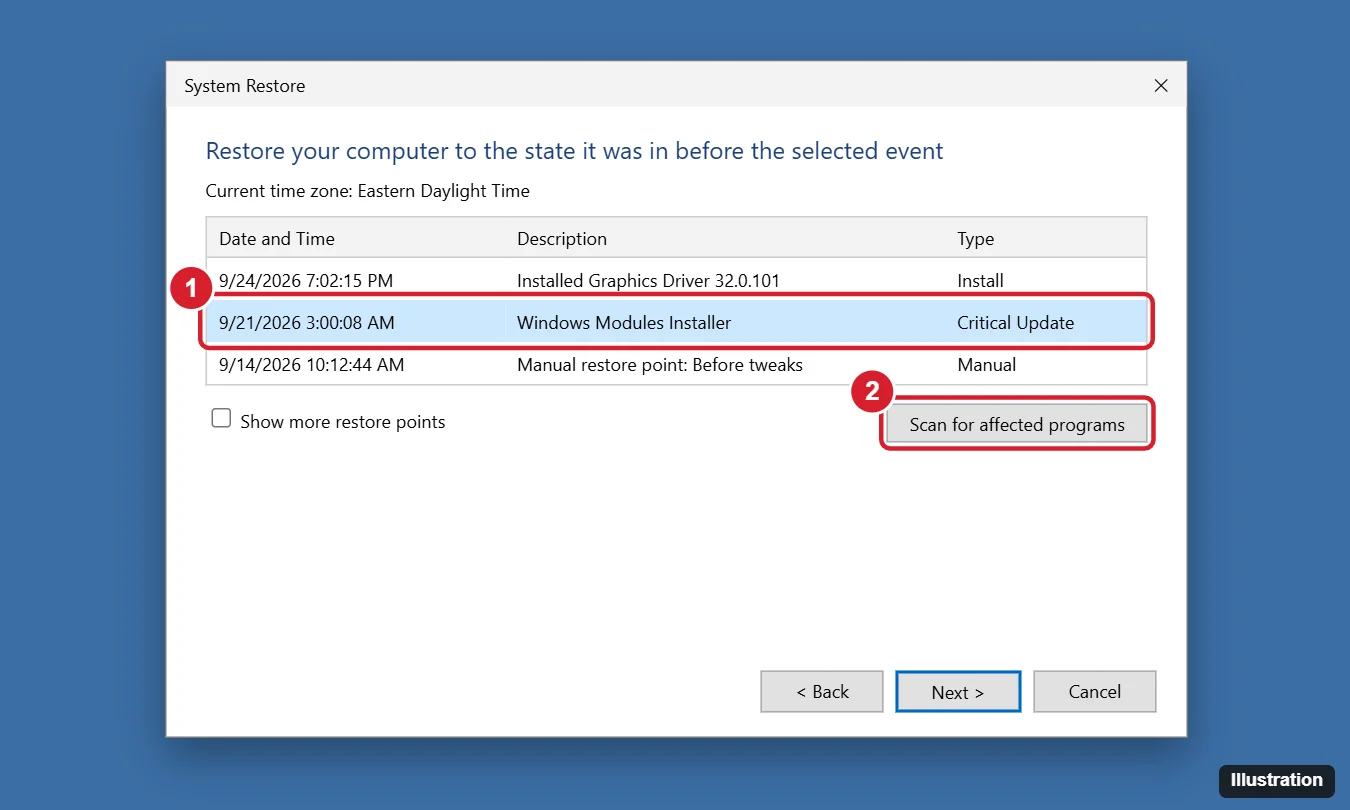
- Check Show more restore points if needed, and select one dated before the problem began.
- Click Scan for affected programs to see which apps and drivers will be removed or restored.
- Click Next, then Finish, and confirm.
Don’t interrupt the process. When Windows restarts, a message confirms that System Restore completed successfully.
Method 2: Restore When Windows Won’t Start
- Turn the PC on and off during startup two or three times to trigger Automatic Repair, or boot from a Windows installation USB and choose Repair your computer.
- Choose Advanced options > Troubleshoot > Advanced options > System Restore.
- Select your account and enter its password if asked.
- Pick a restore point and follow the prompts.
A restore started from recovery mode can’t be undone, so choose carefully.
Undo a System Restore
If things got worse, run rstrui again and choose Undo System Restore. Windows creates a restore point automatically before each restore.
No Restore Points? Turn On System Protection
- Search Start for Create a restore point and open it.
- Select your system drive (C:) and click Configure.
- Choose Turn on system protection and set the Max Usage to about 5 to 10% of the drive. Click OK.
- Click Create to make a restore point now, and give it a name.
Windows creates restore points automatically before updates and driver installs once protection is on. Create a manual one before big changes.
Related: How to Open Registry Editor in Windows 11.
Troubleshooting
“System Restore did not complete successfully”
Try another restore point. Temporarily disable third-party antivirus, or run System Restore from Safe Mode or the recovery environment. Running sfc /scannow first can also help.
The restore point I need is missing
Older points are deleted when the space limit is reached, and major Windows upgrades can remove them. Increase Max Usage for the future.
An app no longer works after restoring
Apps installed after the restore point were removed. Reinstall them.
Frequently Asked Questions
Will System Restore delete my files?
No. Personal files aren’t affected. Only system files, settings, drivers, and programs are rolled back.
How far back can I go?
As far as your oldest available restore point, which depends on the disk space set for System Protection.
Can System Restore remove viruses?
It may undo some changes, but it isn’t a reliable malware removal tool. Run a full scan with Windows Security.
Summary
- Run
rstrui, and pick a restore point from before the problem. - Scan for affected programs, then click Finish.
- Use the recovery environment if Windows won’t start.
- Undo the restore if needed, and keep System Protection turned on.

Kermit Matthews is a freelance writer based in Philadelphia, Pennsylvania with more than a decade of experience writing technology guides. He has a Bachelor’s and Master’s degree in Computer Science and has spent much of his professional career in IT management.
He specializes in writing content about iPhones, Android devices, Microsoft Office, and many other popular applications and devices.