The ability to add a page border in Microsoft Word can be useful when you are designing something like a document or newsletter. But if you have previously only use Word to create normal documents, then you may not be accustomed to using options such as the border tool in Word.
Microsoft Word provides you with the ability to customize many of your document’s settings. Among these customization options is the ability to add borders to the document. You can then adjust the borders and shading settings for your Word document to achieve the border style that you want to include in your page layout.
Our tutorial below is going to show you where to find the page border settings in Microsoft Word so that you can apply them to your document. You will even be able to use the drop-down menus found on this settings page to really customize the way that you border looks.
How to Insert Border in Word
- Open the document in Microsoft Word.
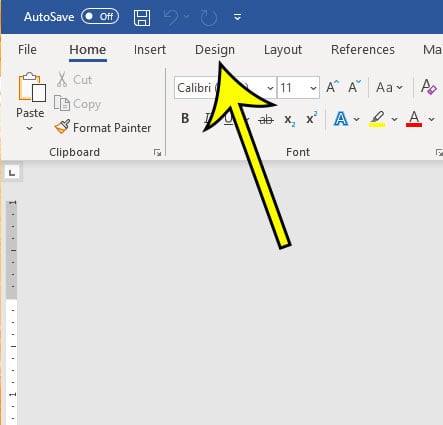
- Select the Design tab at the top of the window.
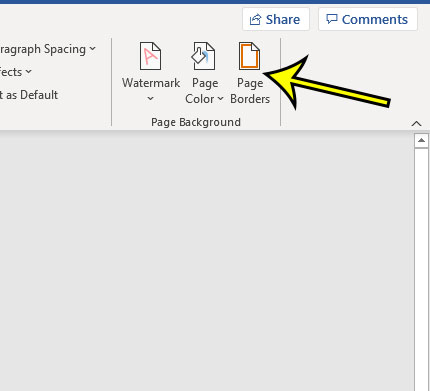
- Click the Page Borders button in the Page Background section of the ribbon.
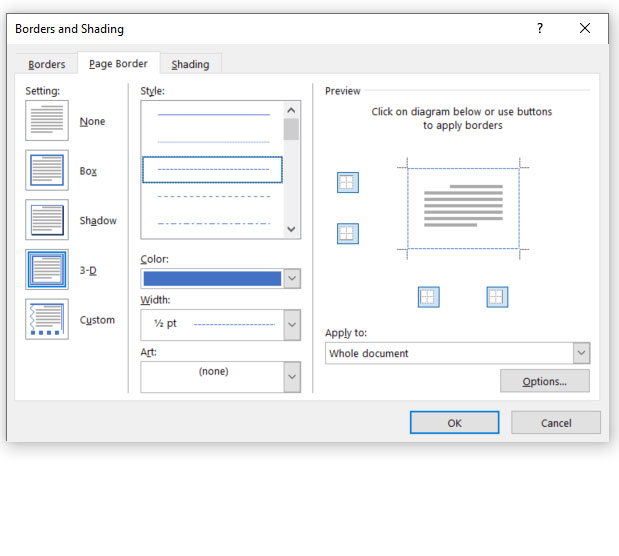
- Adjust the settings on this menu to change the appearance of the page border.
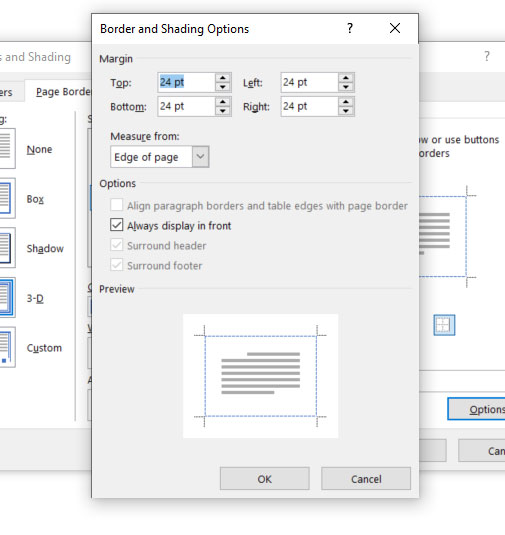
- Click the Options button to change the distance between the edge of the page and the border, then click OK to save the setting.
- Click OK again to add the page border to your document.
Our article continues below with additional information on how to add a page border in Microsoft Word, including pictures of these steps.
How to Adjust Page Borders and Shading Settings in a Microsoft Word Document (Guide with Pictures)
The steps in this article were performed in Microsoft Word for Office 365, but will work in Word documents created using many other versions of Microsoft Office as well. This guide will show you how to create a custom page border that you can apply to your whole document.
Step 1: Open the document to which you would like to add a border around the entire page.
Step 2: Select the Design tab at the top of the window.

Step 3: Click the Page Borders button in the Page Background group of the ribbon.

Step 4: Select the different options for your page borders by clicking the drop-down menus for each setting and navigating the drop-down list until you have the custom border that you want.
The Page Border tab of this menu includes a drop down menu for Style, Color, Width, and Art.

Step 5: Click the OK button to apply the border to the page.
If you need to know more about customizing the page border in Word, then you can continue to the section below.
How to Customize Page Borders in Microsoft Word from the Borders and Shading Dialog Box
Note that there is an Options button at the bottom-right of the Borders and Shading window. If you click that button you can adjust the distance of the border from the edge of the page.

Additionally there is an Always display in front option on this menu that, if checked, will ensure that the border displays above any page background that you might have applied to the Word document.
Additional Notes on Adding a Page Border to a Word Document
- There is a Shading dialog box to the right of the Page Border tab at the top of the Borders and Shading window where you can elect to add shading to your paragraphs.
- By default the page border is applied to the whole document.
- You can choose which pages of your document you want to include the page border by clicking the Apply to drop down menu at the bottom-right of the window. This lets you do things like apply the border to the first page only, or apply it to all but the first page. The ability to add a border to a page, rather than an entire Word document, can come in handy when you are customizing a title page in Microsoft Word, for example.
- You can also apply borders to a text box, if you so choose. Simply click inside the text box then select the Shape Outline option in the Shape Styles section of the ribbon found on the Format tab.
- The border style can be customized in many ways, such as selecting the Art drop-down list and choosing a clip art option from there.
Find out how to add a border to a picture in Word if you would also like to include borders around the images in your document.
More Information

Kermit Matthews is a freelance writer based in Philadelphia, Pennsylvania with more than a decade of experience writing technology guides. He has a Bachelor’s and Master’s degree in Computer Science and has spent much of his professional career in IT management.
He specializes in writing content about iPhones, Android devices, Microsoft Office, and many other popular applications and devices.