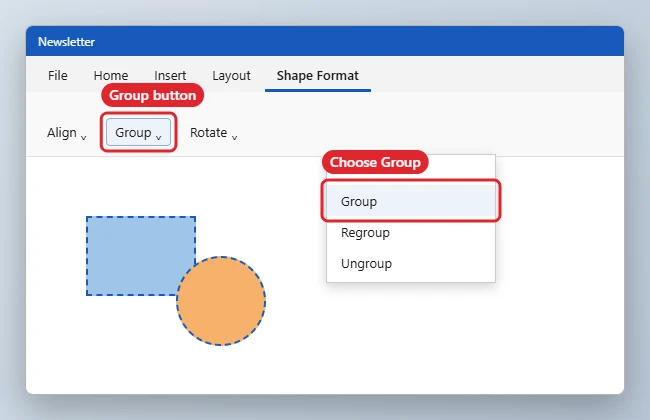
Grouping objects in Word turns several shapes, text boxes, icons, or pictures into one unit, so you can move, resize, or copy a diagram without knocking its pieces out of line. Hold Shift or Ctrl and click each object, then go to Shape Format (or Picture Format), click Group, and choose Group. To separate them later, choose Ungroup from the same menu. It works in Word for Microsoft 365, Word 2021, and older desktop versions.
How to Group Objects in Word
- Make sure every picture uses a wrapping style other than In Line with Text. Select the picture, click Wrap Text, and choose Square or In Front of Text.
- Click the first object, then hold Shift or Ctrl and click each of the others.
- Open the Shape Format tab (Picture Format if you only selected pictures).
- Click Group in the Arrange group and choose Group.
- Drag or resize the group as one object. Click a single item inside it if you need to edit just that piece.
Does grouping change the size of the objects?
No. Each object keeps its size until you resize the whole group, which scales everything together.
Group Menu Options
| Command | What it does |
|---|---|
| Group | Combines the selected objects into one |
| Ungroup | Splits a group back into separate objects |
| Regroup | Rebuilds the last group you ungrouped |
| Selection Pane | Lists objects so you can pick hidden or stacked ones |
If Group Is Greyed Out or Won’t Work
- Group is greyed out: one of the objects is probably in line with text. Change its wrapping, then try again.
- You cannot click an object behind another: open Home, Select, Selection Pane and pick it from the list.
- Grouping pictures with shapes may not work in older versions; insert them into a drawing canvas first (Insert, Shapes, New Drawing Canvas).
- Grouping is handy for diagrams like the one in how to make a spider diagram in Word.

Kermit Matthews runs Live2Tech from just outside Philadelphia. He is an IT specialist with over 20 years of experience, from a university help desk to small-business IT, IT management and his own consulting practice, and has written tech guides full time since 2020. Steps are checked against the current software on a real device or the maker’s official documentation. More about Kermit.