Formatting a PC and reinstalling Windows 10 from a USB drive, often called a clean install, wipes the system drive and starts over with a fresh copy of Windows. Back up your files, then on a working PC use Microsoft’s Windows 10 download page to create an 8 GB or larger USB installer. Boot the PC from it with the boot menu key, click Install now > Custom: Install Windows only, delete the partitions on the Windows drive, select the Unallocated Space, and click Next.
Before You Start
- This erases everything on the drive you install to: files, apps, and settings. Back up documents, photos, browser bookmarks, and saved passwords to an external drive or cloud storage.
- Windows 10 support ended in October 2025. A fresh Windows 10 install won’t get regular security updates unless you’re enrolled in Extended Security Updates. If your PC meets the requirements, consider installing Windows 11 with the same steps instead.
- Activation: if Windows 10 was activated on this PC before, it usually reactivates automatically with its digital license. Choose I don’t have a product key during setup. Linking your license to a Microsoft account beforehand helps.
- Drivers: download your network (Wi-Fi) driver from the PC maker’s website onto a second USB drive, in case Windows doesn’t include it.
- BitLocker: if the drive is encrypted, save your recovery key first.
No-USB Alternative: Reset This PC
If Windows still starts, Settings > Update & Security > Recovery > Reset this PC, with Remove everything and Cloud download, gives almost the same result without a USB drive. Turn on Clean data if you’re giving the PC away. Use the USB method when Windows won’t start, the recovery partition is damaged, or you want to change partitions.
Step 1: Create the Windows 10 USB Installer
- On any working PC, go to Microsoft’s official Download Windows 10 page.
- Download the Media Creation Tool, if it’s offered, and run it. Accept the license terms.
- Choose Create installation media (USB flash drive, DVD, or ISO file) for another PC.
- Pick the language, edition, and architecture (64-bit for almost all PCs).
- Choose USB flash drive, select your 8 GB or larger USB drive, and click Next. Everything on the USB drive is erased.
- Wait for the download and USB creation to finish.
Microsoft has changed what the Windows 10 download page offers since end of support. If the tool isn’t available or fails, download the official ISO if offered and write it to USB with a tool such as Rufus. If the PC qualifies, create Windows 11 media instead.
Step 2: Boot the PC from the USB Drive
- Plug the USB drive into the PC you want to format.
- Restart it and immediately press the boot menu key repeatedly.
- Choose the USB drive (it may be listed as “UEFI: USB…” or by brand).
| PC brand | Common boot menu key |
|---|---|
| Dell | F12 |
| HP | Esc, then F9 |
| Lenovo | F12 (or the Novo button) |
| ASUS | Esc or F8 |
| Acer | F12 (enable it in BIOS if needed) |
| MSI | F11 |
From Windows, you can also hold Shift while clicking Restart, then choose Use a device > your USB drive.
Step 3: Install Windows 10 and Format the Drive
- Choose your language, time, and keyboard, then click Next > Install now.
- On the activation screen, click I don’t have a product key if Windows was activated on this PC before. Otherwise, enter your key.
- Choose the edition your PC is licensed for (usually Home or Pro) and accept the license.
- Choose Custom: Install Windows only (advanced).
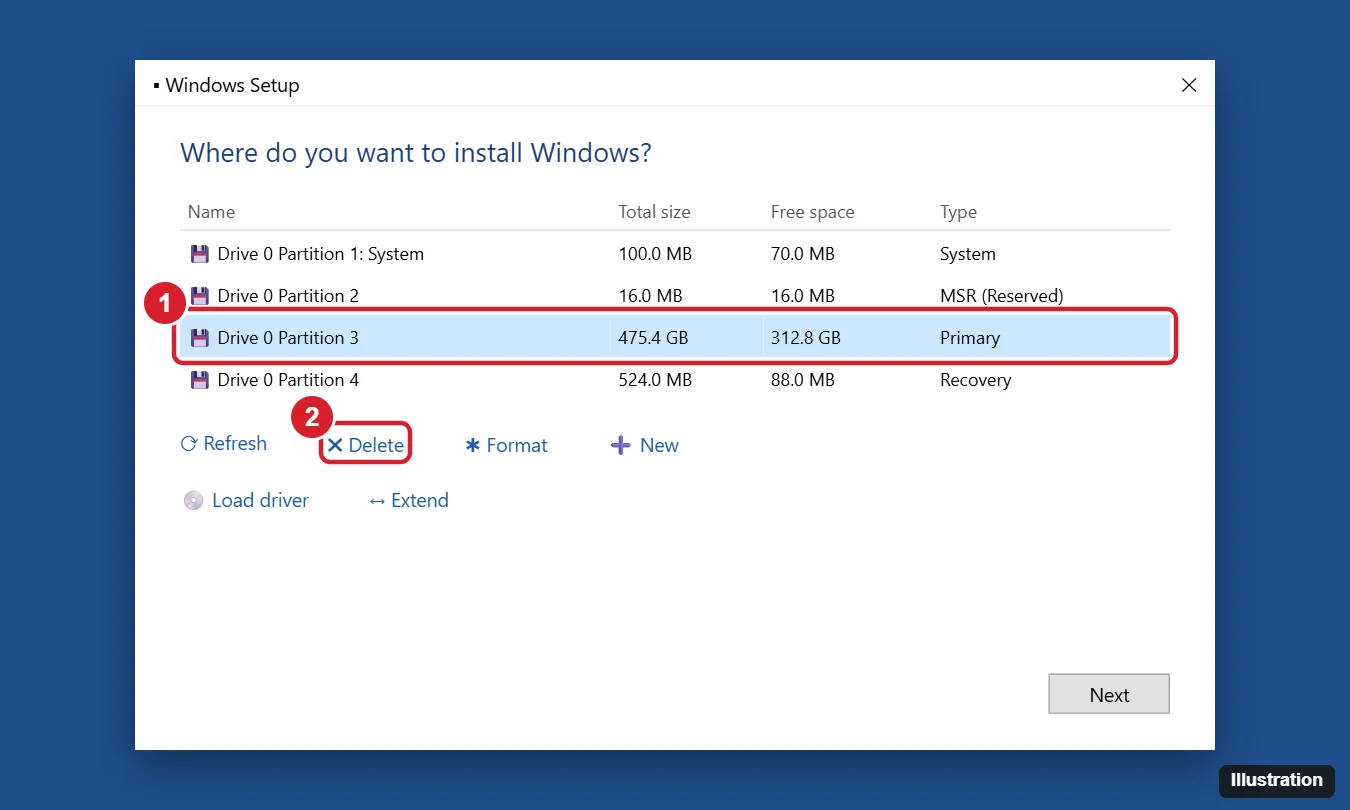
- Select each partition on the Windows drive (usually Drive 0) and click Delete, until only Drive 0 Unallocated Space remains. Don’t delete partitions on other drives that hold data you want to keep.
- Select the unallocated space and click Next. Setup creates the partitions it needs and formats them.
- The PC restarts several times. Remove the USB drive when you reach the region selection screen, if it keeps booting to Setup.
How long does a clean install take?
Creating the USB takes 20 to 60 minutes. The install itself takes 20 to 40 minutes on an SSD, plus time for updates and drivers.
Step 4: Finish Setup
- Choose your region and keyboard, connect to the internet, and sign in with a Microsoft account or set up a local account.
- Choose your privacy settings.
- Run Settings > Update & Security > Windows Update until no more updates appear.
- Install drivers from your PC maker’s support page, especially graphics, chipset, and touchpad drivers.
- Check activation in Settings > Update & Security > Activation.
- Restore your files and reinstall your apps.
Does formatting remove viruses?
Deleting all partitions and reinstalling removes almost all malware. Scan your backup files before restoring them.
When Setup Runs Into Problems
The PC doesn’t boot from the USB
Try another USB port (a rear port on desktops), recreate the USB, and check that UEFI boot is enabled in BIOS. On older PCs, you may need to turn off Secure Boot temporarily, or choose the non-UEFI USB entry.
“Windows cannot be installed to this disk”
Delete all partitions on the drive so it shows as unallocated. For “GPT partition style” errors, boot the USB in UEFI mode. For MBR errors, delete everything and let Setup recreate the partitions.
Setup doesn’t see my drive
Click Load driver and provide the storage driver (often Intel RST or VMD) from the PC maker’s website. Or check the BIOS for a SATA/VMD mode setting.
Windows isn’t activated after install
Make sure you installed the same edition (Home or Pro) that was licensed. Then run the Activation troubleshooter in Settings.
On an HP, tap Esc and then F9 instead; here is how to install Windows 10 on an HP laptop from USB with the HP keys and drivers.

Kermit Matthews runs Live2Tech from just outside Philadelphia. He is an IT specialist with over 20 years of experience, from a university help desk to small-business IT, IT management and his own consulting practice, and has written tech guides full time since 2020. Steps are checked against the current software on a real device or the maker’s official documentation. More about Kermit.