You want your files physically on this PC: maybe you’re going offline, leaving a work or school account, running short of OneDrive storage, or switching OneDrive off. Here’s the rule: Always keep on this device only downloads a copy and leaves everything in OneDrive, while cutting files from the OneDrive folder and pasting them into a local folder takes them off OneDrive. Download first, then move only what should leave the cloud.
What happens to the cloud copy when you copy, move, delete or free up space
Every action you take inside the OneDrive folder in File Explorer syncs. This table shows where the file ends up after each one, based on Microsoft’s Files On-Demand documentation.
| Action | On this PC | In OneDrive (web and other devices) | Use it when |
|---|---|---|---|
| Always keep on this device | Full copy, kept offline | Still there, still syncing | You want offline access but still want OneDrive |
| Copy (Ctrl + C) to a local folder | Independent local copy | Original stays | You want a safety copy before changing anything |
| Cut (Ctrl + X) and paste outside OneDrive | File in the new local folder | Removed | You want the file on the PC only |
| Delete inside the OneDrive folder | In the Recycle Bin if it was downloaded | Gone (sent to the OneDrive recycle bin) | You don’t want the file anywhere |
| Free up space | Placeholder only, downloaded when opened | Still there | You need disk space, not a move |
| Unlink this PC | Downloaded files stay; online-only ones won’t open | Still there | You want syncing to stop on this PC |
Bring everything down first
Downloading before moving avoids half-finished moves and errors when you stop folder backup. Make sure the PC has enough free disk space for everything you plan to keep.
Read the status icons first
Open File Explorer and select your OneDrive folder in the left pane. The Status column, or the small icon on each file, tells you what is stored locally:
- Blue cloud: online-only. Nothing but a placeholder is on the PC, and the file downloads when you open it.
- Green check: locally available. It’s on the PC now, but it can be freed up again later.
- Green circle with a white check: always available. It stays on the PC until you change that.
Anything with a blue cloud has to download before it can live only on this PC. If you can’t see OneDrive in File Explorer at all, see how to add OneDrive to File Explorer in Windows 11.
Download chosen files or folders
- In the OneDrive folder, select the files or folders (press Ctrl + A to select everything in the current folder).
- Right-click the selection and choose Always keep on this device.
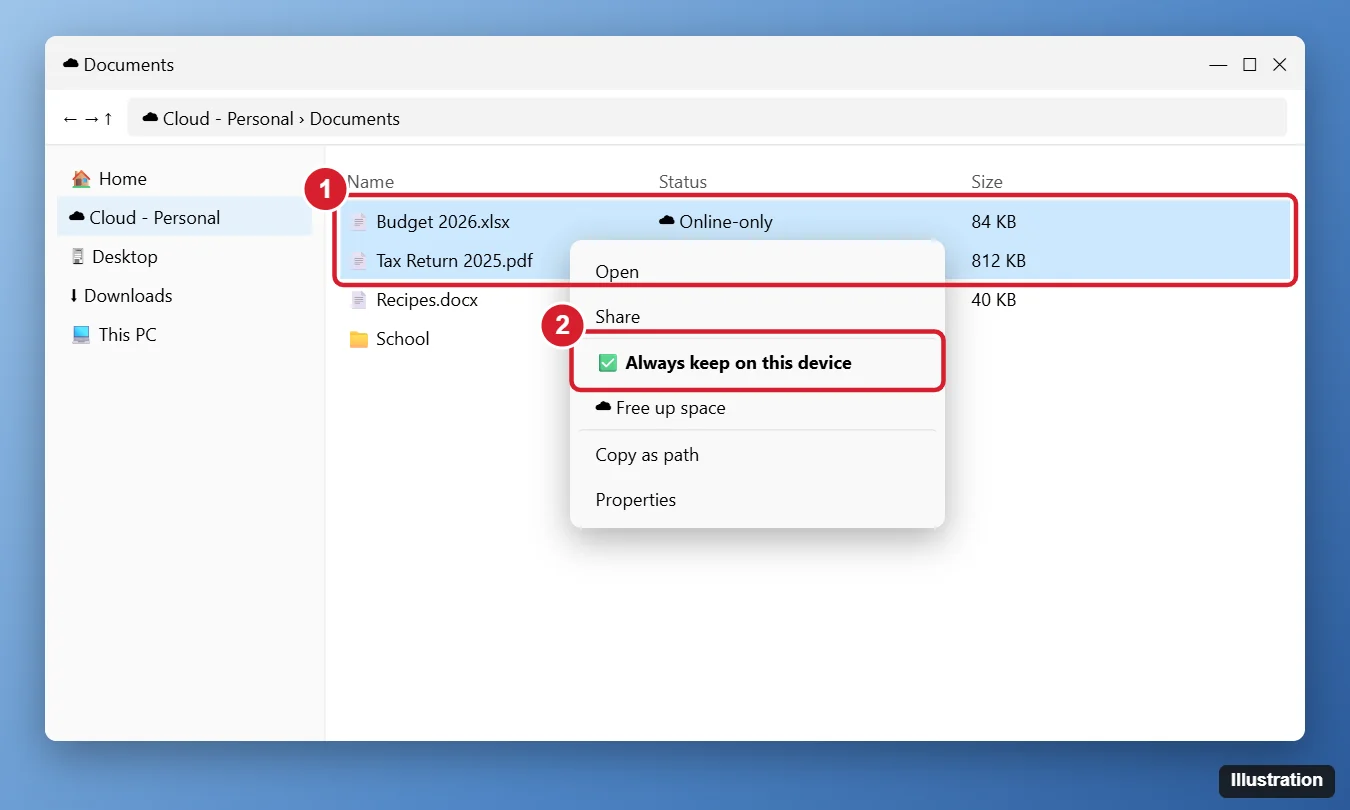
- Wait until every icon changes to the green circle with a white check. Large libraries can take a long time on a slow connection.
After this, the files still appear under OneDrive in File Explorer. That’s expected: the OneDrive folder is a real folder on your PC, and this step only made sure the files inside it are fully downloaded.
Download the whole OneDrive
- Select the OneDrive cloud icon in the taskbar notification area (click the ^ arrow if it’s hidden).
- Select Help & Settings, then Settings.
- Open Sync and backup, then Advanced settings.
- Under Files On-Demand, choose Download all files (the default is Free up disk space) and confirm.
Take Desktop, Documents and Pictures off OneDrive
If OneDrive backs up your Desktop, Documents or Pictures folders, don’t drag them out by hand. Microsoft’s page on backing up folders with OneDrive gives a dedicated option that moves them back to the PC. The same screen also covers Music and Videos if those are backed up.
- Download the folder’s contents first, as above. Online-only files block this step.
- Select the OneDrive cloud icon, then Help & Settings > Settings.
- Open Sync and backup and select Manage backup.
- Turn off the folder you want back on the PC.
- When OneDrive asks what to do with the existing files, pick Keep the files only on my PC, removing them from OneDrive. The other choice, Keep the files only in OneDrive, removing them from your computer, does the opposite, so read both carefully before confirming.
New files you save to that folder afterward stay on the PC. To make apps such as Office save locally too, see how to save files to your PC instead of OneDrive.
Messages you might see when stopping backup
- “Some files couldn’t be moved. Download them first by changing their state to Always keep on this device.”: some files were still online-only. Download them and try again.
- “File is open and cannot be moved”: close the app using that file and try again.
- OneNote notebooks: Microsoft notes they can’t be moved this way. Leave them in OneDrive.
- Manage backup is greyed out on a work or school account: your organization can lock folder backup. Ask your IT team.
Pull chosen files into a regular folder
For anything outside those backed-up folders, move or copy it with File Explorer. The basics of cut, copy and drag are in how to move files in Windows 11.
- Create a destination outside the OneDrive folder, for example a new folder named Local Files under
C:\Users\<name>, or a folder on another drive. - In the OneDrive folder, select the files and press Ctrl + X to move them, or Ctrl + C to copy them.
- Open the destination and press Ctrl + V.
- Wait for File Explorer to finish before closing it, especially with large folders.
For files you can’t afford to lose, copy rather than cut, open a few of the copies, and only then delete the originals from the OneDrive folder. For an external drive, the same steps work with the drive as the destination; for regular backups to that drive, the routine in how to back up files to an external hard drive (written for Windows 10) still applies.
Notes from an iPad app that sync through OneDrive are files like any others. For Goodnotes there is also a direct route, covered in how to sync Goodnotes between iPad and Windows.
Without the sync app
When the sync app isn’t installed, or you only need a few items, download them from the browser:
- Go to onedrive.com and sign in with the account that holds the files.
- Select the files or folders.
- Select Download. A single file downloads as is; several items or a folder arrive as one ZIP file, as Microsoft explains on its page about downloading files and folders from OneDrive.
- Open the Downloads folder, right-click the ZIP and choose Extract All, then move the extracted folder where you want it.
This only copies the files. Everything stays in OneDrive until you delete it on the website. If the PC is short on space, download in smaller batches.
Check the copy before deleting anything
- Right-click the original OneDrive folder and the new local folder, choose Properties, and compare the number of files and folders and the total size.
- Open a few files from the new location, including large ones, to confirm they’re complete rather than placeholders.
- Look in the OneDrive folder for anything still showing a blue cloud; those files weren’t downloaded.
If something is missing, check the OneDrive recycle bin on onedrive.com. Microsoft keeps deleted items there for 30 days on a personal account and 93 days on a work or school account. To undo a folder backup change, turn the folder back on in Manage backup. To undo a manual move, cut the files from the local folder and paste them back into OneDrive.
Moving files off OneDrive also frees cloud storage, which matters on the free plan’s 5 GB. If the PC’s own disk is the problem, see how to get more storage on Windows.
Stop syncing without moving anything
Sometimes the real goal is just to stop OneDrive touching the files for a while. Microsoft’s page on how to cancel or stop sync in OneDrive lists these options:
- Pause syncing: right-click the OneDrive taskbar icon (or open its menu) and choose Pause syncing for 2, 8 or 24 hours.
- Quit OneDrive: from the same menu. Syncing stops until OneDrive starts again.
- Unlink this PC: in OneDrive Settings, open the Account tab and select Unlink this PC. Do this after downloading what you need, because online-only files won’t open once the PC is unlinked.
To go further and pause, unlink or uninstall OneDrive for good, see how to turn off OneDrive on Windows 11, and for removing the app itself, how to remove OneDrive from Windows 11.
Questions before moving OneDrive files
Why isn’t Always keep on this device on the right-click menu?
That option is part of Files On-Demand. If it’s missing, OneDrive is probably set to Download all files, which Microsoft describes as the equivalent of turning Files On-Demand off: every OneDrive file is already stored on the PC, so you can move it straight away. You can check under Sync and backup > Advanced settings in OneDrive Settings.
Next step: if this PC shouldn’t sync anything else, unlink OneDrive now that your files are local.

Kermit Matthews runs Live2Tech from just outside Philadelphia. He is an IT specialist with over 20 years of experience, from a university help desk to small-business IT, IT management and his own consulting practice, and has written tech guides full time since 2020. Steps are checked against the current software on a real device or the maker’s official documentation. More about Kermit.