A presentation full of photos can grow too big to email or upload. The quickest fix in PowerPoint for Windows: select any picture, go to Picture Format > Compress Pictures, clear Apply only to this picture so every picture shrinks, decide whether to Delete cropped areas of pictures, pick a resolution and select OK.
Compress every picture in a presentation
These steps are for PowerPoint for Microsoft 365 on Windows and also match PowerPoint 2024, 2021, 2019 and 2016. Before you start, consider saving a copy of the file under a new name (File > Save As). The copy keeps your full-size originals in case the smaller version looks too soft on a big screen.
- Open the presentation and select a picture on any slide. If you only want to shrink one picture, select that specific picture. The Picture Format tab appears on the ribbon only while a picture is selected; if you do not see it, double-click the picture.

Older PowerPoint version shown (the tab was called Format under Picture Tools); current screens look different. - On the Picture Format tab, select Compress Pictures in the Adjust group. On a narrow window the button may show only its icon without a label.
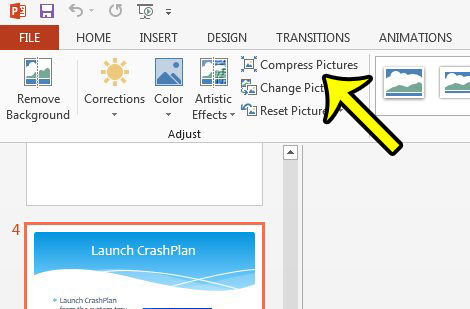
Older PowerPoint version shown; current screens look different. - Under Compression options, clear Apply only to this picture to compress all pictures in the presentation. Leave it checked to change only the selected picture.
- Decide on Delete cropped areas of pictures. When checked, the parts you cropped away are thrown out for good (more on that below).
- Under Resolution, choose a resolution, then select OK.

Older PowerPoint version shown (the list was called Target output); current screens look different. - Save the presentation. The compression is applied when the dialog closes, and the smaller file size shows up once you save.
Microsoft’s guide to reducing picture file size in Office adds two details worth knowing. Clearing Apply only to this picture overrides any earlier compression you set on individual pictures. And if the result looks worse than you hoped, you can undo it straight away with Ctrl+Z.
Pick a resolution for how the deck will be used
Resolution is measured in ppi (pixels per inch). Lower numbers mean smaller files and less detail. Microsoft’s file-size advice for PowerPoint is a resolution of 150 ppi or lower, while High fidelity keeps pictures at their original quality, and Use default resolution follows the file’s own setting (see the next sections). Pick the lowest option that still looks sharp where the deck will be shown: a copy for email or on-screen reading can go lower than one that will be projected or printed. If the result looks too soft, press Ctrl+Z right away and pick a higher option.
What Delete cropped areas really removes
When you crop a picture, PowerPoint keeps the cropped-away parts in the file unless you delete them. Checking Delete cropped areas of pictures discards them, and Microsoft warns that once the cropped data is deleted you won’t be able to restore it. If you might still adjust a crop, such as one made with a circle crop in PowerPoint, finish cropping first and compress last.
The same thinking applies to picture effects. Microsoft suggests compressing and saving before you apply an artistic effect, because compression can change how the picture looks.
Make the setting stick for the whole file
Compress Pictures only affects the pictures already in the deck. To keep new pictures from bloating the file, change the presentation’s image settings:
- Go to File > Options > Advanced.
- Under Image Size and Quality, use the drop-down to choose whether the change applies to this presentation or to all new presentations.
- Select Discard editing data. This removes the extra data PowerPoint keeps to restore an edited picture; afterward, undoing those edits means inserting the picture again.
- Make sure Do not compress images in file is not selected. If it is checked, PowerPoint keeps every picture at full size.
- In the Default resolution list, choose a value. Microsoft’s file-size advice is 150 ppi or lower for a smaller file.
- Select OK and save.
Which value is the default out of the box is unclear: one Microsoft page says the default picture resolution in Microsoft 365 is 220 ppi, while another says PowerPoint 2016 and newer default to high fidelity. Rather than relying on either, open the Default resolution list and look at what your copy is set to. These steps follow Microsoft’s page on reducing PowerPoint file size.
Compress pictures in PowerPoint for Mac
The Mac version uses a slightly different dialog:
- To compress every picture, open the File menu at the top of the screen and choose Compress Pictures.
- To compress only some pictures, hold Shift, select them, then choose Compress Pictures on the Picture Format tab.
In the dialog, choose an option in the Picture Quality box (the highest resolution is listed first and the lowest last), decide on Delete cropped areas of pictures, and choose Selected pictures only or All pictures in this file. When you start from the File menu, the Selected pictures only choice is unavailable.
PowerPoint for the web
Compress Pictures is not available in PowerPoint for the web. Microsoft says these features are only in the desktop versions of the Office apps. If you only have a browser, resize or compress photos before inserting them, or open the file in the PowerPoint desktop app to compress it. For a file that is still too big to attach, sharing it from OneDrive as a link avoids the attachment limit altogether.
Shrink video and audio with Compress Media
Pictures are often not the main problem. A single embedded video clip can outweigh every photo in the deck. PowerPoint for Windows can shrink media too:
- Select File > Info.
- In the Multimedia section, select Compress Media.
- Choose Full HD (1080p), HD (720p) or Standard (480p), then wait for the progress window to finish and save.
Per Microsoft’s Compress Media page, this option exists in PowerPoint for Windows but not on Mac or the web, and embedded subtitles and alternate audio tracks are lost when you compress. For background on adding clips in the first place, see embedding video in PowerPoint.
Check that the file actually got smaller
Note the size before you start. In File Explorer, right-click the presentation and choose Properties, or switch the folder to Details view to see the Size column. Compress, save, then check again. If the number barely changed, the bulk is coming from something other than pictures: media, embedded fonts, or a picture setting that is still set to keep full quality.
If the deck is still too big
- Embedded fonts add size. If you embed fonts, the option to embed only the characters used in the presentation keeps it smaller; see saving fonts with a PowerPoint file.
- Resize or compress very large photos before inserting them.
- Delete pictures and slides you no longer need, including hidden slides.
What people ask about shrinking PowerPoint files
Can I undo compression after saving and closing?
Use Undo (Ctrl+Z) right after compressing if you are not happy with the result. Once the file is saved and closed, there is no setting that restores the original pictures, and Microsoft warns that deleted cropped areas cannot be restored. That is why a full-size copy saved under another name is worth keeping.
Will compressed pictures look worse on a projector?
They can. Microsoft notes that compressing a picture may make it look different because of loss of detail. If a test run on the projector looks soft, undo the compression and choose a higher resolution or High fidelity.
Does compressing pictures in Word work the same way?
Yes, the dialog is shared across Office apps. The Word version, with its own file-size tips, is covered in compressing pictures in Word.
Should I change the slide size before compressing?
Yes, if you plan to change it. If you will switch between widescreen and standard or to portrait, change the slide size first, then compress the pictures once the layout is final.

Kermit Matthews runs Live2Tech from just outside Philadelphia. He is an IT specialist with over 20 years of experience, from a university help desk to small-business IT, IT management and his own consulting practice, and has written tech guides full time since 2020. Steps are checked against the current software on a real device or the maker’s official documentation. More about Kermit.