Link OBS to Twitch and most of the work is done: streaming from a Windows 10 PC takes a free Twitch account, broadcasting software such as OBS Studio, and the encoder settings Twitch publishes in its own broadcasting guidelines. Keep your stream key private from the first minute, because anyone who has it can broadcast to your channel.
The steps below use OBS Studio.
What Twitch says you need
Twitch’s How Do I Stream FAQ keeps the list short: a stable internet connection and a tool that can broadcast video, which Twitch calls a video encoder. Everything else is optional.
- A Twitch account. You stream from your regular Twitch account.
- An encoder. On a PC that means streaming software. Twitch’s FAQ names Twitch Studio, the mobile Twitch app and OBS as examples. Twitch’s help still mentions Twitch Studio but has no dedicated setup article for it, so this guide uses OBS Studio, which has full documentation on its own site.
- Enough upload speed. Twitch’s rule is that your upload speed should equal your stream’s bitrate plus 30%. Its own example: a 6 Mbps stream may need an upload speed of at least 8 Mbps. Run any browser speed test and read the upload figure, not the download one.
- A PC that runs your game or app. Twitch’s answer to “Do I need a powerful computer?” is no. A laptop works; the settings section below shows how to scale down when the PC struggles.
- A microphone and webcam, if you want them. Twitch says neither is required, although talking to viewers is a large part of what makes a channel work.
One note on the operating system. Microsoft’s support page says Windows 10 has reached the end of support on October 14, 2025, and the Consumer Extended Security Updates program can protect a Windows 10 device until October 12, 2027. OBS still supports Windows 10, so you can stream from it, but a PC that can move to a current version of Windows 11 should.
Install OBS Studio and run the setup wizard
Get OBS only from its official site, obsproject.com.
- Open the OBS Studio download page and choose the Windows installer. The page states that the Windows release supports Windows 10 and 11.
- Run the installer, accept the defaults and open OBS Studio.
- The Auto-Configuration Wizard appears the first time you open OBS. Choose the option for streaming when it asks how you will use OBS, pick Twitch as the service when it asks, and let it run its tests. It suggests a resolution, frame rate and bitrate based on your PC and connection.
- If you skipped the wizard, open it later from Tools > Auto-Configuration Wizard.
Treat the wizard’s result as a starting point. The next sections show how to check it against Twitch’s numbers.
Connect OBS to your Twitch account
OBS can talk to Twitch in two ways: by signing in to your Twitch account from inside OBS, or by pasting your stream key. Signing in is the simpler choice because you never have to copy the key at all.
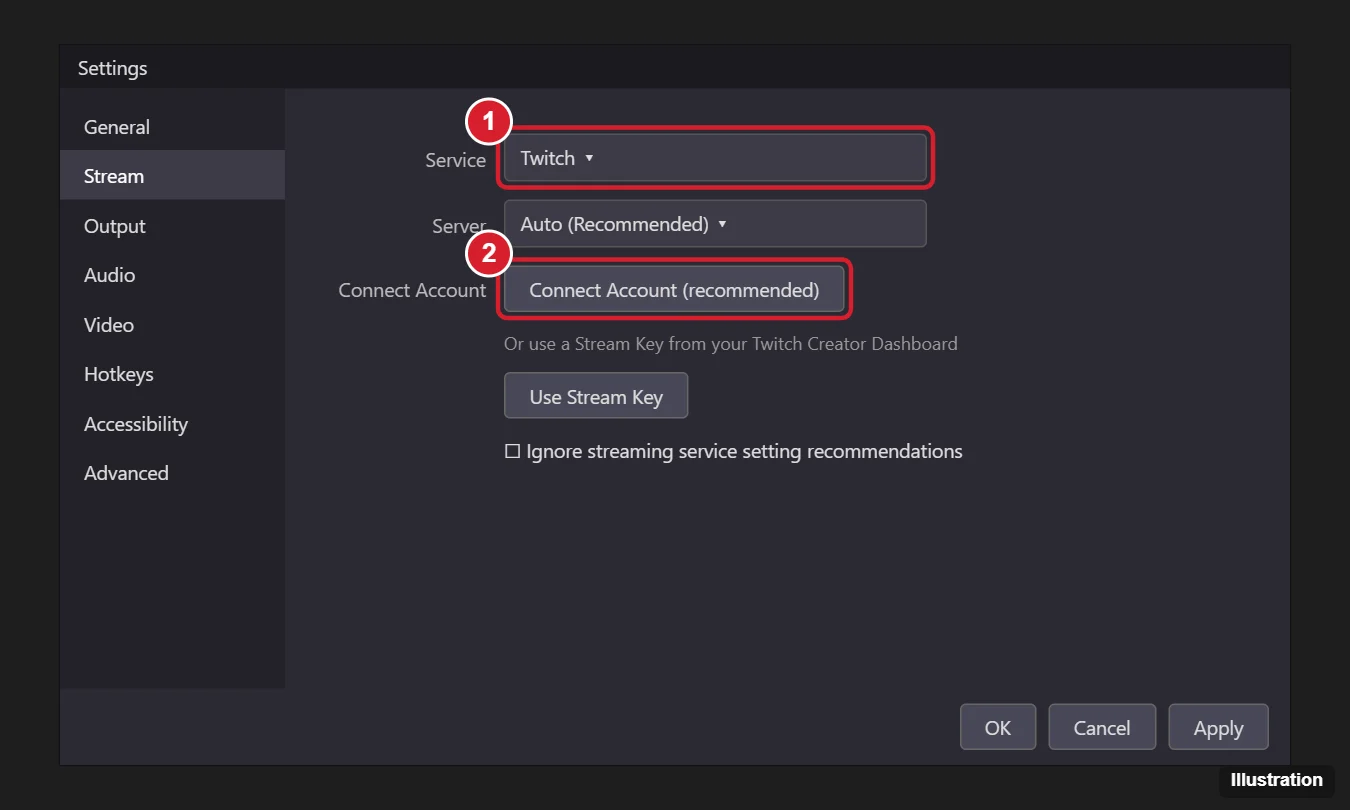
- In OBS, open Settings and select Stream.
- Set Service to Twitch.
- Select the button to connect your account (it shows as Connect Account in the illustration below) and sign in to Twitch in the window that opens.
- Select Apply, then OK.
Using a stream key instead
If you choose the stream key option in OBS, Twitch’s Stream Key FAQ says to retrieve the key from the Creator Dashboard (the Settings icon, then Stream). Paste it into the OBS key field and apply.
Twitch’s warning is blunt: never share your stream key with anyone, and don’t show it on stream. In practice that means no screenshots of the OBS Stream settings page, no pasting the key into a chat to ask for help, and closing that settings page before you go live. If the key ever leaks, Twitch says you can reset it at any time from the same place you found it, and it is also reset each time you change your Twitch password. After a reset, paste the new key into OBS.
Check your settings against Twitch’s guidelines
Twitch’s broadcasting guidelines list a recommended setup for each common quality level. The figures below are Twitch’s. All four use constant bitrate (CBR), which Twitch suggests for every broadcaster, and a keyframe interval of 2 seconds.
| Quality | Resolution | Video bitrate | Frame rate |
|---|---|---|---|
| 1080p, high frame rate | 1920×1080 | 6000 kbps | 60 or 50 fps |
| 1080p, standard frame rate | 1920×1080 | 4500 kbps | 30 or 25 fps |
| 720p, high frame rate | 1280×720 | 4500 kbps | 60 or 50 fps |
| 720p, standard frame rate | 1280×720 | 3000 kbps | 30 or 25 fps |
For audio, Twitch lists AAC-LC in stereo or mono, recommends 96 kbps for the widest compatibility and sets 160 kbps as the maximum. For software (x264) encoding it suggests starting with the veryfast preset; for GPU encoding it gives NVIDIA NVENC as an example and lists a Quality preset.
Pick the row your connection can carry
Apply Twitch’s plus-30% rule backward. Say a speed test shows 7 Mbps upload. Divide by 1.3 and you get roughly 5.4 Mbps, so the 6000 kbps row is too much, and either 4500 kbps row fits with room to spare. If both 4500 kbps rows fit, the frame rate is your choice: Twitch lists 60 or 50 fps for the high-frame-rate rows and 30 or 25 fps for the standard ones. With roughly 4 to 5.4 Mbps upload, the 3000 kbps row is the one that fits; below about 4 Mbps, set a bitrate under 3000 kbps (your upload divided by 1.3) and expect a softer picture.
In OBS, the encoder, rate control and bitrate fields are under Settings > Output, and the output resolution and frame rate are under Settings > Video. Audio devices are under Settings > Audio. If the wizard already picked values inside Twitch’s ranges, leave them alone.
Add your game, screen, camera and mic
A scene in OBS is a layout, and sources are the pieces inside it. Add sources with the + button in the Sources area. OBS documents these capture types:
- Game Capture (Windows only): the best choice for full-screen 3D games. Its modes are Capture any fullscreen application, Capture specific window, and Capture foreground window with hotkey. Capture specific window is the most predictable for one game.
- Window Capture: one app window, such as a browser or drawing program.
- Display Capture: the whole monitor, useful for desktop tutorials or when Game Capture shows nothing.
- Video Capture Source: your webcam or a capture card. Resize and drag it in the preview. If the image is backward, see how to mirror or flip a webcam on Windows, and for brightness or focus, how to adjust webcam settings on Windows 10.
Your microphone and desktop sound appear in the Audio Mixer once the right devices are chosen in Settings > Audio. Before your first stream, test your microphone in Windows 10 so you know the problem is not the mic itself. Owners of the popular USB mic can follow the steps to set up a Blue Yeti microphone on Windows first, and a co-host on a second mic is covered in using two microphones at the same time.
Most streamers build two or three scenes, for example a gameplay scene with the webcam in a corner and a “be right back” scene with just a still image and music, then switch between them during the stream.
Set the title and category, then go live
- Open your Twitch Creator Dashboard in a browser and fill in the stream title and category so viewers can find you. If you connected your account in OBS, OBS can show a stream information panel with the same fields.
- Run a test first. Twitch says it offers a network test so you can check your setup before going live, and explains it in the Stream Key FAQ linked above. OBS’s own quick start guide also recommends a short test run.
- Select Start Streaming on the Controls dock in OBS.
- Open your channel on a phone with the sound muted and check that video and audio arrive. Watch the OBS status bar for dropped frames.
- Select Stop Streaming when you are done. Twitch’s maximum broadcast length is 48 hours.
To keep a copy on your PC, Start Recording sits on the same Controls dock. If you only want a recording and no live stream, a simpler setup is in screen recording with audio.
To keep broadcasts on Twitch itself, turn on the past-broadcast (video on demand) option in your Creator Dashboard stream settings; Twitch explains it in its On-Demand Content help article.
Problems on the first stream and what to try
| What you see | Likely cause | What to try |
|---|---|---|
| Viewers see buffering; OBS shows dropped frames | Bitrate too high for your upload, or something else using the connection | Drop one row in Twitch’s table, use a wired Ethernet connection, pause cloud backups and large uploads |
| OBS warns that encoding is overloaded | The PC can’t encode and run the game at once | Lower the resolution or frame rate, or switch to a GPU encoder if your graphics card has one |
| Game Capture shows a black screen | Wrong capture mode, or on laptops with two graphics chips, OBS running on a different GPU from the game | Try Capture specific window, then Display Capture; on two-GPU laptops, set OBS and the game to the same graphics processor in Windows graphics settings |
| Viewers can’t hear the game | Desktop audio muted or the wrong output device set | Unmute desktop audio in the Audio Mixer and check the device in Settings > Audio |
| Mic too quiet or noisy | Mic level too low or room noise | Raise the mic level in Windows sound settings or the OBS Audio Mixer; OBS also documents audio filters such as Gain and Noise Suppression that you can add to the mic source |
| Viewers can’t hear you | Wrong microphone selected or muted in OBS or Windows | Pick the mic in Settings > Audio and check that its Audio Mixer bar moves when you speak |
For stuttering that isn’t obviously on your side, Twitch points to Twitch Inspector, which shows health information about your stream, and its Guide to Stream Health, which has a troubleshooting section for telling your problem apart from Twitch’s. If the Xbox Game Bar overlay keeps popping up over your game, you can turn off Xbox Game Bar in Windows 10.
Twitch streaming answers
Can I stream to Twitch without OBS?
Yes. Any encoder that supports Twitch works, including consoles and the mobile Twitch app, which Twitch says does not need a stream key. On a Windows PC, OBS is the option with full official documentation.
What happens if I accidentally show my stream key on stream?
Reset it right away from the same Stream settings page where you found it; Twitch says you can reset it at any time.
Can someone else stream to my channel without my key?
Twitch’s Stream Key FAQ describes a Permissions setting called People who can stream to your channel, used for guest streaming. Only people you add there can use that route; your own key stays private either way.
Start with a private test, set the bitrate from your real upload speed, and keep the stream key off screen; the rest is choosing what to stream. When you watch other channels on your phone, you can also hide Twitch chat in the iPhone app for a cleaner view.

Kermit Matthews runs Live2Tech from just outside Philadelphia. He is an IT specialist with over 20 years of experience, from a university help desk to small-business IT, IT management and his own consulting practice, and has written tech guides full time since 2020. Steps are checked against the current software on a real device or the maker’s official documentation. More about Kermit.