Fix the loop first: when Windows 11 keeps showing Enter network credentials, it is usually retrying an old saved sign-in or a user name missing the sharing PC’s name. The box wants an account on the device that shares the files; Windows keeps any saved copy under Credential Manager > Windows Credentials, which shows the user name but not the password.
Written for current versions of Windows 11 and for accounts you own or were given; no step uncovers someone else’s password.
Stop the repeat prompt in four checks
Run these in order and try the share again after each one. Most loops end by the third check.
- Check the user name format. For a local account on another PC, the name typically needs the PC’s name and a backslash in front of the account name. For a Microsoft account, use the full email address. The next section shows what to type for each kind of device.
- Type the account password. A Windows Hello PIN generally isn’t accepted here; use the account’s password.
- Remove a stale saved entry. If the password changed on the sharing device, Windows keeps trying the old one it saved. Delete that entry in Credential Manager (steps further down), then connect again and type the new details.
- Try the device’s IP address. In File Explorer’s address bar, type two backslashes and the sharing device’s IP address (for example
\\192.168.1.20). If that works and the name does not, the problem is name lookup, not the password.
If all four pass and the prompt still won’t accept anything, the cause is more likely on the sharing PC; the sharing settings section near the end covers that side.
What to type, by the device sharing the files
The prompt looks the same whatever you are connecting to, so name the device that holds the shared folder first. That decides the user name, the password and who can reset it.
| You are opening a share on | User name usually typed | Password to type | Who can reset it |
|---|---|---|---|
| Another Windows PC with a local account | Typically the PC’s name, a backslash, then the account name, such as OFFICE-PC\<name> | That account’s Windows password | Whoever has an administrator account on that PC |
| Another Windows PC signed in with a Microsoft account | Usually the Microsoft account email address | The Microsoft account password | The account owner, through Microsoft’s account recovery |
| A NAS, router USB drive or other storage box | A user created on that device in its own admin page or app | That device user’s password | The device’s administrator, from its admin page |
| A work or school network | Usually your work account, often written as DOMAIN\<name> or as an email address | Your work password | Your IT department |
In every row, the sign-in comes from the device doing the sharing. For a NAS, look at the users set up in its admin page or app and create one for yourself if needed; the maker’s manual has the steps for that model.
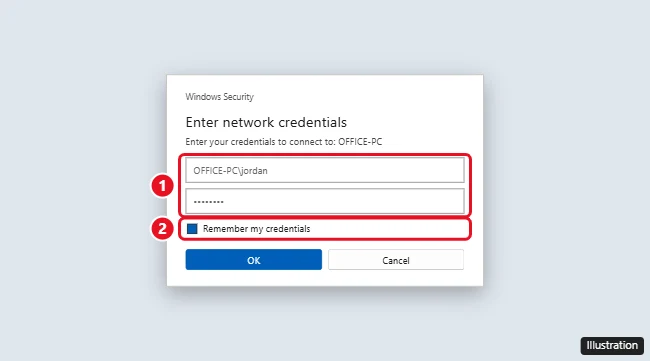
Tick the box to remember your credentials if you want Windows to save them, so the next connection to the same device signs in on its own.
Your Wi-Fi password is a different thing: for the network you are on, Microsoft’s Wi-Fi connection page shows it under Settings > Network & internet > Properties, with Show next to Wi-Fi network password. Saved networks and a command-line route are in seeing your Wi-Fi password on Windows 11.
When the sharing device is a Windows PC
Go to that PC and collect three details.
- The PC’s name. Open Settings > System > About and note the device name.
- The account type. Open Settings > Accounts > Your info. An email address under the name means a Microsoft account; a name only means a local account.
- The exact account name (local accounts). Open Command Prompt or Terminal and run
whoami. Microsoft’s whoami reference describes the command; it prints the signed-in account, which on a local account is the PC name and account name together.
A common case: a desktop called STUDY-PC shares a folder from a local account. On the laptop, the user name is typically STUDY-PC followed by a backslash and that account’s name, plus the password used to sign in to the desktop.
If the sharing PC belongs to someone else, ask them to share the folder with an account you already have, or to type their own credentials on your PC. Getting into a share without its owner’s sign-in is not something Windows offers, and this article doesn’t cover it.
The password and who can reset it
The password lives on the device that shares the files, or with the account provider. Your PC cannot reveal it: Microsoft’s cmdkey reference says plainly that passwords are not displayed after they’re stored, and Credential Manager’s Windows Credentials list shows the user name only.
- Forgotten local password: the owner of the sharing PC resets it there. Getting back in after a forgotten Windows password covers that.
- Forgotten Microsoft account password: the account owner resets it through Microsoft’s account recovery.
- NAS or work account: the device administrator or IT department resets it.
If you are unsure which password you have lost (Windows sign-in, Wi-Fi, website or network share), finding passwords used on your Windows computer matches each kind to where Windows keeps it.
Review or remove sign-ins in Credential Manager
Credential Manager is where Windows keeps saved sign-ins for websites, connected apps and networks. Microsoft’s Credential Manager page describes it as letting you view and delete those saved credentials.
- Type credential manager in the search box on the taskbar and select Credential Manager (Control panel).
- Select Windows Credentials. Network shares are listed here by the name or address of the device, not under Web Credentials.
- Expand the entry for the device you connect to. You will see the user name Windows saved for it.
- To fix an entry with an old password, remove it with the option in the expanded entry, then reconnect and type the new details. Some versions also offer an edit option for the user name and password.
Prefer a list you can read at once? Open Command Prompt and run cmdkey /list. Microsoft documents it as displaying the stored user names and credentials. To delete one entry from the command line, use cmdkey /delete: followed by the target name exactly as the list shows it.
A mapped drive saved with its credentials is generally listed in the same Windows Credentials list, so the same remove-and-reconnect fix applies. After you change an entry, reopen the share, or map the network drive in Windows 11 again so it uses the new details.
A full tour of every place Windows 11 stores passwords, including browsers, is in finding stored passwords on Windows 11. On a Windows 10 PC, clearing cached credentials in Windows 10 walks through removing stale entries that keep failing.
Settings on the PC that holds the folder
When the sign-in is right but the connection still fails, check the sharing PC (and your own).
- Turn on discovery and sharing. In Settings, search for manage advanced sharing settings, open it, and under Private networks turn on Network discovery and File and printer sharing, as Microsoft’s file sharing page describes.
- Share with a named account. Give your account access to the folder, so you can sign in with an account you already know.
Microsoft’s file sharing steps also turn off password protected sharing under All Networks. That stops the prompt, but it also means anyone on that network can open the shared folders without a password. Only consider it on a home network you trust, and leave it on for anything else.
When the credentials are accepted but the folder still won’t open, the problem is usually permissions on the share; accessing a shared folder on a network covers those checks.
Once the right account works, save it with the remember option so the share opens without a prompt next time.

Kermit Matthews runs Live2Tech from just outside Philadelphia. He is an IT specialist with over 20 years of experience, from a university help desk to small-business IT, IT management and his own consulting practice, and has written tech guides full time since 2020. Steps are checked against the current software on a real device or the maker’s official documentation. More about Kermit.