Second drives need two jobs done: fitting the drive inside the PC the way its maker’s manual describes, then preparing it in Disk Management so Windows can give it a drive letter. Before either job, back up anything that matters. The Windows half wipes whatever is on the disk, so a drive that already holds files you want should skip it.
Which kind of drive are you adding?
The right steps depend on what the drive is and where it came from. Find your row before you start.
| The drive | What to do |
|---|---|
| A brand-new, empty internal hard drive or SSD | Fit it inside the PC, then initialize it and create a volume in Disk Management (all sections below). |
| An internal drive taken from another PC that still holds files you want | Fit it, then do not initialize or format it. Follow “A drive that already holds files.” |
| A used drive whose old files you no longer need | Copy off anything you might want first, then treat it like a new drive. Initializing and formatting both erase it. |
| An external USB drive or flash drive | No installation needed. Plug it in. For copying files to one, see moving files to a flash drive in Windows 11. |
Before you open the case
- Back up first. Copy important files from the PC to another drive or cloud storage. You will be working inside the computer and then changing disks in Windows, and a wrong click on the wrong disk can erase it.
- Check that there is room. Desktops usually have spare drive bays, SATA ports or an M.2 slot. Many laptops have no second bay or slot at all, so check the maker’s specifications or manual before you buy a drive. If there is no room, an external drive is the practical option.
- Match the drive to the PC. The manual lists which drive types the PC accepts (for example, 3.5-inch and 2.5-inch SATA drives, or M.2 SSDs and which M.2 types the slot supports), and whether you need extra cables, screws or a bracket.
- Use an administrator account. Microsoft states that you must be signed in as an administrator to create a partition in Disk Management.
- Windows 10 users: the Disk Management steps are the same on both versions (Microsoft says it “looks and works the same in Windows 10 and Windows 11”). Note that, in Microsoft’s words, “Windows 10 has reached the end of support on October 14, 2025,” and a PC running it “will no longer receive security updates.” Microsoft’s Windows 10 end of support page lists the options.
Fit the drive inside the PC
Every case and laptop is built differently, so the PC or motherboard manual (or the drive maker’s installation sheet) is the only reliable source for where the drive goes and how it is secured. The general order is the same for most desktops:
- Shut down Windows, switch off the power supply if it has a switch, and unplug the power cord. Unplug a laptop’s charger too.
- Open the case or the laptop’s access panel as the manual shows. Touch a bare metal part of the case before handling parts, to discharge static.
- Mount the drive in the bay, tray or M.2 slot the manual names, using the screws, clips or latch it describes.
- For a SATA drive, connect a SATA data cable from the drive to the motherboard and a SATA power cable from the power supply. For an M.2 SSD, fit it into the slot as the manual shows.
- Close the case, reconnect power and start the PC.
Some motherboards share connections between M.2 slots and SATA ports, and some need a firmware setting changed before a new drive is detected. Both are model-specific, so follow the manual rather than general advice. If the PC is under warranty, check the maker’s terms before opening it.
A drive that already holds files
A drive moved from another Windows PC normally keeps its volumes, so it does not need initializing or formatting, and doing either would erase it. After you fit it:
- Check File Explorer first. A drive with an NTFS volume usually appears with its own letter.
- If it is missing there, open Disk Management. If the disk is listed as Offline, right-click the disk and select Online.
- If the volume is there but has no letter, right-click the volume and use the drive letter option to add one. Do not choose Format or Delete Volume.
- If Windows offers to initialize a disk you know holds data, cancel. Initializing would erase the files; check the drive in the PC it came from, or contact the drive maker, before going further.
Set up a blank drive in Disk Management
Back in Windows, a new drive will not appear in File Explorer yet, because it has no volume or drive letter. Disk Management is where you set that up. Initializing writes a partition style to the disk so Windows can use it, and Microsoft is direct about the risk: “The initialization process erases all data on the disk.” Only initialize a new drive, or a used drive you have already backed up.
- Right-click (or long-press) the Start button, then select Disk Management. You can also search for “Disk Management” and open Create and format hard disk partitions, or run
diskmgmt.msc. - Look at the lower half of the window. Each physical drive is a row (Disk 0, Disk 1 and so on). Disk 0 is often the drive Windows is on, but check the volumes and sizes rather than assuming. Find the row for the new drive: its size matches the drive you installed and it has no volumes yet. Be sure of the disk number before you go on; every step that follows applies to the disk you right-click, and Windows does not ask which drive you meant.
- If the disk is listed as Offline, right-click the disk and select Online.
- Right-click the new disk (the label on the left of its row) and select Initialize Disk. In the Initialize Disk dialog box, make sure the correct disk is selected, keep the default partition style, which Microsoft says is GUID Partition Table (GPT), and select OK. The disk status changes to Initializing and then Online.
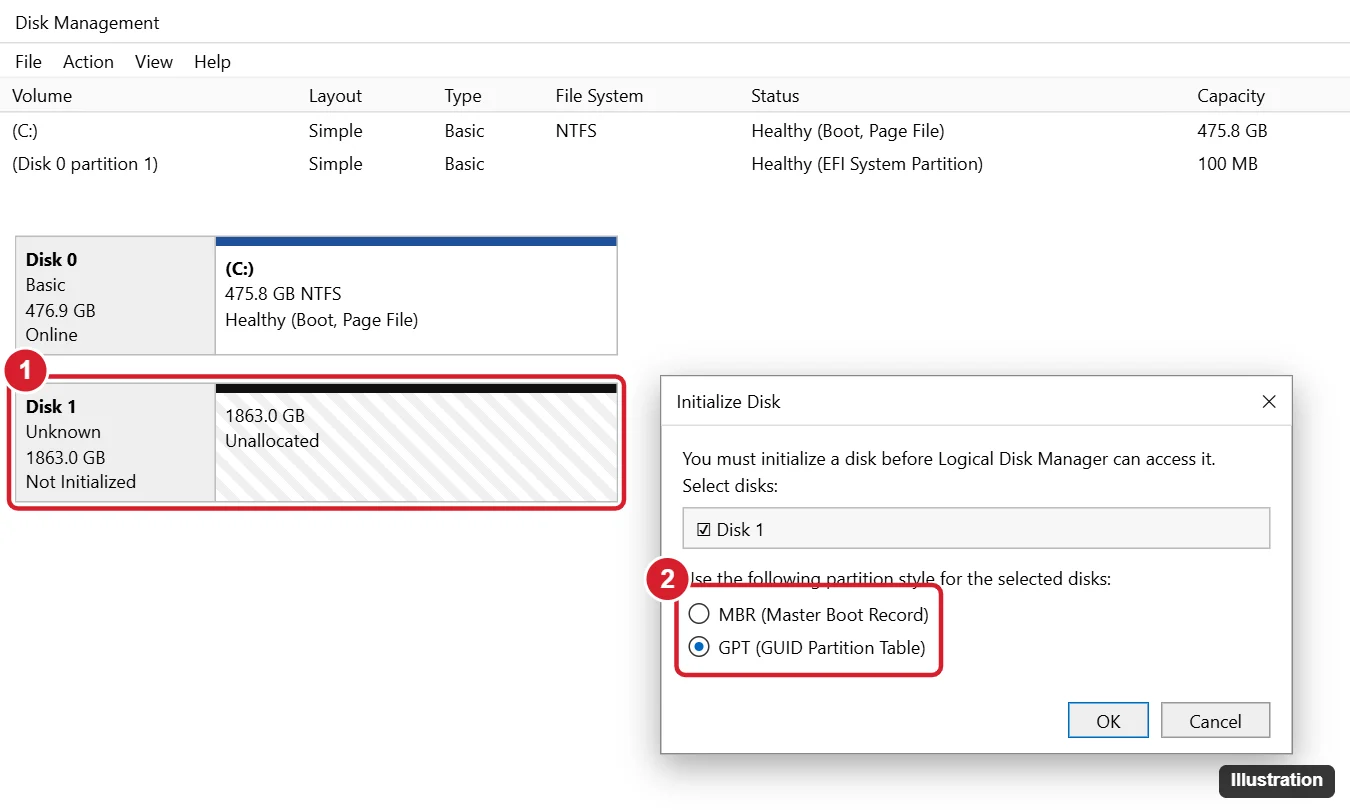
A new drive shows as (1) Not Initialized in Disk Management. (2) Choose GPT when Windows asks you to initialize it. Which style to pick, per Microsoft: use GPT if you have a modern system with UEFI firmware and need support for large drives and more than four partitions; GPT allows volumes larger than 2 TB. Use MBR only with older hardware or operating systems that do not support UEFI.
- Right-click the unallocated region of the new disk and select New Simple Volume, then select Next in the New Simple Volume Wizard.
- Enter a size in megabytes (MB), or accept the maximum default size to use the whole drive, and select Next.
- Accept the default drive letter or choose a different one, and select Next.
- On the format page, keep the file system at NTFS (Microsoft says this is the usual choice), type a name for the volume if you want one, such as “Storage”, and select Next. Microsoft explains that Perform a quick format “will create a new file table but will not fully overwrite or erase the volume,” which is fine for a new drive.
- Review your choices, then select Finish. The disk row shows the new volume with its letter.
Want more than one volume on the drive, for example one for games and one for backups? Enter a smaller size in step 6 and repeat the wizard on the space that is left. Creating a partition in Disk Management covers that in detail.
Confirm the drive in File Explorer (or find out why it is missing)
Open File Explorer (Windows + E) and select This PC. The new volume appears with the name and letter you chose. Right-click it and choose Properties to see its capacity and free space, or check the drive’s size and type another way. You can now save files, install games or point a backup to the new drive.
If the drive is not there:
- Not in Disk Management at all: turn the PC off, unplug it, and check that the data and power connections are seated as the manual shows. The PC maker’s manual also explains how to see whether the firmware detects the drive and whether a slot or port has to be enabled. Do not change other firmware or boot settings for this.
- Listed but Offline: right-click the disk and select Online.
- Initialize Disk fails or is not offered on a USB drive: Microsoft notes that some types of USB drives can’t be initialized; they are only formatted and then assigned a drive letter.
- Still nothing: contact the PC or drive maker. The drive or the slot may be faulty, or the slot may not support that type of drive.
Second drive setup questions
Do I need to reinstall Windows to add a second drive?
No. Windows stays on its current drive and keeps starting from it. The new drive is extra storage. Moving Windows itself to a new drive is a different job.
Can I install games and apps on the second drive?
Yes, if the installer lets you choose an install location; pick a folder on the new drive letter. The app then runs from that drive while Windows stays where it is.
Microsoft’s Disk Management in Windows and Initialize new disks pages have the full reference for these screens.

Kermit Matthews runs Live2Tech from just outside Philadelphia. He is an IT specialist with over 20 years of experience, from a university help desk to small-business IT, IT management and his own consulting practice, and has written tech guides full time since 2020. Steps are checked against the current software on a real device or the maker’s official documentation. More about Kermit.