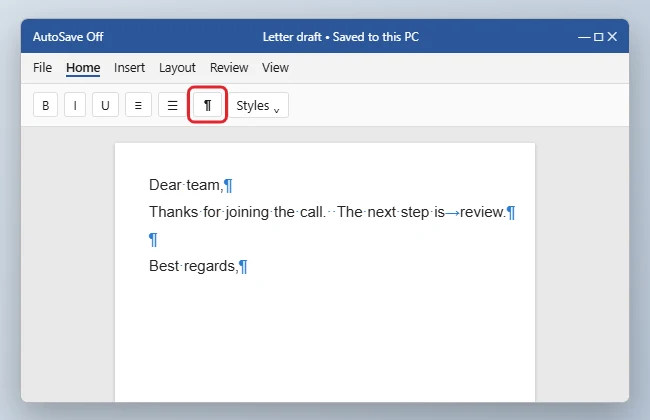
To show spaces in Word, select the Show/Hide ¶ button on the Home tab, or press Ctrl + Shift + 8 (Command + 8 on a Mac). Word then displays a raised dot (·) for each space, an arrow (→) for each tab, and a pilcrow (¶) at the end of each paragraph. These marks never print.
If you only want to see spaces, not every mark, turn on Spaces alone in File > Options > Display.
Quick Answer
Select Home > ¶ or press Ctrl + Shift + 8. Do it again to hide the marks.
Method 1: Use the Show/Hide Button
- Open your document and select the Home tab.
- In the Paragraph group, select the ¶ button (Show/Hide Editing Marks).
- Dots appear between words where there are spaces. Look for double dots, which mean double spaces.
- Select ¶ again to hide the marks.
Method 2: Show Only Spaces
- Select File > Options (on a Mac, Word > Preferences > View).
- Select Display.
- Under Always show these formatting marks on the screen, check Spaces.
- Select OK. Spaces stay visible even when Show/Hide is off.
What Each Mark Means
| Mark | Meaning |
|---|---|
| · | Space |
| ° | Nonbreaking space |
| → | Tab |
| ¶ | Paragraph break (Enter) |
| ↵ | Line break (Shift + Enter) |
| Dotted line with “Page Break” | Manual page break |
| Dotted underline | Hidden text |
Remove Double Spaces Quickly
- Press Ctrl + H to open Find and Replace.
- In Find what, type two spaces.
- In Replace with, type one space.
- Select Replace All. Repeat until Word reports 0 replacements.
Formatting marks are also useful when you create fill-in-the-blank lines, because they show which blanks are tabs and which are spaces.
Related: How to Turn Off Paragraph Symbols in Microsoft Word.
Related: How to Replace a Word With Another Word in Microsoft Word.
Troubleshooting
- The shortcut doesn’t work: Use the 8 key on the main keyboard row, not the number pad. Some keyboard layouts need Ctrl + *.
- Marks show up and you can’t turn them off: One of the marks is checked in File > Options > Display. Clear it there.
- Worried the marks will print? They won’t. Formatting marks only show on screen. If hidden text is printing, clear Print hidden text in File > Options > Display.
Formatting marks also help you fix layout problems. Use them to remove extra space between paragraphs or delete a blank page in Word, which is often caused by stray ¶ marks.
Related: Get a Word document back to normal view.
Frequently Asked Questions
Why is there a dot between my words?
Formatting marks are turned on. The dots mark spaces and won’t print. Select ¶ to hide them.
Can I show spaces in Word on the web?
Yes. On the Home tab, select Show/Hide ¶. It may be under the Paragraph options in a simplified ribbon.
Summary
- Select Home > ¶ or press Ctrl + Shift + 8.
- A dot is a space; two dots are a double space.
- Turn on only Spaces in File > Options > Display.
- Use Find and Replace to remove double spaces.

Kermit Matthews is a freelance writer based in Philadelphia, Pennsylvania with more than a decade of experience writing technology guides. He has a Bachelor’s and Master’s degree in Computer Science and has spent much of his professional career in IT management.
He specializes in writing content about iPhones, Android devices, Microsoft Office, and many other popular applications and devices.