To remove the space between lines in Word, select the text and click Line and Paragraph Spacing on the Home tab. Choose 1.0 for single spacing, then click the button again and choose Remove Space After Paragraph (and Remove Space Before Paragraph if shown). For full control, open Line Spacing Options, set Before and After to 0 pt, and check Don’t add space between paragraphs of the same style. To change it for the whole document, use Design > Paragraph Spacing > No Paragraph Space.
This guide explains the difference between line spacing and paragraph spacing, how to fix gaps in part of a document or everywhere, how to make it the default, and what to do when spacing won’t change.
Line spacing vs. paragraph spacing
- Line spacing is the space between lines within a paragraph (1.0, 1.15, 1.5, 2.0).
- Paragraph spacing is extra space added before or after each paragraph, which appears every time you press Enter. Word’s default Normal style adds 8 pt after each paragraph and uses 1.08 line spacing.
Method 1: Use the Line and Paragraph Spacing button
- Select the text (press Ctrl + A for the whole document).
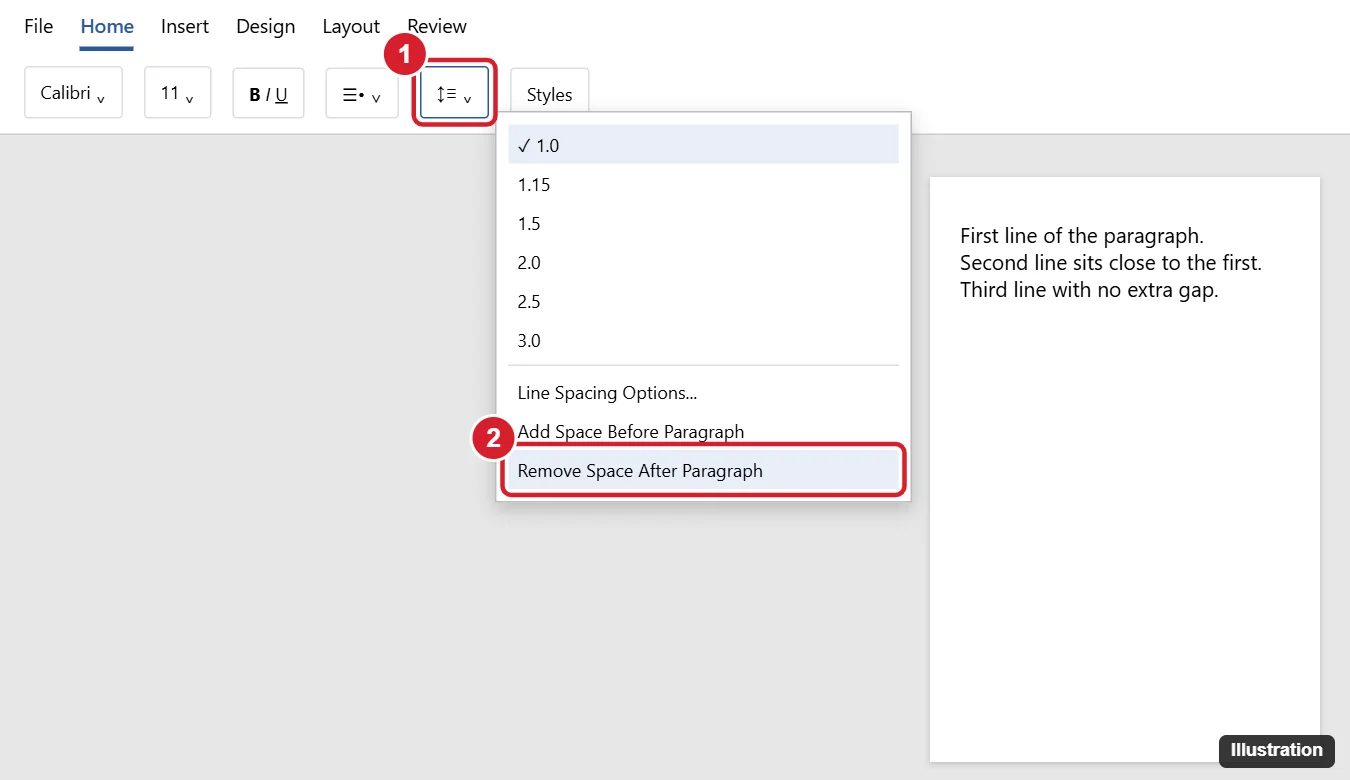
- On the Home tab, click Line and Paragraph Spacing.
- Choose 1.0.
- Click the button again and choose Remove Space After Paragraph.
Method 2: Use the Paragraph dialog
- Select the text and click Line Spacing Options (or the small arrow in the corner of the Paragraph group).
- Under Spacing, set Before and After to 0 pt.
- Set Line spacing to Single, or Exactly with a point value for precise control.
- Check Don’t add space between paragraphs of the same style if you want lists and single-style text tight.
- Click OK.
Method 3: Change the whole document
Click Design > Paragraph Spacing and choose No Paragraph Space. This updates the document’s style set so all paragraphs lose the extra space.
Make it the default for new documents
- On the Home tab, right-click the Normal style and choose Modify.
- Click Format > Paragraph, set spacing to 0 pt before and after and line spacing to Single, and click OK.
- Select New documents based on this template and click OK.
Or use Design > Paragraph Spacing > No Paragraph Space, then Design > Set as Default.
Use a line break instead of a new paragraph
Press Shift + Enter to start a new line without starting a new paragraph. The new line has no paragraph spacing, which is handy for addresses and poems.
Troubleshooting
- Gaps remain – turn on Show/Hide ¶ (Ctrl + Shift + 8) to look for empty paragraphs (extra ¶ marks) and delete them.
- Spacing is “Exactly” and text is cut off – switch to Single or increase the point value.
- Pasted text has big gaps – paste with Keep Text Only (right-click > Paste Options) and reapply spacing.
- Only some paragraphs change – they may use different styles, like Heading or List Paragraph. Update those styles too.
- Justified text looks spaced out – that’s word spacing from justification, not line spacing. Use left alignment instead.
Frequently asked questions
What’s the shortcut for single spacing?
Ctrl + 1 sets single line spacing, Ctrl + 5 sets 1.5, and Ctrl + 2 sets double spacing.
How do I remove space between lines in Word for Mac?
Use the same Line and Paragraph Spacing button on the Home tab, or Format > Paragraph.
Why does Word add space when I press Enter?
The Normal style includes space after paragraphs. Remove it with the steps above.

Kermit Matthews is a freelance writer based in Philadelphia, Pennsylvania with more than a decade of experience writing technology guides. He has a Bachelor’s and Master’s degree in Computer Science and has spent much of his professional career in IT management.
He specializes in writing content about iPhones, Android devices, Microsoft Office, and many other popular applications and devices.