Word 2013 and later versions use 1.08 line spacing and add 8 points of space after every paragraph by default, so text looks double-spaced between paragraphs even when you want it compact. Single spacing takes two changes: setting line spacing to 1.0 and removing the extra paragraph space. This guide shows how to single space selected text, the whole document, and every new document, in Word 2013 and newer versions.
Quick Answer
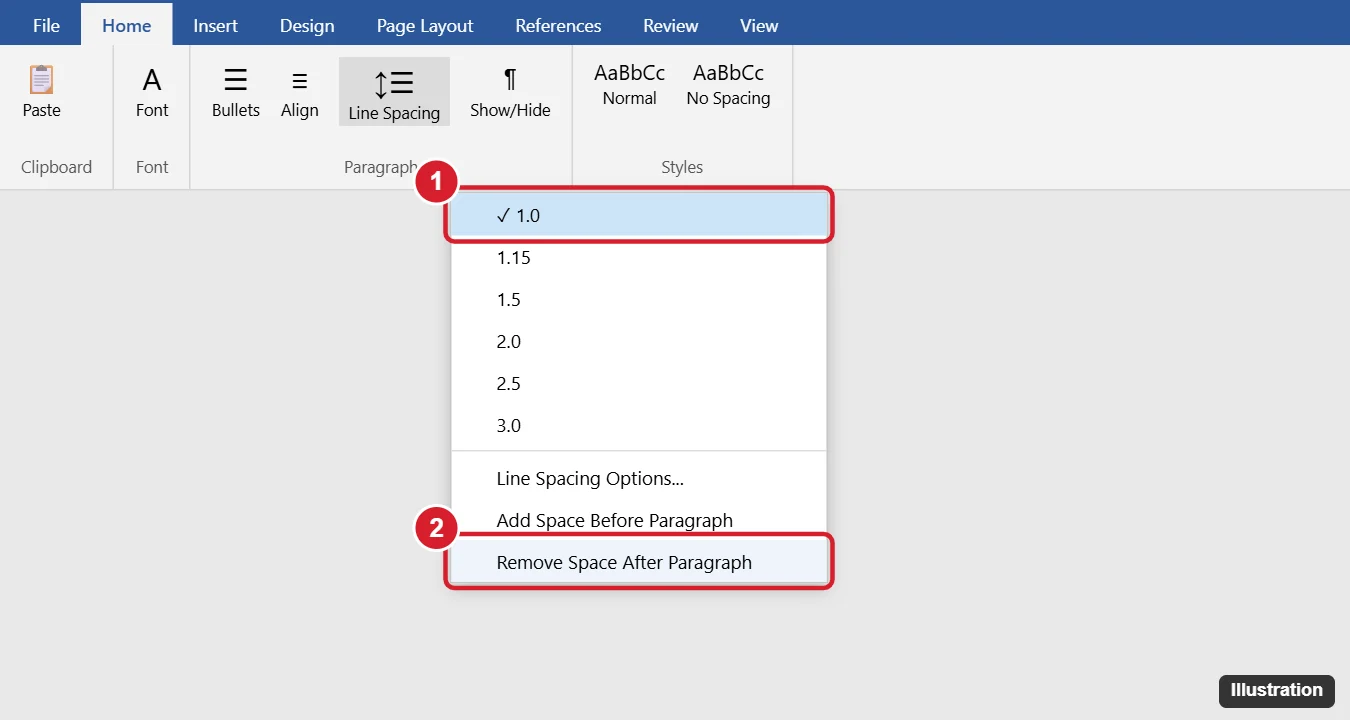
Select your text (press Ctrl + A for everything), go to Home > Line and Paragraph Spacing, and choose 1.0. Open the same menu again and choose Remove Space After Paragraph. Or press Ctrl + 1 for single line spacing.
Line Spacing vs. Paragraph Spacing
| Line spacing | Paragraph spacing | |
|---|---|---|
| What it controls | Space between lines within a paragraph | Extra space before or after each paragraph |
| Word 2013+ default | 1.08 | 0 pt before, 8 pt after |
| For single spacing | 1.0 (Single) | 0 pt before and after |
Method 1: Home Tab
- Select the text, or press Ctrl + A to select the whole document.
- On the Home tab, click Line and Paragraph Spacing in the Paragraph group.
- Click 1.0.
- Open the menu again and click Remove Space After Paragraph.
Method 2: Paragraph Dialog (Exact Control)
- Select the text.
- Click the small arrow in the corner of the Paragraph group.
- Under Spacing, set Before and After to 0 pt.
- Set Line spacing to Single.
- Click OK.
Method 3: Design Tab (Whole Document)
Go to Design > Paragraph Spacing and choose No Paragraph Space. This sets single line spacing with no extra space for the entire document's styles.
Method 4: Keyboard Shortcuts
- Ctrl + 1: single line spacing
- Ctrl + 5: 1.5 line spacing
- Ctrl + 2: double line spacing
- Ctrl + 0: add or remove 12 pt of space before a paragraph
Make Single Spacing the Default
- Open the Paragraph dialog (Method 2).
- Set Before and After to 0 pt and Line spacing to Single.
- Click Set As Default.
- Choose All documents based on the Normal template and click OK.
Alternatively, on the Design tab, choose No Paragraph Space and click Set as Default. You can also use the built-in No Spacing style from the Styles gallery.
Troubleshooting
Text is still spaced out
Check for extra blank paragraphs: turn on Show/Hide ¶ and delete empty paragraph marks. Also check Before spacing, and headings that have their own spacing.
Some lines are spaced differently
If line spacing is set to Exactly or large fonts and images are inline, spacing may look uneven. Use Single or At least.
Spacing changes when I paste
Pasted text keeps its formatting. Use Paste Options > Merge Formatting or Keep Text Only.
Frequently Asked Questions
Why does Word 2013 look double spaced?
Because it adds 8 pt after each paragraph and uses 1.08 line spacing by default.
What is the shortcut for single spacing?
Ctrl + 1 (Cmd + 1 on Mac).
Does this work in newer Word versions?
Yes. Word 2016, 2019, 2021, and Microsoft 365 use the same steps.
Summary
- Select text and set Line and Paragraph Spacing to 1.0.
- Choose Remove Space After Paragraph.
- Use Design > No Paragraph Space for the whole document.
- Click Set As Default in the Paragraph dialog for future documents.

Kermit Matthews is a freelance writer based in Philadelphia, Pennsylvania with more than a decade of experience writing technology guides. He has a Bachelor’s and Master’s degree in Computer Science and has spent much of his professional career in IT management.
He specializes in writing content about iPhones, Android devices, Microsoft Office, and many other popular applications and devices.