For many years, people have taken screenshots of their computer screens and have even been able to capture movies of what they view on their computers.
Mobile devices like the iPhone have similar capabilities, and you don’t even need to install other software to use them.
Our lesson below will show you how to locate the screen recording function on your device so you may capture videos of your on-screen material.
You can record a screen on your iPhone by following these steps:
- Tap the green Plus next to Screen Recording in Settings > Control Center.
- Open the Control Center, then tap the Screen Recording button. Wait three seconds for the recording to begin.
- Record the information, then tap Stop on the red clock.
If you wish to use the camera lens to capture things around you, your iPhone’s camera offers a Video option.
But, there may be times when something happens in an app on your screen that you’d like to share with others.
This how to screen record on iPhone 13 video provides additional information on this topic as well.
Summary – How to Record Your iPhone 13 Screen
- Go to the Control Center.
- To begin, click the Screen Record icon.
- To stop recording, tap the clock symbol.
- Touch Stop.
Our article continues below with further information on how to screen record on iPhone 13, including screenshots.
If you’ve ever tried to record this content with another device, you’ll understand how tough it may be.
Thankfully, Apple included a screen recording capability in iOS 11 that allows you to record what is happening on your screen.
Our how to screen record on iPhone 13 guide will show you how to do so.
Related: Our article on hiding iPhone alerts can help you out if you have a text message conversation that has too many message notifications.
Video About Screen Recording an iPhone 13
How to Record an iPhone 13 Screen (Guide with Pictures)
The methods in this post were carried out on an iPhone 13 running iOS 16. These procedures will also work on other iPhone models running iOS 11 or later.
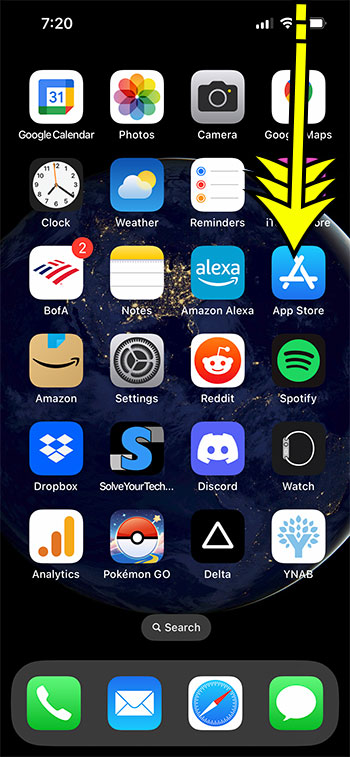
Step 1: Open the Control Center by swiping down from the top-right corner of the screen.
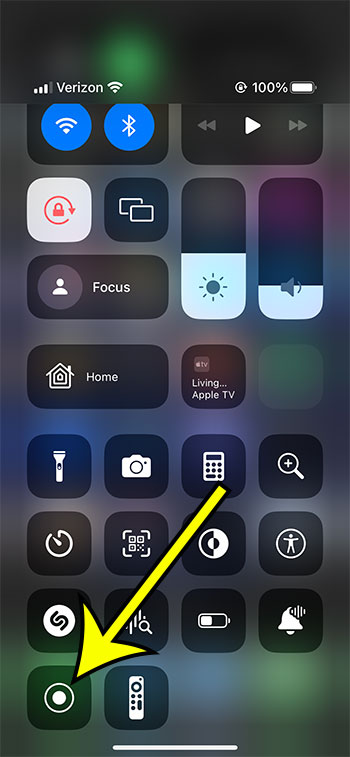
Step 2: Find and touch the Screen Recording button.
When you press the button, a three-second timer begins, followed by the screen recording.
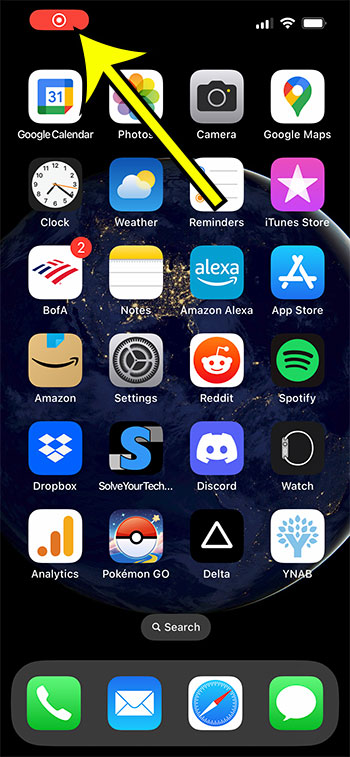
Step 3: When you’re ready to stop recording, tap the red clock button in the top-left corner of the screen.
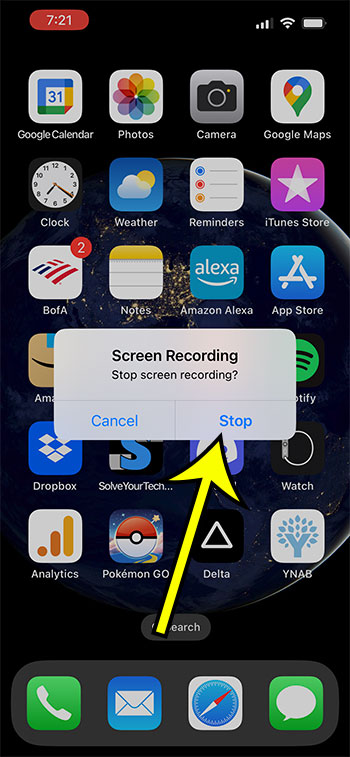
Step 4: To turn off the iPhone screen recorder, tap Stop.
You will then see a notification that the screen recording has been saved to Photos, where you will be able to find it so you can view it and share it with others.
Now that you know how to screen record on iPhone 13, you may use it whenever there is something happening on your screen that you want to keep for later or share with someone else.
How to Activate the iPhone 13 Control Center Screen Recording Option
While the screen recorder should be enabled by default on your iPhone, it is easy to delete it via the Control Center.
You can reactivate the iPhone 13 screen recording button by performing the following steps:
Step 1: Launch the Settings application.
Step 2: Choose the Control Center tab.
Step 3: Touch the green + button to the left of Screen Recording.
When you return to the Control Center, you should see that record button again.
Additional Details on iPhone Screen Recordings
If you have an iPhone with a Home button, you can open the Control Center by swiping up from the bottom of the screen rather than down from the top-right corner.
By default, the iPhone screen recording function does not record device audio.
But you can record sounds by turning on the microphone.
To do so, open the Control Center, press and hold the Screen Recording button, then touch the Microphone button to turn it on.
Videos of your screen recording are saved to the Pictures app. You can discover these in the Recents folder as well as a Screen Recordings folder in the Pictures app by going to the Media Types section of the Albums menu.
If you want a photo of the screen rather than a video, you can take screenshots of your iPhone. By simultaneously pushing the Volume Up and Power buttons on your iPhone 13, you can take a screenshot.
Once the screenshot is obtained, a little preview of it will appear in the bottom-left corner of the screen. You can dismiss it by swiping it to the left, or you can tap the thumbnail to view the screenshot and make adjustments or delete it.

Kermit Matthews is a freelance writer based in Philadelphia, Pennsylvania with more than a decade of experience writing technology guides. He has a Bachelor’s and Master’s degree in Computer Science and has spent much of his professional career in IT management.
He specializes in writing content about iPhones, Android devices, Microsoft Office, and many other popular applications and devices.


