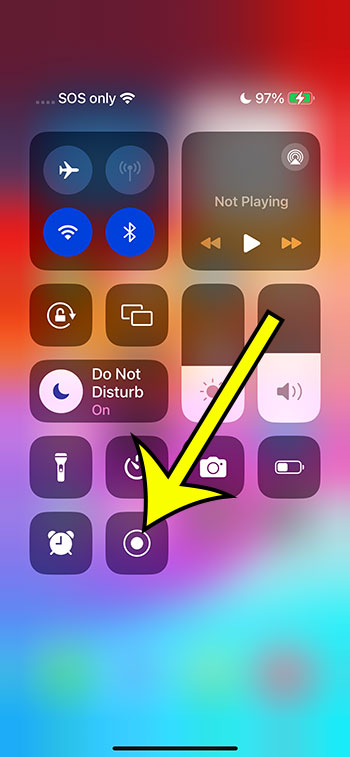
Screen recording on iPhone 14 is simple and efficient. Open Control Center, add Screen Recording if it’s not already there, press and hold the screen recording icon, and start recording. Your videos will be saved to the Photos app, ready to be viewed or shared. Remember to monitor your battery life and storage space, and you’re all set to capture whatever’s happening on your screen!
You can also watch this video about how to screen record on iPhone 14 for more on this topic.
Getting Started with Screen Recording on iPhone 14
The iPhone 14 comes packed with a bunch of cool features, and one of them is the ability to screen record. This is super handy for creating tutorials, saving video clips, or sharing what’s happening on your screen with friends. Let’s dive in and figure out how to make the most out of this feature, shall we?
Understanding Screen Recording
Before we get started, it’s important to know what screen recording is all about. Essentially, it’s a way to capture whatever is happening on your screen as a video file. Think of it like taking a video of your screen, but without needing another camera. The iPhone 14 makes this whole process pretty simple and straightforward.
Related: How to Screen Record on iPhone 13
Setting Up Screen Recording
First things first, you’ve got to get everything set up. Don’t worry, it’s not rocket science!
Accessing the Control Center
- Swipe down from the top-right corner of your screen to open the Control Center.
- Look for the screen recording icon; it looks like a little circle within a circle.
If you don’t see it, no panic! You just need to add it to your Control Center:
Adding Screen Recording to Control Center
- Head to Settings.
- Tap on Control Center.
- Scroll down until you find Screen Recording and tap the green plus (+) icon next to it.
And voila, you’re all set up!
Recording Your Screen
Now that you’ve got everything set up, let’s get to the fun part – recording your screen!
Starting the Recording
- Open the Control Center.
- Press the screen recording icon.
- You’ll see a countdown, and then your recording will start.
Recording with Audio
Want to include audio in your recording? Easy peasy!
- Before you start recording, press and hold the screen recording icon.
- Tap on the Microphone icon to turn on the audio recording.
- Hit Start Recording.
Now you’re recording both your screen and the audio!
Viewing and Sharing Your Recording
So, you’ve made your recording, what next?
Finding Your Recording
Once you’ve stopped recording, your video will be saved to your Photos app. Just open the app, and you’ll find your recording there.
Sharing Your Recording
Want to share your masterpiece? No problem!
- Go to the Photos app.
- Find your screen recording.
- Tap on the Share icon (it looks like a box with an arrow pointing up).
- Choose how you want to share it (Message, Mail, Facebook, etc.), and you’re done!
Pros and Cons of Screen Recording on iPhone 14
Every rose has its thorn, and screen recording on the iPhone 14 is no exception. Here’s a quick look at the pros and cons.
Pros
- Super Convenient: Everything you need is right there in the Control Center.
- High Quality: The recordings come out looking great.
- Versatile: You can record just about anything that’s happening on your screen.
Cons
- Can Be a Battery Drainer: Screen recording can eat up your battery life if you’re not careful.
- Limited Editing Options: The built-in editing options are a bit on the basic side.
- May Not Capture Everything: Some apps might not allow screen recording for privacy or security reasons.
Conclusion
Screen recording on the iPhone 14 is a breeze once you know how to do it. Whether you’re creating a tutorial, saving a memorable video clip, or just showing off your high game score, this feature has got you covered. Just remember to keep an eye on your battery, and you’ll be recording like a pro in no time!
Video About iPhone Screen Recording
FAQs
Can I record audio from the apps I’m using?
Yes, you can! Just make sure to turn on the Microphone audio before you start recording.
Will screen recording capture my notifications?
If you have notifications appearing on your screen while you’re recording, they will be captured in the video.
Can I edit my screen recording on my iPhone?
Yes, you can use the built-in editing tools in the Photos app to trim your video, but for more advanced editing, you might want to use a different app.
How long can I record my screen for?
It depends on your available storage space and battery life. Just keep an eye on both to make sure you don’t run out.
Can I record a phone call or FaceTime call with this feature?
No, screen recording does not capture audio from phone calls or FaceTime calls for privacy reasons.
Additional Information
Screen recording is just one of the many features that make the iPhone 14 such a versatile device. You can also explore other features like Live Photo, Portrait mode, and the AR applications to enhance your iPhone experience. And don’t forget to check out the App Store for apps that offer more advanced screen recording and video editing options. With the iPhone 14, the possibilities are practically endless!

Kermit Matthews is a freelance writer based in Philadelphia, Pennsylvania with more than a decade of experience writing technology guides. He has a Bachelor’s and Master’s degree in Computer Science and has spent much of his professional career in IT management.
He specializes in writing content about iPhones, Android devices, Microsoft Office, and many other popular applications and devices.
