The fastest way to close the gap between pages in Word is to stay in Print Layout view, point to the top or bottom edge of a page until the pointer turns into a double-pointed arrow, and double-click. Word pulls the pages together, and double-clicking again brings the space back. If the double-click doesn’t work for you, the same switch lives in Word Options: File > Options > Display > Show white space between pages in Print Layout view.
What “white space” means in Print Layout
Print Layout is the view that shows each page as a separate sheet, the way it will print. Between the sheets you see a gray strip, and at the top and bottom of every page there is a blank margin area. Hiding white space removes both from the screen, so the text of one page runs almost straight into the next.
Microsoft describes the setting as the option that displays the top and bottom margins of the page, including the content of headers and footers. That tells you what disappears when you hide it:
- The top and bottom margins of each page.
- Headers and footers, including page numbers in them.
- Anything that sits in the header or footer area, such as a logo or a watermark placed there.
This is useful when you are reading or editing a long report and want less scrolling. It is less useful when you are checking page numbers or header text, because those are exactly what goes out of view. The setting only matters in Print Layout. Draft and Web Layout views already show a document without separate pages.
Hide the gap with a double-click
This works in Word for Microsoft 365, Word 2024, 2021, 2019 and 2016 on Windows, and in Word for Microsoft 365, 2024 and 2021 on a Mac.
- Make sure you are in Print Layout: on the View tab, click Print Layout.
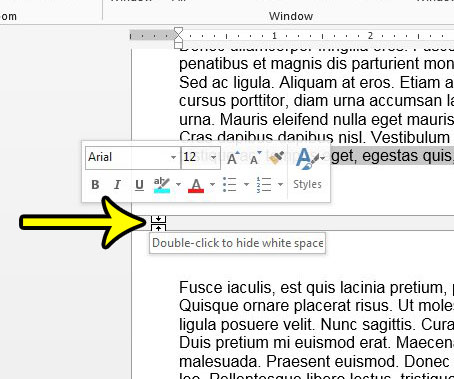
- Move the pointer to the top or bottom edge of a page. When it changes to a double-pointed arrow, you are in the right spot.
- Double-click. The margins and the gray gap collapse, so the pages run together on screen.
The old Word screen below shows the pointer on the edge between two pages.
Hide it from Word Options
The Options route does the same thing with a checkbox, which is handy if you prefer to see exactly what is on or off.
- Open your document and click the File tab.
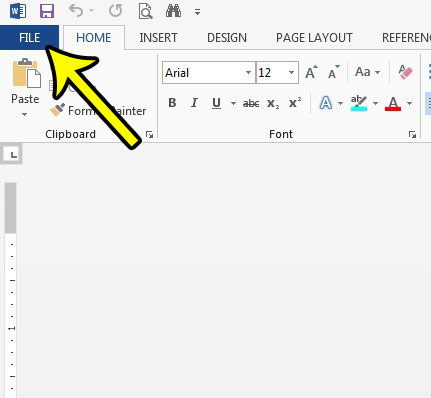
Older Word version shown; current screens look different. - Click Options near the bottom of the left column. In a small window it may be tucked under More.
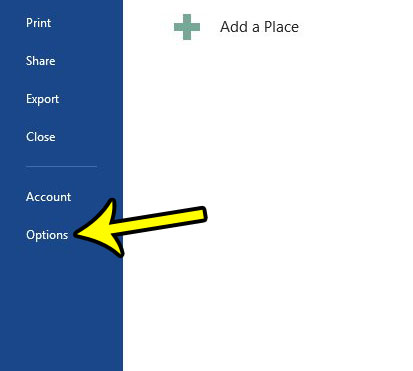
Options in an older version of Word. - Click Display on the left side of the Word Options window.
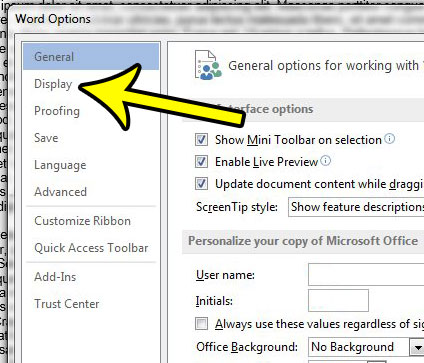
Older Word version shown; current screens look different. - Under Page display options, clear the check box for Show white space between pages in Print Layout view.
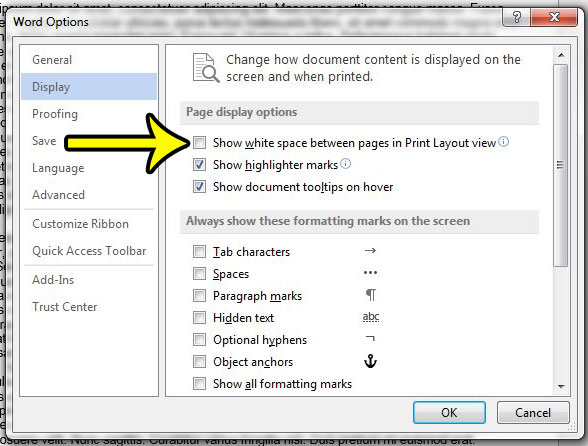
The white space option in an older version of Word Options. - Click OK.
Microsoft’s Word Options (Display) page describes this option and the others on the same screen.
Show the white space again
To get the margins, headers and footers back on screen, use either method in reverse:
- Point to the place where two pages meet until you see the double-pointed arrow, then double-click.
- Or go back to File > Options > Display and select Show white space between pages in Print Layout view again.
Microsoft’s help page for this problem is titled “My top margin is missing”. It explains that when the top and bottom margins appear to be cut off, the option for hiding them has been switched on.
Is anything in the document changed?
No text is deleted and your headers and footers are not removed; they are only out of view. The option sits with Word’s display settings, so it controls what you see on screen. Before you print or export a PDF, it is still worth opening File > Print and checking the preview, which shows each full page with its margins, headers and footers.
Word for Mac and Word for the web
On a Mac, the double-click method above works the same way in current versions of Word. Microsoft’s help page covers it for Word for Microsoft 365 for Mac, Word 2024 for Mac and Word 2021 for Mac.
Word for the web works differently. Microsoft’s help pages for this setting apply to the desktop apps, and they don’t describe the same toggle in the browser. If you need the gap hidden or shown exactly as described here, open the file in the Word desktop app.
When the gap is real blank space
Hiding white space only removes margins and the gap between sheets. If a big empty area remains in the middle or at the bottom of a page, something in the document is creating it. Turn on formatting marks with the paragraph mark (¶) button on the Home tab to see what is there. Common causes and fixes:
- Several empty paragraphs, extra spacing before or after a paragraph, or a page break holding text down: see removing extra space in Word.
- A blank page you can’t get rid of: deleting a page in Word covers blank pages at the end and in the middle.
- Dotted lines labeled as page or section breaks: these dotted lines in Word are break markers you can hide or remove.
- Margins that are simply too wide for your taste: setting margins in Word, including different margins on different pages changes the printed page, not just the view.
White space in Word, explained
Why did my header and footer disappear?
Most likely the white space between pages is hidden. Double-click where two pages meet to bring it back. Show the white space before you edit a header, so you can see it; for the editing itself, see adding a custom header or footer in Word.
Why does double-clicking do nothing?
You are probably not in Print Layout, or the pointer is not on the page edge. Check the View tab, then wait for the double-pointed arrow before you click.
Does this setting follow the document to another computer?
Microsoft’s pages don’t say clearly whether the choice is stored with the file or with Word itself. If a colleague sees the gaps on their screen, they can hide them with the same double-click.
Can I do this in Google Docs?
Google Docs has its own way to hide the gap between pages. Removing blank space in Google Docs includes that option.
Next time Word looks like it has lost your top margin, try a double-click on the page edge before changing any settings.

Kermit Matthews runs Live2Tech from just outside Philadelphia. He is an IT specialist with over 20 years of experience, from a university help desk to small-business IT, IT management and his own consulting practice, and has written tech guides full time since 2020. Steps are checked against the current software on a real device or the maker’s official documentation. More about Kermit.