A second screen that shows a copy of your laptop, stays dark or makes the mouse leave from the wrong side usually needs two fixes. Press Windows logo key + P and pick Extend to change the mode, then fix the arrangement in Settings > System > Display so the pointer crosses where your monitors actually sit. These apply to current versions of Windows 11.
What you see and what to do about it
Find your symptom, then jump to the matching section. Most problems come down to the wrong mode, a layout that doesn’t match your desk, or a connection Windows can’t see.
| What you see | Likely cause | Start here |
|---|---|---|
| Both screens show the same thing | Duplicate mode is on | Switch to Extend |
| Laptop screen is on, second screen is dark | PC screen only is on, or the monitor isn’t detected | Switch to Extend, then the detection checklist |
| Laptop screen is dark, second screen is on | Second screen only is on | Switch to Extend |
| Mouse exits the left side to reach a monitor on your right | The boxes in Settings are in the wrong order | Line up the boxes |
| Mouse gets stuck partway along the edge | The screens’ tops or bottoms don’t line up in the layout | Line up the boxes |
| Windows pile onto one screen after undocking | Multiple display options | The docking section |
| Text is tiny or blurry on one screen | Scale or resolution | Mixed screens |
Switch to Extend from the keyboard or from Settings
The keyboard route
This is the quickest way, and it works from anywhere in Windows.
- Connect the second screen and turn it on.
- Press Windows logo key + P. A short list of display modes opens.
- Select Extend.
- Give the screens a moment. They may flicker or go black briefly while Windows changes modes.
If nothing changes after you select Extend, Windows may not be seeing the second screen at all. Skip to the detection checklist further down instead of pressing the shortcut again.
Microsoft’s multiple monitors page names four modes:
- PC screen only: Uses one display only. The other stays dark.
- Duplicate: Shows the same thing on all displays, which suits presenting to a room. If you need the same picture across several screens, see how to duplicate your display on 3 monitors.
- Extend: Spreads your desktop across multiple screens, so you can drag windows between them.
- Second screen only: Sends everything to the second display only.
The Settings route
Use this when you also need to rearrange things, or if the keyboard shortcut isn’t convenient.
- Open Start > Settings > System > Display.
- If only one box appears, scroll to Multiple displays and select Detect.
- Look for the list of display modes near the numbered boxes and choose the Extend option. Its exact wording may differ on your PC, and Microsoft’s page doesn’t name it, so go by the word Extend.
- If Windows asks whether to keep the change, confirm it. If you can’t see the prompt, wait, as Windows may revert the setting by itself.
Line the boxes up with your desk
Windows doesn’t know where your monitors sit. It only knows the layout you draw on the Display page, and the pointer follows that drawing. A monitor physically on your right but drawn on your left forces the mouse out of the wrong side.
- In Settings > System > Display, select Identify. A number appears briefly on each screen.
- Drag the numbered boxes until they match the way the screens sit on your desk.
- Select Apply.
- Move the pointer across to each screen to test it.
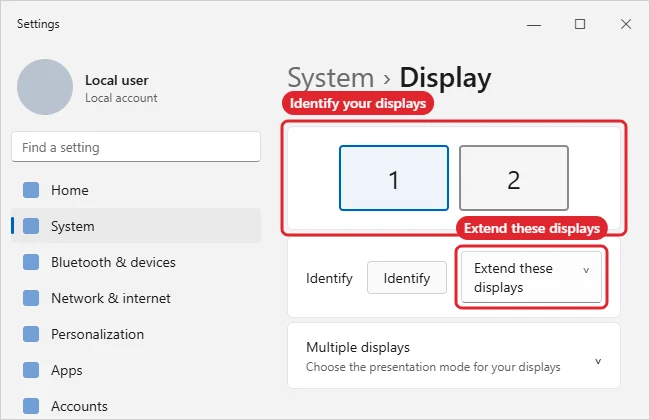
A few details make the layout feel natural:
- Heights matter too. The pointer can only cross where the box edges touch. If the larger monitor’s box hangs far above the laptop’s, the top of that edge acts like a wall. Slide the boxes up or down until they match the real heights.
- Stacked screens work. A monitor mounted above a laptop can go above it in the layout, and the pointer then exits through the top.
- The numbers don’t have to be in order. Screen 2 can sit left of screen 1. If it bothers you, read about changing display numbers or changing a monitor’s identity number in Windows 11 first, since the layout is what actually controls the pointer.
To choose which screen is the main one, select its box and expand Multiple displays, then look for an option to make it your main display. Microsoft’s pages don’t document this label, so it may read a little differently on your PC.
Laptop users: make Windows handle docking
Plugging and unplugging every day is where extended setups get annoying. Two checkboxes in Start > Settings > System > Display, under the expanded Multiple displays section, decide what happens to your windows.
| Setting | Leave it on when |
|---|---|
| Remember window locations based on monitor connection | You want windows to go back to the external screen after you reconnect it |
| Minimize windows when a monitor is disconnected | You’d rather have those windows minimized than moved on top of your laptop’s work |
Moving windows by hand is faster with the keyboard. Windows logo key + Shift + Left arrow moves the active window to the monitor on the left, and Windows logo key + Shift + Right arrow moves it to the right, per Microsoft’s keyboard shortcut list. You can also drag a window by its title bar.
Want the taskbar on each screen, or only one? Right-click the taskbar, open Taskbar settings, expand Taskbar behaviors, and check or clear Show my taskbar on all displays. Microsoft’s taskbar page describes the option.
Connecting through USB-C? The port and the dock both have to carry video, and not every USB-C port does. See how to use USB-C video (DP Alt Mode). If you’d rather work with the lid closed, there’s a Windows 10 walkthrough on how to use 2 monitors with the laptop closed. The menus may differ a little on Windows 11.
Add a TV, projector or wireless screen
A TV or projector connected by cable behaves like any other monitor. Connect it, press Windows logo key + P, and choose Extend if you want your notes on one screen and something else on the other, or Duplicate if the audience should see just what you see. Check that the TV is set to the HDMI input you plugged into.
Wireless screens take an extra step:
- If you’re using a wireless display adapter, connect it to the HDMI port on the TV.
- Press Windows logo key + K to open Cast from Quick Settings.
- Select the adapter or display from the list.
Another route is Start > Settings > System > Display > Multiple displays > Connect, which looks for wireless displays. Once connected, use Windows logo key + P to pick the mode, then arrange the box like any other screen. A wireless link can show more lag than a cable, so it may suit slides or video better than fast mouse work.
When the screens differ in size or sharpness
A laptop beside a large desktop monitor rarely looks consistent straight away. Fortunately, each screen has its own settings. Microsoft’s resolution and layout page covers these controls.
- In Settings > System > Display, select the box for the screen you want to change. The settings below apply to that screen only.
- Under Display resolution, keep the option marked (Recommended) when you can. Microsoft warns that lower resolutions can make text less sharp, or leave the picture small, centered, edged with black or stretched.
- Under Scale & layout, open Scale and try the recommended option first. For example, a 4K monitor might suit 150% while a 1080p screen beside it stays at 100%.
- Repeat for the other screen, then drag a window between the two to compare text size.
There’s more on scaling in this piece on how to adjust display scaling in Windows 11. If motion looks choppier on one screen, check its refresh rate. And if the colors look washed out compared with the other panel, you can make colors more vibrant on Windows 11.
Windows can’t see the monitor: a checklist from cable to driver
When Windows lists only one display, Extend has nothing to extend to. Work from the top, because the early steps are the quickest and need no technical skill. The steps draw on Microsoft’s external monitor troubleshooting page, reordered so the quickest checks come first.
- Ask Windows to look again. Go to Settings > System > Display > Multiple displays and select Detect.
- Confirm the mode. Press Windows logo key + P and make sure Extend is selected.
- Check for updates. Go to Start > Settings > Windows Update > Check for updates.
- Simplify the connection. Remove any docks, dongles or adapters and connect the cable straight to the PC if you can. An adapter that fails will look the same as a bad monitor.
- Swap the parts. Try a different cable and another video output port. Then test the monitor on another PC. If it works there, the problem is on this PC’s side. It’s also worth checking that the monitor is on the right input, using its own buttons.
- Restart. Go to Start > Power > Restart. If that doesn’t help, use Power > Shut Down, then turn the PC back on.
- Reset the graphics driver. Press Windows logo key + Ctrl + Shift + B. Screens may blink briefly.
- Roll back the driver, if this started after an update. In Device Manager, expand Display adapters, right-click the adapter, then go to Properties > Driver > Roll Back Driver. If that option isn’t available, reinstall instead.
- Reinstall the driver. In the same list, choose Uninstall device, select Attempt to remove the driver for this device, then Uninstall, and restart. Back in Device Manager, use Update driver > Search automatically for updated driver software.
Hardware limits that no setting can change
- Splitters don’t extend. Microsoft says a display splitter can’t extend to multiple monitors. It sends the same signal to each one.
- Only one video port? Microsoft suggests a docking station (ask your PC’s manufacturer what’s available) or, with a USB-C port, a USB adapter that adds a video output. Check how many monitors your graphics adapter supports before buying.
- Multiple graphics adapters? Microsoft suggests switching the default adapter if your PC has more than one. The steps vary by device, so check with the manufacturer.
Work and school PCs
If the Display page or projection options are grayed out on a PC someone else manages, your organization may have restricted them. The cable checks above still apply, but don’t try to work around a restriction. Ask your IT team, and tell them what you see and which monitor or dock you’re using.
Go back to one screen
Press Windows logo key + P and choose PC screen only. Your display stays connected but unused, and you can switch back to Extend the same way. If windows seem to have vanished afterward, the docking settings above control where they go. To leave a monitor plugged in and off for longer, see how to disable a second monitor in Windows 11.
Extended display questions
Does Windows logo key + P work the same on Windows 10?
Microsoft’s multiple monitors page applies to both Windows 11 and Windows 10 and lists the shortcut and modes on the same page, though other menus can look different.
Will Windows keep my layout the next time I plug in?
Remember window locations based on monitor connection covers where your windows go. If the screens’ arrangement itself looks wrong after reconnecting, redo the drag and select Apply.
Windows lists the monitor, so why is there no picture?
Check the monitor’s input selection and its cable connection first. Then try another video port, since Windows detecting a screen doesn’t prove that a working picture is reaching it.
Can I use a splitter to get a third screen?
Not for Extend. A splitter only copies the signal, so use a dock or a USB adapter that supports the number of monitors you want, or a graphics card with enough outputs.
Once your screens are set, drag one window across each edge. If it moves where you expect, you’re done.

Kermit Matthews runs Live2Tech from just outside Philadelphia. He is an IT specialist with over 20 years of experience, from a university help desk to small-business IT, IT management and his own consulting practice, and has written tech guides full time since 2020. Steps are checked against the current software on a real device or the maker’s official documentation. More about Kermit.