Track every edit before you send the draft: Word’s Track Changes marks insertions and deletions in color so the other side sees each one. Then lock tracking on with Lock Tracking, so whoever edits the file next can’t quietly switch it off and slip in unmarked changes.
The steps below are for current Word for Microsoft 365 on Windows, with notes for Word for the web and Word for Mac. They follow a redline from the first edit to the moment you send it out, and back again.
What “redline” means in Word
“Redline” is the name lawyers, contract managers and editors use for a marked-up draft: the version where every added word and every cut is visible, so the other party can see exactly what you want to change. Microsoft doesn’t use the word in Word’s menus. The feature you want is Track Changes, which records edits as you make them. For two finished versions that were edited without tracking, Word’s Compare feature builds the redline afterward, and Microsoft labels that Compare option “legal blackline”.
So there are two ways to end up with a redline:
- Redline as you edit with Track Changes. This is the usual choice when you’re the one marking up a contract, policy or report. Most of this page covers it.
- Redline after the fact with Compare, when you have an original and a revised copy and no tracked changes. That’s covered briefly near the end.
Making edits by hand with red text and strikethrough formatting isn’t a substitute. Word treats that as ordinary formatting, so the other side can’t accept or reject anything, and nothing stops a later edit from slipping through without color.
Set up the copy you will mark up
Before you change anything, save an untouched copy of the draft as your original; it’s what you’ll compare against if a question comes up later. Then turn tracking on in the working copy.
- Open the document you received and save it under a new name, such as the original name plus “redline” and the date.
- On the Review tab, select Tracking > Track Changes. The button stays highlighted while tracking is on.
- In the Markup group, choose All Markup from the drop-down list so you can see every change as you make it.
- Edit normally: type new wording, delete what you want removed, move clauses and change formatting. Word marks each edit.
- Add a comment where the other side needs the reason for a change, for example why a deadline moved from 30 to 45 days.
- Save the file.
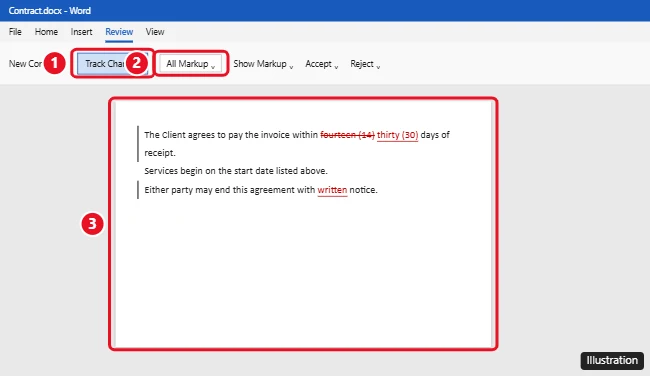
The Track Changes button has a drop-down with two scopes that matter when several people share one file. Microsoft lists For Everyone to track everyone’s changes and Just Mine to track only your own. For a redline you’ll send to another party, For Everyone is the safe choice, because a colleague’s edits then show up as well. The full set of options is on Microsoft’s Track Changes in Word training page.
If a reviewer will suggest edits rather than make final ones, the process is the same from their side; see how to add suggestions in Word with Track Changes.
What the other side sees in each markup view
The drop-down in the Markup group changes how the redline looks on screen. It doesn’t change what’s stored in the file, which matters once the document leaves your hands. Microsoft describes the four views like this:
| View | What Microsoft says it shows | When to use it for a redline |
|---|---|---|
| Simple Markup | Tracked changes with a red line in the margin | Reading the new wording without clutter while still seeing where changes are |
| All Markup | Tracked changes with different colors of text and lines for each reviewer | Making and checking the redline; this is the classic marked-up look |
| No Markup | The document with changes incorporated, markup hidden | Previewing how the agreed text would read |
| Original | The original document without tracked changes and comments showing | Checking what a clause said before anyone touched it |
The view is a display choice on each computer. Choosing No Markup before you send the file doesn’t remove your edits: Microsoft warns that it only hides them temporarily, and the other side can switch back to All Markup and see everything. To clear the markup area from your own screen without touching the edits, see how to remove the markup area in Word.
The Show Markup menu also lets you show or hide insertions and deletions or formatting changes, and show changes from all reviewers or only specific people; hidden formatting changes stay in the file, and you can settle them in one go with how to accept all formatting changes in Word.
Make the redline easy to read
A long redline is easier to review when the marks are consistent. Word gives you two sets of controls, plus the Show Markup filters described above.
Balloons or inline
On the Review tab, in the Markup group, select Show Markup > Balloons. Microsoft lists three choices:
- Show Revisions in Balloons puts deletions and formatting changes in the right margin.
- Show All Revisions Inline keeps every change in the text itself, with deletions struck through in place.
- Show Only Formatting in Balloons keeps text changes inline and moves formatting notes to the margin.
Balloons only appear in Print Layout or Web Layout view, per Microsoft.
Colors and strikethrough
Go to Review, select the Tracking Dialog Launcher from the Markup group (the small arrow in the group’s corner), and then select Advanced Options. Microsoft’s defaults are an underline for insertions and a strikethrough for deletions, each colored By author, with an Outside border marking changed lines. You can set a fixed color, but “by author” is what lets the other side tell your edits from a colleague’s. Details are on Microsoft’s page about how to change the Track Changes color.
Put your name on every change
Each tracked change carries the author’s name, and the other side will see it when they point at an edit. If your copy of Word shows a generic name or an old one, fix it before you edit:
- Select File > Options.
- In the Options dialog box, find the Personalize your copy of Microsoft Office section.
- Enter your user name and initials, then select OK.
Microsoft notes that this name is shared by the Office apps on that computer, so changing it in Word changes it in the others too. If you’re signed in to Office, Word may show your account name instead; look in the same section for an option to always use the values you typed. Microsoft’s steps are on change your user name and initials. To change the author already stored in a document’s properties, see how to change the author in Word.
Lock and send the redline
Once the redline leaves your hands, anyone with the file can normally turn Track Changes off, make edits that won’t show, and turn it back on. Lock Tracking prevents that.
- On the Review tab, select Tracking > Track Changes > Lock Tracking.
- If Word asks for a password, enter one if you want it, then select OK.
Microsoft describes the password as a way to keep others from turning off Track Changes. That’s the whole scope: it doesn’t stop anyone opening, copying or retyping the document, and it isn’t encryption, so treat it as a guard against quiet untracked edits, not as security. Microsoft also notes that if a document has been shared with you for review, you may not be able to turn off Track Changes.
Before you attach the file, three quick checks:
- Count what’s left. On the Review tab, select Reviewing Pane; Microsoft says its summary shows the exact number of visible tracked changes and comments.
- Look for hidden data. Microsoft recommends Document Inspector to check a file for tracked changes, comments and other hidden information before you share it.
- Don’t rely on No Markup. Switching to No Markup only hides the edits; they’re still in the file. For a clean copy as well as the redline, accept or reject everything in a separate copy.
If the other side will print the redline, File > Print has Print Markup under Document Info in the Print All Pages menu; leave it checked to print the marks. For printing just the margin bars, see how to print Simple Markup in Word. The fuller pre-send cleanup, the accept and reject steps and the web and Mac differences are in Track Changes in Word, then accept or reject each edit.
Turn an untracked revision into a redline
Sometimes the other side sends back a revised draft with no markup at all. You can still produce a redline by comparing their version with yours. On the Review tab, in the Compare group, select Compare, and then Compare two versions of a document (legal blackline). Choose your original and their revised file. Microsoft says the result opens as a third, new document showing what changed, and the two documents being compared aren’t changed. Microsoft explains the options on its legal blackline page.
For several reviewers’ copies, Microsoft points you to Combine revisions from multiple authors into a single document instead. A full walkthrough of comparison settings and how to read the result is in how to run a redline comparison in Word, and the basic steps are in how to compare two documents in Word.
When the marked-up draft comes back
The other side will usually answer your redline with one of their own, in the same file. On the Review tab, use Next and Previous to move between changes, and Accept or Reject for each one. The Accept and Reject drop-downs also have Accept All Changes and Reject All Changes, which are best saved for a final, agreed draft. Microsoft covers these on accept or reject tracked changes in Word.
The Track Changes walkthrough linked in the previous section goes through each edit in detail. If a finished document still shows red marks afterward, see how to remove red lines in Word, which separates spelling marks from leftover tracked changes.
Redlining in Word for the web and on a Mac
In Word for the web, Microsoft says you turn on tracking by selecting Reviewing in the mode menu at the top of the page, and that the browser version has a limited set of Track Changes features, so lock tracking, compare versions and print markup in the desktop app (see can I use Track Changes in Word for the web). Word for Mac has Track Changes on its Review tab too, but menu names can differ from Windows; the Track Changes walkthrough linked above covers both platforms.
Redlining questions
How does the other side tell my edits from a colleague’s?
In All Markup, Microsoft says Word shows tracked changes in different colors for each reviewer, and each change carries its author’s name. That’s why setting your user name before you start, and leaving colors on By author, matters on a team redline.
Should I use For Everyone or Just Mine on a shared contract?
Use For Everyone unless you have a specific reason not to. Just Mine tracks only your own edits, so a colleague working in the same file could change wording without leaving a mark, which defeats the point of a redline.
Do my comments go out with the redline?
Yes. Microsoft says comments are no longer part of the Track Changes function, so they stay in the file whether or not tracking is on. Check them separately and delete internal notes meant only for your own team; Microsoft’s Document Inspector also flags comments before you share the file.
Do I need to unlock tracking when the deal is done?
Yes, if you want to turn Track Changes off in that file. Select Tracking > Track Changes > Lock Tracking again; if you set a password, Word asks for it. Then accept or reject the remaining changes in a final copy before signing.

Kermit Matthews runs Live2Tech from just outside Philadelphia. He is an IT specialist with over 20 years of experience, from a university help desk to small-business IT, IT management and his own consulting practice, and has written tech guides full time since 2020. Steps are checked against the current software on a real device or the maker’s official documentation. More about Kermit.