Borders help a tip, quote, heading or signature block stand out, and a page border can frame a certificate or flyer. Word can put a border around a few words, a whole paragraph, a table, a picture or the entire page, and each one is set in a slightly different place. This guide covers all of them, from the one-click Outside Borders option to fully customised page borders.
Quick Answer
To box text, select it, go to Home, click the arrow next to the Borders button in the Paragraph group and choose Outside Borders. For a page border, go to Design, click Page Borders, choose Box, pick a style and click OK.
Text Borders vs. Paragraph Borders
Word treats a few selected words and a whole paragraph differently. If you select only some words, the border hugs those words, like a box around a single phrase in a sentence. If you select an entire paragraph, including its paragraph mark, the border stretches from the left margin to the right margin. Turn on Show/Hide (Ctrl+Shift+8) to see the ¶ mark and control exactly what you select.
Method 1: Outside Borders From the Home Tab
- Select the text, paragraphs or table you want to box.
- On the Home tab, find the Borders button in the Paragraph group.
- Click the small arrow next to it and choose Outside Borders.
- To add a line on one side only, choose Top Border, Bottom Border, Left Border or Right Border instead.
Outside Borders draws one box around the whole selection without lines between paragraphs. All Borders, by contrast, adds lines around every cell when used on a table.
Method 2: Customise With Borders and Shading
- Select the text or paragraph.
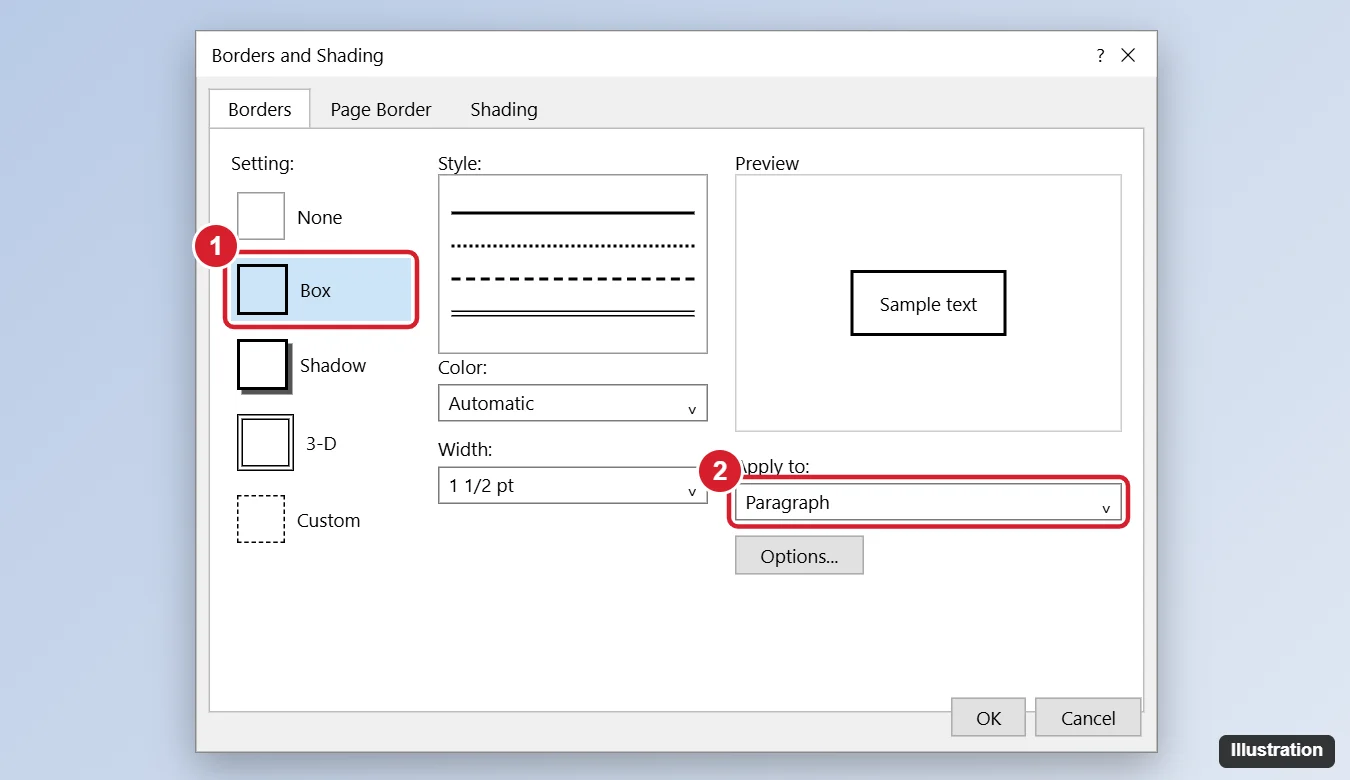
- Click the Borders arrow and choose Borders and Shading at the bottom of the menu.
- On the Borders tab, choose a setting such as Box, Shadow or 3-D.
- Pick a Style (solid, dashed, double), Color and Width.
- Under Apply to, choose Text or Paragraph.
- Click Options to add space between the border and the text, then click OK.
On the Shading tab of the same box you can fill the background with a colour, which makes callout boxes and notes stand out. See also how to change border color in Word.
Method 3: Use a Text Box or One-Cell Table
If you want to move the boxed text around freely, use Insert, Text Box, Draw Text Box, then format its outline with Shape Format, Shape Outline. For a box that stays in line with your text but is easy to resize, insert a 1×1 table (Insert, Table) and type inside it; set its border with Table Design, Borders.
Borders on Tables
- Click inside the table and open the Table Design tab.
- Choose a Line Style, Line Weight and Pen Color, then use the Borders menu to apply them: Outside Borders for the frame only, All Borders for every cell, or Inside Borders for the grid only.
- Use Border Painter to click individual cell edges and apply the chosen style one line at a time.
Borders on Pictures and Shapes
Select the picture, then on the Picture Format tab click Picture Border and choose a colour, weight and dash style. For shapes and text boxes, use Shape Format, Shape Outline. The Picture Styles gallery also includes ready-made framed and shadowed looks.
Add a Border Around the Whole Page
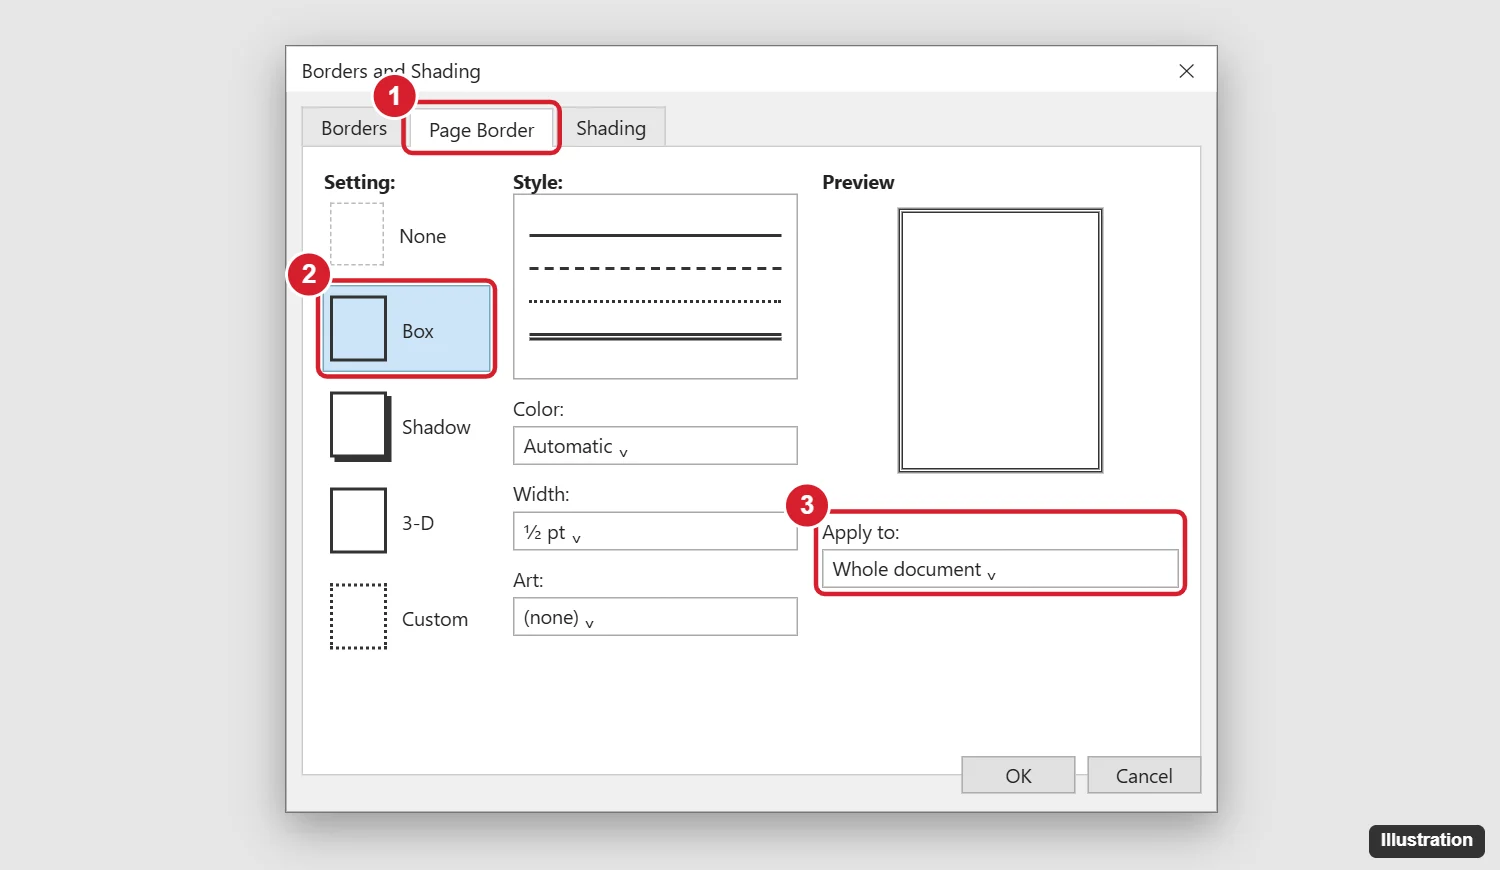
- Click the Design tab (Page Layout in Word 2010 and earlier).
- Click Page Borders in the Page Background group.
- On the Page Border tab, under Setting, click Box, Shadow or 3-D.
- Choose a Style, Color and Width, or pick a decorative border from the Art menu.
- Under Apply to, choose Whole document, This section, This section – First page only, or This section – All except first page.
- Click OK.
Put a border on only one page
Click on the page you want, insert a section break before and after it if needed (Layout, Breaks, Next Page), then open Page Borders and set Apply to This section. For a cover page, choose This section – First page only.
Move the border closer to the edge or the text
In the Page Borders dialog, click Options. Change Measure from to Edge of page or Text, and adjust the Top, Bottom, Left and Right margins. If part of the border doesn’t print, measure from Text or increase the distance from the edge, because many printers can’t print right up to the paper edge.
Remove a Border
- Text or paragraph: select it, click the Borders arrow and choose No Border.
- Table: select the table and choose No Border from Table Design, Borders.
- Page: open Design, Page Borders and choose None under Setting.
- Stubborn line: a line that appears when you type three hyphens and press Enter is an automatic paragraph border; select the paragraph above it and choose No Border.
Troubleshooting
- The border covers the full width: you selected the whole paragraph. Select just the words, or apply to Text in Borders and Shading.
- Borders join between paragraphs: paragraphs with identical border settings merge into one box. Change the spacing or border slightly on one of them to separate them.
- Page border missing on some pages: check the Apply to setting and whether the document has several sections.
- Art border is greyed out: choose Box first, then pick an Art border.
Frequently Asked Questions
Can I add a border to just one side?
Yes. Use Top, Bottom, Left or Right Border from the Borders menu, or click the side buttons in the Borders and Shading preview.
Will borders print?
Yes. Text, table and picture borders print normally; page borders may be clipped if they sit too close to the paper edge.
Does this work in Word for Mac and the web?
Word for Mac has the same Borders button and Page Borders option on the Design tab. Word for the web supports paragraph borders from the Borders button, but page border options are more limited.
Summary
- Select text and use Home, Borders, Outside Borders for a quick box.
- Use Borders and Shading for style, colour and spacing.
- Use Table Design or Picture Format for tables and pictures.
- Use Design, Page Borders for the whole page or a single section.
- Choose No Border or None to remove borders.
Want a decorative first letter too? See how to apply a drop cap in Word.

Kermit Matthews is a freelance writer based in Philadelphia, Pennsylvania with more than a decade of experience writing technology guides. He has a Bachelor’s and Master’s degree in Computer Science and has spent much of his professional career in IT management.
He specializes in writing content about iPhones, Android devices, Microsoft Office, and many other popular applications and devices.