Your old NAS, network printer or Windows XP-era PC share will not open from Windows 11. SMB1, the original file-sharing protocol, is off by default because it is insecure, and installing just its client usually gets an SMB1-only device talking again. On Windows 11, though, the real cause is often SMB signing or blocked guest access, which SMB1 will not fix. Match your error to the cause first, then install the client, connect, and remove it again.
Match your error to the cause
Read the exact message Windows shows, then find it below. Only the first row is solved by SMB1.
| What you see | Likely cause | What to do |
|---|---|---|
| A message that begins “You can’t connect to the file share because it’s not secure. This share requires the obsolete SMB1 protocol”, or the device’s manual says it supports only SMB1 (sometimes called SMB 1.0 or CIFS) | The device speaks only SMB1 | Check for a firmware update first; otherwise install the SMB1 client below |
| STATUS_INVALID_SIGNATURE or 0xc000a000 on Windows 11 Pro, Enterprise or Education | The device does not support SMB signing, which Windows now requires | Update or replace the device; SMB1 does not help |
| A message ending “your organization’s security policies block unauthenticated guest access,” or error 0x80070035 | The share uses guest access with no username or password | Create a user account on the device and connect with it |
| The device is missing under Network in File Explorer but opens when you type its address | Network browsing, not a protocol failure | Connect by address or map a drive |
If you are not sure which version the device uses, look in its admin page or manual for an SMB, CIFS or Windows file sharing setting. Many NAS boxes from the last decade support SMB2 or SMB3, sometimes only after a firmware update.
What changed in Windows 11 for older network devices
Three changes explain most connection failures with old hardware, and they are documented across Microsoft’s SMB pages:
- SMB1 is not installed. According to Microsoft’s SMBv1 not installed by default article, Windows 11 has neither the SMB1 client nor the SMB1 server after a clean install. It can still be added, but Microsoft strongly recommends against reinstalling it because it exposes the PC to ransomware and other malware.
- Signing is required. Starting with Windows 11 version 24H2, Microsoft’s SMB signing page says Pro, Enterprise and Education require SMB signing by default for outgoing and incoming connections; Home does not. A device that cannot sign its traffic fails with STATUS_INVALID_SIGNATURE, and Microsoft does not recommend turning signing off to work around it.
- Guest access is blocked. Microsoft’s guest access page says Windows 10 Enterprise and Education, and Windows 11 Pro from Insider build 25267 on, block unauthenticated guest logons over SMB2 and SMB3 by default, and its signing page says requiring SMB signing also disables guest access to shares. A share that never asks for a password falls into this group.
The practical takeaway: on a Pro PC, an old NAS may need SMB1 and still fail because of signing. In that case the device itself has to change.
Install only the SMB1 client
The client lets your PC connect to an SMB1 device. The server part would let other devices connect to your PC over SMB1, which you almost never need, so leave it off. You need an administrator account.
- Press Windows + R, type optionalfeatures and press Enter. This opens Turn Windows features on or off.
- Find SMB 1.0/CIFS File Sharing Support and select the + next to it to expand it, without checking the parent box.
- Check SMB 1.0/CIFS Client.
- Leave SMB 1.0/CIFS Server unchecked.
- Select OK, wait while Windows adds the files, then restart when prompted.
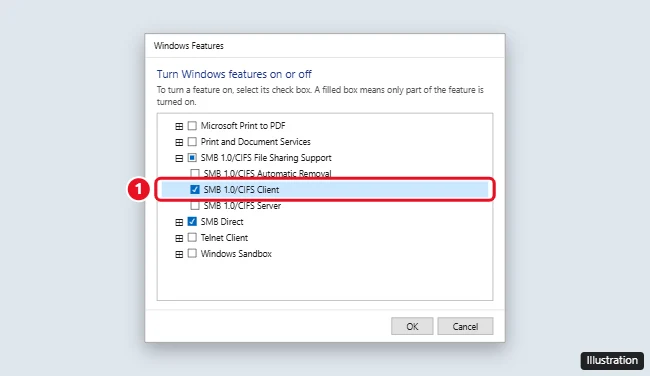
Some PCs also list an automatic removal item under the same heading. Microsoft documents automatic removal for Windows 10 Home and Pro, where an unused SMB1 client is uninstalled after 15 days; it does not publish the same schedule for Windows 11. If SMB1 later disappears on its own, that item is the first thing to check.
Install SMB1 from an admin terminal
PowerShell is quicker if you manage several PCs or prefer commands. The feature name SMB1Protocol and these cmdlets come from Microsoft’s detect, enable and disable SMB page.
- Right-click Start and open Terminal as administrator.
- Check the current state:
Get-WindowsOptionalFeature -Online -FeatureName SMB1Protocol - List the SMB1 sub-features your PC offers, so you can pick the client one by its exact name:
Get-WindowsOptionalFeature -Online | Where-Object FeatureName -like "SMB1*" | Select-Object FeatureName, State - Enable the client sub-feature using the name shown (commonly SMB1Protocol-Client). The
-Allswitch also turns on the parent feature it depends on:Enable-WindowsOptionalFeature -Online -FeatureName SMB1Protocol-Client -All - Restart when asked. Run the check from step 2 again afterward; the state should read Enabled.
Microsoft’s page also documents Enable-WindowsOptionalFeature -Online -FeatureName SMB1Protocol, which turns on the whole SMB1 feature rather than only the client. Prefer the client-only route when your PC lists separate sub-features.
To check whether your PC’s own SMB server has SMB1 turned on, the same page documents Get-SmbServerConfiguration | Format-List EnableSMB1Protocol, which runs without elevation.
Connect by address and confirm it works
SMB1 devices often do not appear under Network in File Explorer even when the protocol works. Microsoft explains that the Computer Browser service, which old-style network browsing relied on, is removed along with SMB1, and that this kind of browsing is deprecated. Go straight to the address instead:
- Find the device’s IP address in its display panel, admin page or your router’s device list.
- Open File Explorer, click the address bar, type \\ followed by the address, for example \\192.168.1.50, and press Enter.
- Sign in with an account created on the device if asked.
- Open a shared folder and copy a small test file in each direction.
If the folders open and the test copy works, the fix is complete. To make the share easy to reach next time, map it as a network drive in Windows 11. The steps for connecting to an SMB share on Windows 10 are similar if you also have an older PC to set up.
Keep SMB1 contained while you need it
Treat SMB1 as a temporary bridge, not a permanent setting. A few rules keep the exposure small:
- Only on a trusted network. Use it at home or in a small office you control, with the network set to private, and never on public Wi-Fi.
- Client only. Leaving the server part off means other devices cannot reach your PC over SMB1.
- Keep SMB2 and SMB3 on. Microsoft advises against disabling the newer versions; your PC uses them for every modern share, and SMB1 only comes into play for the old device.
- Do not stack workarounds. Turning on the Lanman Workstation policy Enable insecure guest logons or turning off SMB signing to reach the same device adds more risk, and Microsoft recommends against both.
- Set a deadline. A realistic plan: copy the files off the old NAS this week, then remove SMB1.
Fix the device, then remove SMB1
The lasting fix is on the device. Check the maker’s support site for firmware that adds SMB2 or SMB3, then look in its settings for a minimum or maximum SMB version and raise it. If the device has a web interface, FTP or SFTP, use that to copy files off it instead of SMB1. For a scanner or multifunction printer that only scans to an SMB1 folder, scan to email or USB instead. A device with no firmware updates for years likely has other security problems and is worth replacing.
Once nothing needs SMB1, remove it:
- Open optionalfeatures again, uncheck SMB 1.0/CIFS File Sharing Support and select OK, or run
Disable-WindowsOptionalFeature -Online -FeatureName SMB1Protocolin an admin terminal. - Restart the PC.
- Run
Get-WindowsOptionalFeature -Online -FeatureName SMB1Protocoland confirm the state reads Disabled.
For a broader look at how file sharing works between Windows PCs, see this overview of SMB file sharing on Windows 10.
When the SMB1 option is missing or blocked
- Work or school PC: your organization can block optional features through Group Policy or device management. If the checkbox is grayed out, the install fails or SMB1 is removed again after a restart, ask IT; they may have a supported way to reach the device.
- Install stalls or fails: Windows may need to download the feature files. Connect to the internet, restart, and try again.
- SMB1 is on but the device still fails: go back to the table at the top. On Pro, Enterprise and Education, signing is the usual blocker.
SMB1 questions
Do I need to restart after turning SMB1 on or off?
Yes. Microsoft’s commands for adding or removing the feature require a restart, and the device may not connect until you do.
Should I also turn on the SMB 1.0/CIFS Server option?
Only if an old device must connect to a folder shared from your PC, such as an old scanner saving into it. For opening a NAS or old PC from Windows 11, the client is enough.
Is allowing insecure guest logons the same as enabling SMB1?
No. Guest logons are a separate setting for shares that need no password, and they apply to SMB2 and SMB3 connections. Creating an account on the device is the safer fix.
Why does the device show up on my phone or Mac but not under Network in Windows?
Other systems use their own discovery methods. Windows no longer relies on the old browsing service that SMB1 devices advertise through, so connect by IP address instead.
Once the files are off the old device or its firmware supports SMB2, remove SMB1 with the steps above and confirm the state reads Disabled.

Kermit Matthews runs Live2Tech from just outside Philadelphia. He is an IT specialist with over 20 years of experience, from a university help desk to small-business IT, IT management and his own consulting practice, and has written tech guides full time since 2020. Steps are checked against the current software on a real device or the maker’s official documentation. More about Kermit.