If your laptop sounds like a hair dryer or feels hot on your lap, here’s the catch: Windows 11 and Windows 10 have no fan-speed slider. The fan is run by the PC’s own firmware. What you can change is how that firmware behaves, through your PC maker’s app, the power plan’s System cooling policy, the Windows power mode, or fan settings in the BIOS or UEFI. Each option is below, plus the cleaning and airflow fixes that often matter more.
Why Windows can’t set the fan speed directly
Inside every laptop is a small chip called the embedded controller. It reads the CPU and GPU temperatures many times a second and sets the fan speed from a table the manufacturer wrote. Many laptops stop the fan entirely when they’re cool, then ramp up in steps as the load rises. Windows can send hints, such as “favor performance” or “favor cooling”, but the controller makes the final call.
Desktops are different. Case and CPU fans plug into headers on the motherboard, and most boards let you shape a fan curve (how fast each fan spins at each temperature) in the UEFI setup. That gives desktop owners far more control than laptop owners get.
So the real question isn’t “where is the fan setting in Windows” but “which layer does my PC let me change”. The table sorts that out.
Pick the right method for your PC
| Your situation | Try first | What to expect |
|---|---|---|
| Brand-name laptop (Dell, Lenovo, HP, ASUS, Acer, MSI) | The maker’s own app | Quiet, balanced or performance profiles; a max-fan option on some gaming models |
| Any laptop that runs hot under load | System cooling policy set to Active, plus the Best performance power mode | Fan reacts sooner instead of the CPU slowing down |
| Laptop where you want it quieter | A quiet profile in the maker’s app, or the Best power efficiency mode | Less noise, slightly lower performance |
| Desktop with fans on the motherboard | Fan curves in the BIOS or UEFI | Full control per fan header |
| Fan loud even when idle | Cleaning and checking background apps | Often fixes the noise without changing any setting |
Make the fan respond sooner with System cooling policy
This setting lives in the classic power plan options and works the same in Windows 11 and Windows 10. It tells the system what to do first when the processor heats up: speed up the fan, or slow down the processor.
- Press Windows + R, type powercfg.cpl and press Enter. Power Options opens in Control Panel.
- Next to the plan that’s selected, click Change plan settings.
- Click Change advanced power settings.
- Expand Processor power management, then System cooling policy.
- Set Plugged in to Active. Set On battery to Active as well if you don’t mind shorter battery life.
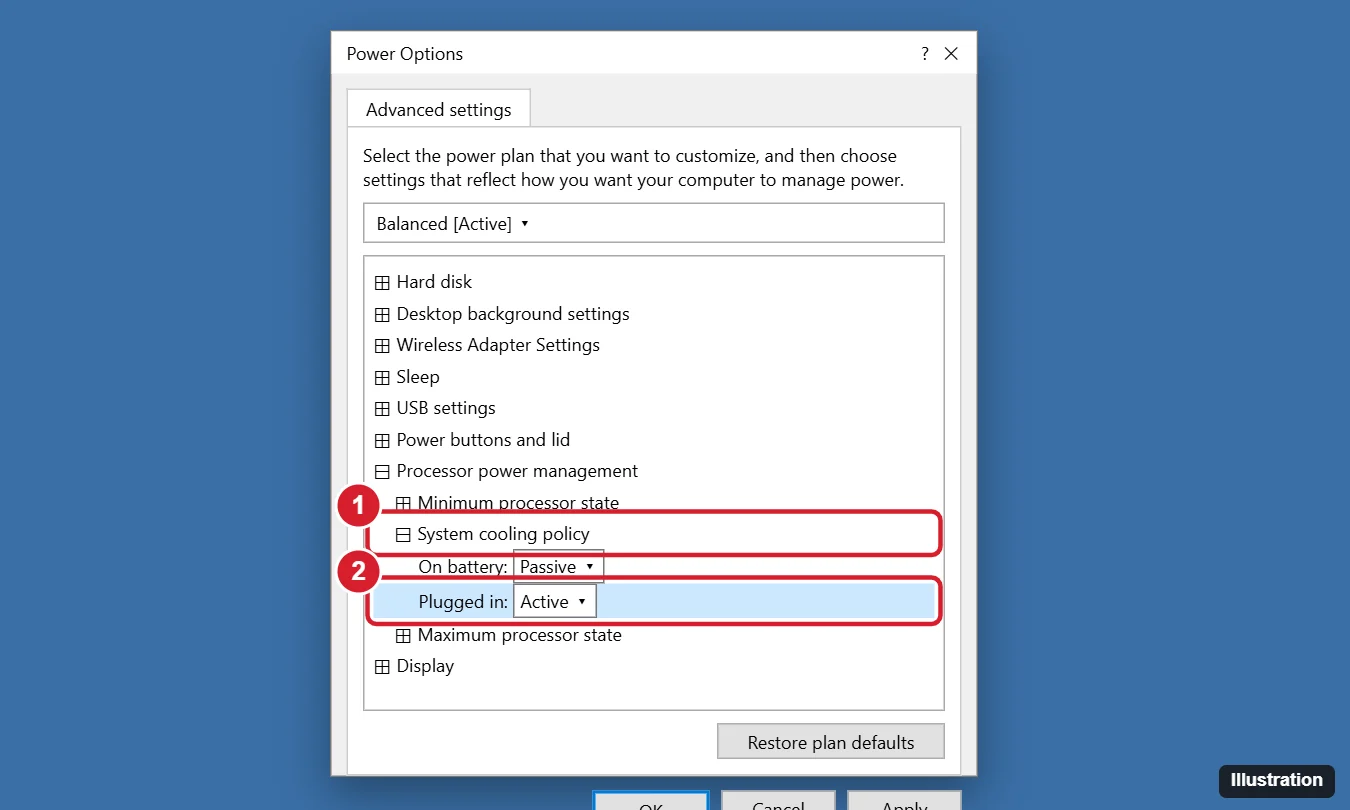
Expand System cooling policy (1) and set it to Active (2) so the fan ramps up sooner. - Click OK. The change applies right away; no restart needed.
| Policy | When the processor warms up | Good for |
|---|---|---|
| Active | The fan speeds up before the processor slows down | Gaming, video exports, keeping performance up |
| Passive | The processor slows down first, and the fan runs less | Quiet rooms, longer battery life |
If you don’t see System cooling policy at all, your PC doesn’t offer it. It’s often missing on newer laptops, especially ones that use Modern Standby, which show fewer power options. In that case, skip ahead to the power mode and the maker’s app. Avoid registry tweaks that force the hidden setting back into view; the firmware may ignore it anyway.
Change the Windows power mode
Power mode is the quickest setting to flip, and on many laptops the firmware uses it as a signal for how hard to cool. Microsoft’s page on changing the power mode gives these steps:
- Select Start > Settings > System > Power & battery.
- Under Power mode, choose Best power efficiency, Balanced or Best performance. Laptops let you set separate choices for plugged in and on battery.
Best performance usually lets the fan run more so the processor can keep higher speeds. Best power efficiency tends to make the laptop quieter and cooler, at the cost of speed. If the power mode can’t be changed, Microsoft notes that a custom power plan may be selected; open Power Options in Control Panel and choose Balanced, then try again.
On Windows 10, the same power mode choice is in Settings, and many Windows 10 laptops also show it as a slider when you click the battery icon on the taskbar. For the separate High performance plan in Control Panel, see getting the High Performance power plan on Windows 11.
Use your PC maker’s cooling app
The maker’s app is the only tool that talks to the embedded controller in a supported way, so on a laptop it’s the best place for real fan control. App names change over time and differ between consumer, business and gaming lines, so treat this list as a starting point and check the support page for your exact model.
| Brand | App to look for | Typical setting name |
|---|---|---|
| Dell | MyDell or Dell Power Manager; Alienware Command Center on Alienware models | Thermal management or thermal profile |
| Lenovo | Lenovo Vantage; Legion gaming models have their own Legion app | Power or thermal mode |
| HP | HP Command Center; OMEN Gaming Hub on OMEN and Victus models | Thermal profile or performance mode |
| ASUS | MyASUS; Armoury Crate on ROG and TUF models | Fan profile or operating mode |
| Acer | NitroSense or PredatorSense on gaming models | Fan control |
| MSI | MSI Center | User scenario or fan settings |
Most of these apps come preinstalled. If yours is missing, get it from the Microsoft Store or the maker’s support site for your model, not a download portal. Gaming laptops often add a max-fan mode for long sessions; it’s loud but safe, and you can switch back when you’re done. Many models also have a keyboard shortcut that cycles between profiles; the key varies, so check your manual.
Set fan behavior in the BIOS or UEFI
The BIOS or UEFI is the firmware setup that runs before Windows. Most laptops offer little or no fan control here, though some business models include an option that keeps the fan running all the time. Desktops usually offer the most.
Open the firmware settings
- Save your work and close apps.
- In Windows 11, go to Settings > System > Recovery and select Restart now next to Advanced startup. In Windows 10, it’s Settings > Update & Security > Recovery.
- Choose Troubleshoot > Advanced options > UEFI Firmware Settings, then Restart.
You can also press the setup key while the PC starts, often F2, F10, F12 or Delete depending on the maker. Detailed routes are in opening the BIOS in Windows 11 and entering the BIOS on Windows 10.
Find and change the fan options
- Look in sections named something like Hardware Monitor, Fan Control, Thermal or System Configuration. On many desktop boards, these live under an Advanced or Monitor tab.
- Pick a preset (names such as Silent, Standard, Performance or Full Speed are common) or edit the curve point by point. A gentle curve keeps fans slow at idle and ramps them up as temperature climbs.
- Save and exit. F10 is the usual shortcut, but use the on-screen Save option if you’re not sure.
Desktop note: 4-pin fans use PWM (pulse-width modulation) and can be controlled precisely; 3-pin fans are controlled by voltage (often called DC mode). If a fan won’t slow down, check that its header is set to the mode that matches the fan. If the PC behaves oddly after a change, go back in and load the optimized or default settings.
Third-party fan tools: proceed with caution
Free tools can give desktops a single dashboard for every fan. Fan Control is a popular free option for desktops, though its developer notes that most laptops won’t work with it, and MSI Afterburner is widely used for graphics card fan curves. Keep these points in mind before installing anything:
- On most laptops, third-party tools can read temperatures but can’t change fan speed, because the embedded controller is locked to the maker’s software.
- SpeedFan, still mentioned in many older guides, hasn’t been updated in years and often doesn’t detect current hardware.
- A tool that sets fans too low can let components overheat. Hardware normally protects itself by throttling or shutting down, but that’s a sign of a bad setting, not a feature to rely on.
- Download only from the developer’s official page, and don’t run two fan tools at once, since they will fight over the same fans.
For graphics cards, the driver software from NVIDIA or AMD, or the card maker’s own utility, is the safer first stop.
Fix the cause: heat, dust and background load
A fan that runs loud is usually responding correctly to heat. Lowering that heat quiets it more reliably than any setting.
- Clean the vents. Shut down and unplug the PC, then use short bursts of compressed air at the intake and exhaust vents. Hold the fan still with a toothpick or plastic tool so it doesn’t overspin.
- Give it airflow. Use the laptop on a desk or a hard, flat surface, not a bed, couch or blanket that blocks the intake underneath. A cooling pad helps during long gaming sessions.
- Check what’s working the processor. Press Ctrl + Shift + Esc to open Task Manager and sort by CPU. A stuck browser tab, an update installing in the background or a cloud sync can keep the fan spinning at idle.
- Update firmware and drivers. Makers often tune fan tables in BIOS updates. Updating the BIOS on Windows 11 covers the safe ways.
- Undo overclocks. Extra speed means extra heat; turning off overclocking returns parts to stock.
- Watch temperatures. Knowing the real CPU temperature tells you whether the noise is justified; see checking CPU temperature on Windows 11.
If the fan never spins even when the PC is hot, or it grinds or rattles, the fan itself may be failing. Checking laptop fan performance walks through the physical checks and the maker’s diagnostic tests. A failing fan or dried-out thermal paste is a job for the maker’s support or a repair shop.
One note for Windows 10 users: Windows 10 reached end of support on October 14, 2025. The methods above all work on it, but the maker apps and BIOS updates that improve fan behavior increasingly target Windows 11.
Fan speed questions
Can I set an exact fan RPM from Windows?
Not with anything built into Windows. Exact speeds or curves come from desktop UEFI settings or a desktop fan tool. Laptops usually offer profiles instead of numbers.
Is running the fan at full speed all the time bad for it?
It won’t harm the PC, but it’s louder, uses more battery, pulls in more dust and wears the fan bearing a little faster. Save max-fan modes for heavy work.
Will a quieter profile damage my laptop?
Unlikely. Quiet profiles are designed by the maker, and the processor slows itself before it gets dangerously hot. Expect lower performance in games or exports instead.
Why does the fan run hard right after I turn the PC on?
Startup apps, Windows updates, antivirus scans and file indexing often run in the first minutes after sign-in. If the noise settles after a few minutes, it’s normal. If it doesn’t, check Task Manager for the app using the CPU.
Start with your maker’s app and the power mode, set System cooling policy to Active if it’s offered, and clean the vents; that combination handles most loud or hot PCs without touching the firmware.

Kermit Matthews runs Live2Tech from just outside Philadelphia. He is an IT specialist with over 20 years of experience, from a university help desk to small-business IT, IT management and his own consulting practice, and has written tech guides full time since 2020. Steps are checked against the current software on a real device or the maker’s official documentation. More about Kermit.