WordPress is an incredibly popular option when it comes to building your own website. Most Web hosts offer a one-click WordPress solution, there are a very high number of support articles and websites dedicated to help you with with any problems you encounter, and there are a lot of themes and plugins that can help you achieve the exact look that you want from your site. (My favorite, and the one used on this site, is Genesis. Find out more about installing the Genesis framework or check out some of the Genesis child themes for an idea of what you can do.)
But as you start using WordPress and discovering the nuances and power of the application, you might find that there are certain things you wish you could do. For me, one of these realizations came when I wanted to post something at a specific time when I was going to be busy. I couldn’t get away from my previously scheduled activity, but that post needed to go live.
Luckily there is a feature in WordPress that lets you schedule a post for a specific date and time so that you don’t need to be physically at your computer to do it.
Post Scheduling in WordPress Without a Plugin
As mentioned earlier, this method is based entirely around using a default feature in a WordPress installation. This article was written in WordPress 4.9.2, in case you are reading this article at some point in the future and this method no longer works.
Step 1: Sign into your WordPress site’s admin dashboard. This is where you go to make changes to your site, write posts, etc. It’s going to be found at yourwebsite.com/wp-admin, but replacing the “yourwebsite.com” part with the actual URL of your site.
Step 2: Hover over the Posts option in the left column, then either click Add New to write a new post, or navigate to an existing post draft that you want to schedule for later.

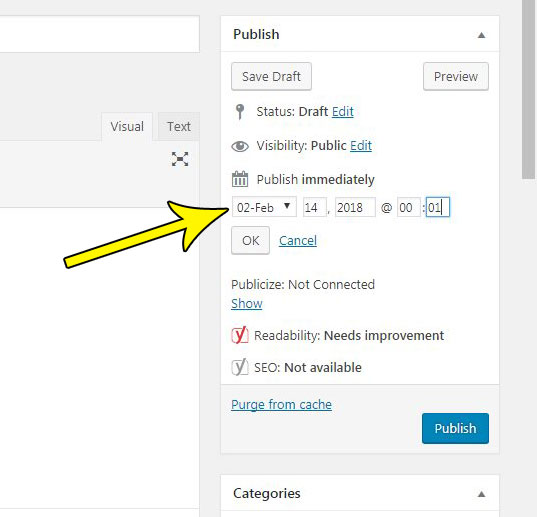
Step 3: Click the Edit link to the right of Publish immediately in the Publish section at the right side of the window.

Step 4: Specify the date and time, then click the OK button.

Step 5: Complete your post, then click the blue Schedule button that will have replaced the Publish button you are accustomed to seeing for regular posts.

One thing that I have learned as I have begun to schedule posts more and more is that you should always do that part of your post first. It’s very easy to get in the habit of publishing a post as soon as you are done with it, so scheduling the post first will ensure that the post is actually scheduled for a later time, rather than posted immediately.

Kermit Matthews is a freelance writer based in Philadelphia, Pennsylvania with more than a decade of experience writing technology guides. He has a Bachelor’s and Master’s degree in Computer Science and has spent much of his professional career in IT management.
He specializes in writing content about iPhones, Android devices, Microsoft Office, and many other popular applications and devices.