Windows 11 puts your PC to sleep after a period of inactivity to save power. If it sleeps too quickly while you read, or stays awake too long, you can change the timer in Settings. Recent Windows 11 versions group these options under Screen, sleep, and hibernate timeouts, while older versions call it Screen and sleep.
Quick Answer
Open Settings, System, Power and battery (or Power), expand Screen, sleep, and hibernate timeouts, and choose a time in the Put my device to sleep after drop-down.
How to Change Sleep Time on Windows 11
- Open Settings with Windows+I.
- Select System, then Power and battery (called Power on desktops).
- Expand Screen, sleep, and hibernate timeouts, or Screen and sleep on older versions.
- Pick a time for Put my device to sleep after. Laptops show separate options for battery and plugged in.
- Choose Never if you do not want the PC to sleep automatically.
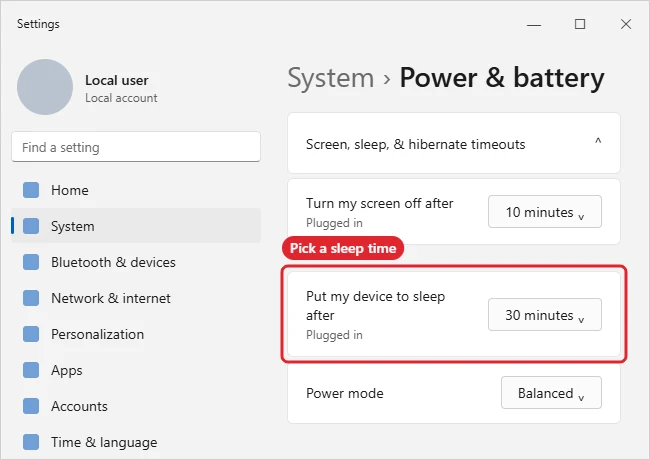
Sleep and Screen Settings
| Setting | What it controls |
|---|---|
| Turn my screen off after | Only the display |
| Put my device to sleep after | The whole PC enters sleep |
| Hibernate after | Saves to disk and powers off, where supported |
| Power mode | Balances performance and battery life |
Troubleshooting
- The PC still sleeps early: check for a work policy or a power plan set in Control Panel, Power Options.
- The PC will not sleep at all: run powercfg /requests in an admin terminal to see which app is keeping it awake.
- To change only the display timer, see how to adjust screen timeout on Windows 11.
- Want hibernate as well? Read how to add the hibernate option in Windows 11.
Frequently Asked Questions
Is it bad to set sleep to Never?
Not for desktops, though it uses more power. For laptops on battery, a shorter time protects battery life.
What is the difference between sleep and screen off?
Screen off only turns off the display. Sleep pauses the whole PC in a low-power state.
Does sleep stop downloads?
Usually yes. Keep the PC awake, or use the Never setting temporarily for large downloads.
Summary
- Open Settings, System, Power and battery.
- Expand the timeouts section.
- Choose a sleep time.
- Use Never to keep the PC awake.

Kermit Matthews is a freelance writer based in Philadelphia, Pennsylvania with more than a decade of experience writing technology guides. He has a Bachelor’s and Master’s degree in Computer Science and has spent much of his professional career in IT management.
He specializes in writing content about iPhones, Android devices, Microsoft Office, and many other popular applications and devices.