Windows 11 puts your PC to sleep after a period of inactivity to save power. That’s a problem during long downloads, backups, renders, remote sessions, or when you’re watching a dashboard. You can stop your computer from sleeping permanently, only when plugged in, or just for a while. This guide covers the Settings app, a quick command, keeping a laptop awake with the lid closed, a temporary “stay awake” tool, and what to check if your PC still sleeps.
Quick Answer
Open Settings > System > Power & battery (Power on desktops). Expand Screen, sleep, & hibernate timeouts (or Screen and sleep) and set Plugged in, put my device to sleep after to Never. Do the same for battery power if you want. The screen can still turn off to save power while the PC stays awake.
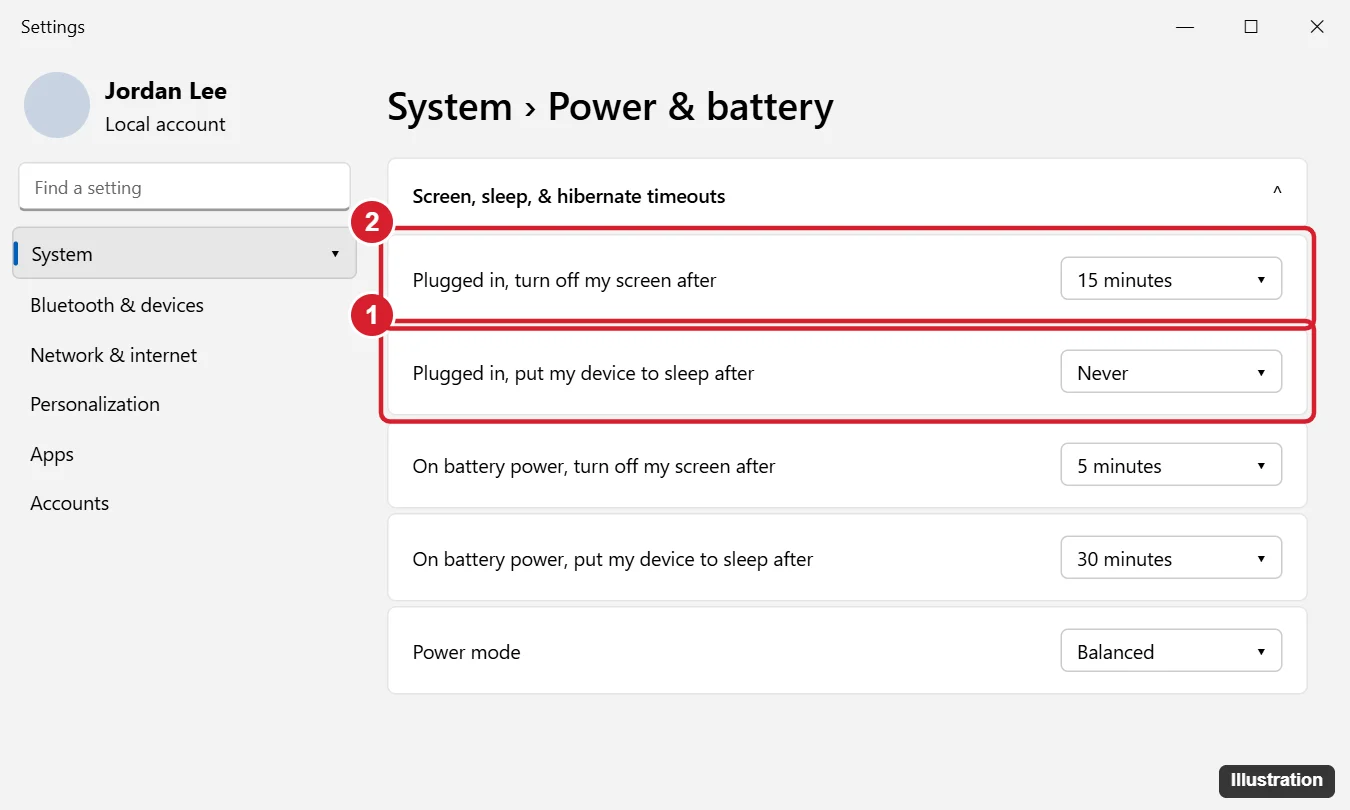
Method 1: Settings App
- Press Windows + I to open Settings.
- Go to System > Power & battery.
- Expand Screen, sleep, & hibernate timeouts (the name varies slightly by version).
- Set put my device to sleep after to Never for plugged in, and for battery if you want.
- Optionally set the screen timeout. Turning the screen off doesn’t put the PC to sleep.
Method 2: One Command
Open Command Prompt or PowerShell and run:
| Command | Effect |
|---|---|
powercfg /change standby-timeout-ac 0 |
Never sleep when plugged in |
powercfg /change standby-timeout-dc 0 |
Never sleep on battery |
powercfg /change monitor-timeout-ac 0 |
Never turn off the screen when plugged in |
powercfg /change standby-timeout-ac 30 |
Sleep after 30 minutes when plugged in |
Method 3: Keep a Laptop Awake With the Lid Closed
- Open Control Panel > Hardware and Sound > Power Options, or search Start for lid.
- Click Choose what closing the lid does.
- Set When I close the lid to Do nothing for Plugged in (and On battery if needed).
- Click Save changes.
Make sure the laptop has ventilation when closed, and don’t put it in a bag while it’s running.
Method 4: Stay Awake Temporarily
Microsoft’s free PowerToys includes Awake, which keeps the PC awake indefinitely or for a set time without changing your power plan. Install PowerToys from the Microsoft Store, open Awake, and choose Keep awake indefinitely or Keep awake for a time interval. It’s ideal for occasional long tasks.
If Your PC Still Goes to Sleep
- Check advanced settings: Control Panel > Power Options > Change plan settings > Change advanced power settings > Sleep. Set Sleep after and Hibernate after to 0 (Never).
- Check for policies: work PCs may enforce sleep through management settings.
- See what’s putting it to sleep: run
powercfg /requestsor check Event Viewer (Windows Logs > System, source Kernel-Power) around the time it slept. - Screen saver lock isn’t sleep, but it can look like it. Check Settings > Personalization > Lock screen > Screen saver.
Frequently Asked Questions
Is it bad to never let my PC sleep?
It uses more electricity and, on laptops, more battery. It doesn’t harm the hardware. Let the screen turn off to save power.
Will downloads continue while the screen is off?
Yes, as long as the PC itself doesn’t sleep.
Is this the same on Windows 10?
Yes. In Windows 10, the setting is under Settings > System > Power & sleep.
Summary
- Set sleep to Never in Settings > System > Power & battery.
- Or run
powercfg /change standby-timeout-ac 0. - Change the lid action to Do nothing for laptops.
- Use PowerToys Awake for temporary stay-awake needs.

Kermit Matthews is a freelance writer based in Philadelphia, Pennsylvania with more than a decade of experience writing technology guides. He has a Bachelor’s and Master’s degree in Computer Science and has spent much of his professional career in IT management.
He specializes in writing content about iPhones, Android devices, Microsoft Office, and many other popular applications and devices.