If your Windows 10 PC keeps locking itself when you step away for a few minutes, several different settings could be responsible: the screen timeout, sleep, the screen saver, the “Require sign-in” option, Dynamic Lock, or an inactivity policy set by your organization. This guide walks through each one so you can stop the automatic lock (and the screen turning off) for good, or just make it wait longer.
Quick Answer
Go to Settings > System > Power & sleep and set both Screen and Sleep to Never (or a longer time). Then open Settings > Accounts > Sign-in options and set Require sign-in to Never. If it still locks, check the screen saver and Dynamic Lock settings below.
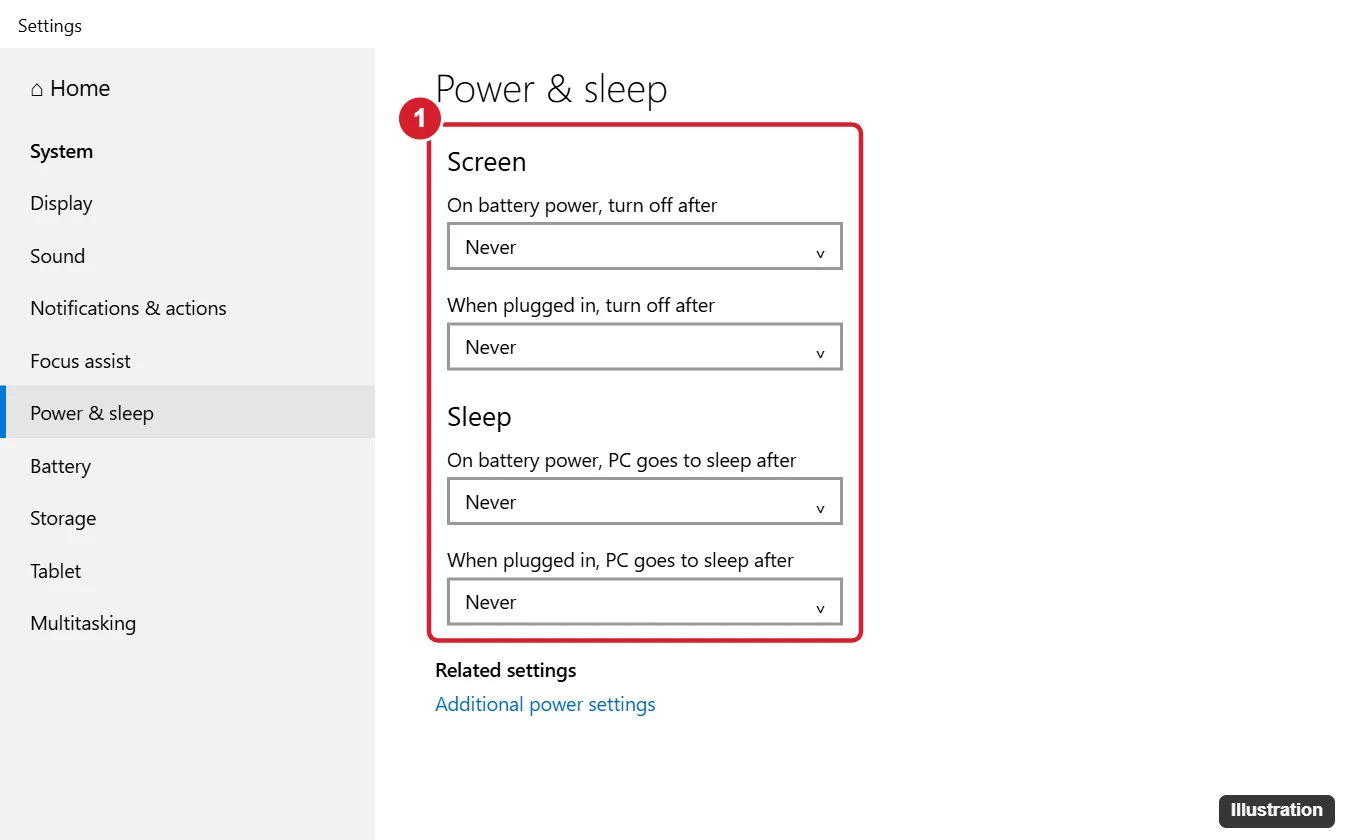
Step 1: Change the Screen and Sleep Timeouts
- Press Windows + I to open Settings.
- Click System > Power & sleep.
- Under Screen, set When plugged in, turn off after (and On battery power on laptops) to Never or a longer time.
- Under Sleep, do the same for PC goes to sleep after.
On a laptop, leaving the screen on while on battery drains it faster. A good compromise is Never when plugged in and 10–15 minutes on battery.
Step 2: Turn Off “Require Sign-In” After Sleep
- Open Settings > Accounts > Sign-in options.
- Under Require sign-in, choose Never for “If you’ve been away, when should Windows require you to sign in again?”
Now, if the PC sleeps or the screen turns off, it wakes straight to your desktop instead of the lock screen. If the option is missing, you may be using Windows Hello or a policy from your organization that requires it.
Step 3: Check the Screen Saver
- Right-click the desktop and choose Personalize > Lock screen.
- Scroll down and click Screen saver settings.
- Either set Screen saver to (None), or uncheck On resume, display logon screen and increase Wait.
- Click OK.
Step 4: Turn Off Dynamic Lock
Dynamic Lock locks your PC automatically when a paired Bluetooth phone moves out of range, which can happen unexpectedly if the connection drops.
- Go to Settings > Accounts > Sign-in options.
- Under Dynamic lock, uncheck Allow Windows to automatically lock your device when you’re away.
Step 5: Check Advanced Power Settings
- In Power & sleep, click Additional power settings.
- Next to your active plan, click Change plan settings > Change advanced power settings.
- Expand Sleep and Display and confirm the timers match what you set. Also check Console lock display off timeout if it appears.
If Console lock display off timeout is hidden, it controls how quickly the screen turns off once the lock screen is already showing (not the lock itself), so you usually don’t need it.
Step 6: Machine Inactivity Limit (Pro, Work, and School PCs)
On Windows 10 Pro, Enterprise, and Education, a security policy can lock the PC after a set number of idle seconds regardless of your other settings.
- Press Windows + R, type secpol.msc, and press Enter (administrator required).
- Go to Local Policies > Security Options.
- Open Interactive logon: Machine inactivity limit and set it to 0 (disabled).
On a work or school PC, this and other lock settings are often enforced by IT. Changing them may be blocked, reversed automatically, or against company policy, so check with your IT team first.
Temporary Option: Keep the PC Awake Without Changing Settings
If you only need the PC to stay awake for a presentation or a long download, you can use a “keep awake” utility (several free ones are available, including one in Microsoft’s PowerToys) instead of changing your permanent settings. When you’re done, turn it off and your normal lock timing returns.
Should You Stop Windows From Locking?
Automatic locking protects your files and accounts if you walk away from your PC. On a home desktop in a private room, turning it off is usually fine. On a laptop or shared or public computer, consider a longer timeout instead, and lock manually with Windows + L when you step away.
Frequently Asked Questions
Why does my PC still lock after I set everything to Never?
Check the screen saver and Dynamic Lock settings, then the inactivity policy. On work PCs, device management software can override local settings.
What’s the difference between the screen turning off and locking?
Turning off the screen only saves power. Locking requires you to sign in again. With Require sign-in set to Never, the screen can turn off without locking.
Do these steps work on Windows 11?
Mostly. On Windows 11, go to Settings > System > Power & battery > Screen and sleep (or Screen, sleep, & hibernate timeouts) and Settings > Accounts > Sign-in options.
Summary
- Set Screen and Sleep to Never in Settings > System > Power & sleep.
- Set Require sign-in to Never in Sign-in options.
- Disable the screen saver’s logon screen and Dynamic lock.
- On Pro PCs, check Machine inactivity limit in secpol.msc.

Kermit Matthews is a freelance writer based in Philadelphia, Pennsylvania with more than a decade of experience writing technology guides. He has a Bachelor’s and Master’s degree in Computer Science and has spent much of his professional career in IT management.
He specializes in writing content about iPhones, Android devices, Microsoft Office, and many other popular applications and devices.