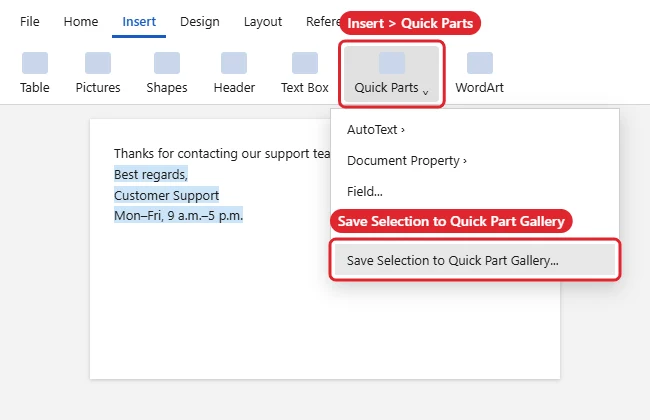
To use Quick Parts in Word, select the text you want to reuse, go to Insert > Quick Parts > Save Selection to Quick Part Gallery, and give it a name. Later, click Insert > Quick Parts and pick the entry to drop it into any document. Quick Parts are handy for signatures, addresses, disclaimers and any paragraph you type again and again.
Quick Answer
Select text > Insert > Quick Parts > Save Selection to Quick Part Gallery. To insert: Insert > Quick Parts > click the entry, or type its name and press F3.
Save a Quick Part
- Type and format the content, then select it. Include the final paragraph mark if you want to keep paragraph formatting.
- On the Insert tab, in the Text group, click Quick Parts (the icon may show only as “Explore Quick Parts” on narrow windows).
- Choose Save Selection to Quick Part Gallery.
- In Create New Building Block, enter a short, memorable Name.
- Leave Gallery as Quick Parts, add a Category if you like, and choose where to save it: Building Blocks (all documents) or Normal.
- Under Options, pick how it inserts (content only, in its own paragraph, or on its own page), then click OK.
Insert a Quick Part
- Click where you want the content.
- Go to Insert > Quick Parts and click the entry’s preview.
- Or type the entry’s name and press F3.
Right-click an entry in the gallery for more placement options, such as inserting at the page header or end of the document.
Quick Parts vs. Related Features
| Feature | Use it for |
|---|---|
| Quick Parts gallery | Reusable text, tables and images you pick from a menu |
| AutoText | Similar blocks that can pop up as you type the name; Quick Parts > AutoText > Save Selection to AutoText Gallery |
| Document Property | Inserts the title, author or company from the file’s properties |
| Field | Dynamic values such as dates, page numbers and file names |
Edit or Delete a Quick Part
- Edit: Insert it, make your changes, select it, and save it again with the same name. Click Yes to redefine it.
- Delete or rename: Insert > Quick Parts > Building Blocks Organizer, select the entry, then Delete or Edit Properties.
In long documents, you can also jump to a page in Word with Ctrl + G.
To make a saved block stand out, add a paragraph border before saving it.
For a full example, see how to create a memo in Word.
In footers, it’s handy to insert the file path with a field.
Troubleshooting
- Entries are gone next time: When closing Word, click Save if asked whether to save changes to Building Blocks.
- Formatting changes when inserted: Include the paragraph mark when saving, or clear formatting first; see removing all formatting in Word.
- Numbering appears unexpectedly: See stopping automatic numbering.
- No Quick Parts button: Quick Parts is a desktop feature; Word for the web doesn’t have it. Word for Mac offers AutoText instead.
Frequently Asked Questions
Can I share Quick Parts with coworkers?
Yes. Save them in a template and share the template, or copy your Building Blocks file.
Can a Quick Part contain images or tables?
Yes. Anything you can select in a document can be saved.
What does F3 do?
It expands the building block whose name you’ve just typed.
Summary
- Select content and save it to the Quick Part gallery.
- Insert it from Insert > Quick Parts, or type its name and press F3.
- Manage entries in the Building Blocks Organizer.
- Save Building Blocks when Word asks.

Kermit Matthews is a freelance writer based in Philadelphia, Pennsylvania with more than a decade of experience writing technology guides. He has a Bachelor’s and Master’s degree in Computer Science and has spent much of his professional career in IT management.
He specializes in writing content about iPhones, Android devices, Microsoft Office, and many other popular applications and devices.