To stream on Twitch from a Windows 10 PC, install the free OBS Studio app, open Settings > Stream, set Service to Twitch, and click Connect Account to sign in. Then add a source such as Game Capture or Display Capture, add your webcam and microphone, and click Start Streaming. For most people, 1080p or 720p at 60 fps with a bitrate around 6,000 Kbps works well on Twitch.
This beginner’s guide walks through the full setup, recommended settings for different internet speeds, and fixes for common problems. It also works on Windows 11.
What you need
- A Twitch account. Turning on two-factor authentication in Settings > Security and Privacy is strongly recommended and may be required for some features.
- Streaming software. This guide uses OBS Studio, which is free and open source. Streamlabs Desktop is a popular alternative built on OBS.
- Upload speed of at least 5 to 10 Mbps for 720p or 1080p. Check yours with any speed test and look at the upload number.
- A microphone, and optionally a webcam.
- A capable PC. A graphics card with a hardware encoder (NVIDIA NVENC, AMD AMF, or Intel Quick Sync) makes streaming much easier while gaming.
Windows 10 reached end of support in October 2025. It still works for streaming, but upgrading to Windows 11 keeps you on current security updates and drivers.
Step 1: Install OBS Studio
- Go to obsproject.com and download the Windows installer.
- Run the installer and open OBS.
- When the Auto-Configuration Wizard appears, choose Optimize for streaming and follow the prompts. It tests your connection and picks starting settings.
Step 2: Connect OBS to Twitch
- In OBS, click Settings (bottom right) > Stream.
- Set Service to Twitch and Server to Auto (Recommended).
- Click Connect Account (recommended) and sign in to Twitch.
- Click Apply.
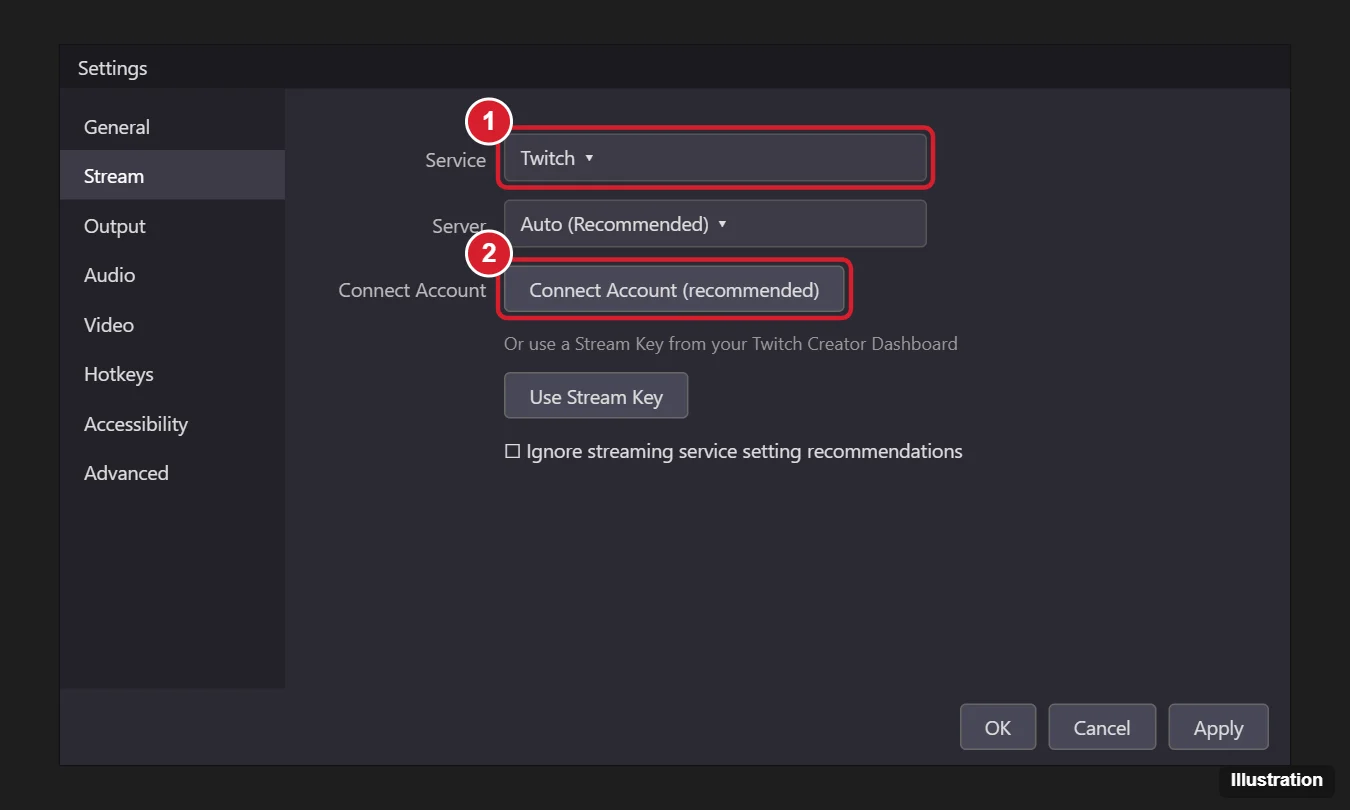
Connecting your account adds Twitch chat and stream info panels to OBS. If you prefer, click Use Stream Key and paste the key from Twitch Creator Dashboard > Settings > Stream. Never share your stream key. Anyone with it can stream to your channel.
Step 3: Set your video and output settings
- In Settings > Video, set Output (Scaled) Resolution to 1920×1080 or 1280×720, and Common FPS Values to 60 (or 30 for slower PCs).
- In Settings > Output, choose a hardware Video Encoder if you have one, such as NVIDIA NVENC H.264.
- Set the Video Bitrate using the table below.
- Set Audio Bitrate to 160.
| Upload speed | Resolution and FPS | Video bitrate |
|---|---|---|
| 5 to 7 Mbps | 720p, 30 fps | 3,000 Kbps |
| 7 to 10 Mbps | 720p, 60 fps | 4,500 Kbps |
| 10 Mbps or more | 1080p, 60 fps | 6,000 Kbps |
Keep your bitrate at no more than about 75% of your upload speed so your connection has headroom. Twitch’s standard limit is about 6,000 Kbps. Some creators can go higher with Twitch’s Enhanced Broadcasting on supported NVIDIA GPUs. Check Twitch’s current broadcast guidelines for the latest limits.
Step 4: Add your sources
In the Sources box at the bottom of OBS, click + and add:
- Game Capture: Choose Capture specific window and pick your game. It’s the most efficient way to capture games.
- Display Capture: Shows your whole monitor, useful for desktop or creative streams.
- Video Capture Device: Your webcam. Resize and move it in the preview.
- Audio Input Capture: Your microphone, if OBS isn’t picking it up already under Mic/Aux.
- Browser Source: For alerts and chat overlays from services like StreamElements.
Use Scenes to switch between layouts, such as “Starting soon,” “Gameplay,” and “Be right back.”
Step 5: Set your stream info and go live
- In OBS’s Stream Information panel, or in the Twitch Creator Dashboard, add a title, category, and tags.
- Do a test: set your stream to go live with the title “Test” or use Twitch’s Bandwidth test mode by adding ?bandwidthtest=true to the end of your stream key.
- Click Start Streaming.
- Check the status bar at the bottom of OBS for dropped frames and CPU usage.
- Click Stop Streaming when you’re done.
Troubleshooting
- Black screen on Game Capture or Display Capture: On laptops with two GPUs, set OBS to use the same GPU as the game. Go to Settings > System > Display > Graphics, add OBS, and choose the right option. Running OBS as administrator can also help.
- Dropped frames (network): Lower the bitrate, use Ethernet instead of Wi-Fi, and close uploads like cloud backups.
- “Encoding overloaded”: Switch to a hardware encoder, lower the resolution to 720p, or drop to 30 fps.
- Viewers can’t hear the game: Check Desktop Audio in the Audio Mixer isn’t muted, and that the right device is set in Settings > Audio.
- Microphone too quiet or noisy: Right-click the mic in the Audio Mixer and choose Filters to add Noise Suppression and Gain. For mic setup help, see how to set up a Blue Yeti microphone on Windows 10.
Frequently asked questions
Is OBS free?
Yes. OBS Studio is completely free with no watermarks or time limits.
Can I stream on Twitch without a webcam?
Yes. Many streamers use only gameplay and a microphone.
How do I save my Twitch streams?
In the Twitch Creator Dashboard, go to Settings > Stream and turn on Store past broadcasts. You can also record locally in OBS with Start Recording.
Can I stream from an Xbox app or Game Bar?
Xbox Game Bar can record clips but doesn’t stream directly to Twitch. Use OBS or another streaming app.

Kermit Matthews is a freelance writer based in Philadelphia, Pennsylvania with more than a decade of experience writing technology guides. He has a Bachelor’s and Master’s degree in Computer Science and has spent much of his professional career in IT management.
He specializes in writing content about iPhones, Android devices, Microsoft Office, and many other popular applications and devices.