You can turn off IPv6 for one network adapter in Windows 11 to troubleshoot connection problems. Microsoft does not recommend disabling IPv6 permanently, because some Windows features expect it, so test and turn it back on if nothing improves.
Quick Answer
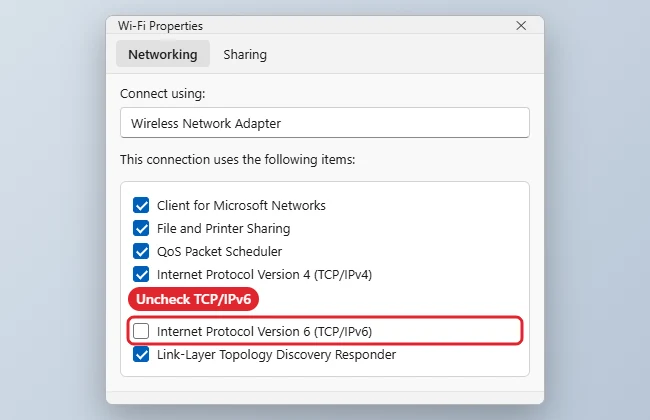
Open Control Panel, Network Connections (run ncpa.cpl), right-click your adapter, choose Properties, uncheck Internet Protocol Version 6 (TCP/IPv6) and click OK.
How to Disable IPv6 in Windows 11
- Press Windows key + R, type ncpa.cpl and press Enter. You can also go to Settings, Network and internet, Advanced network settings, More network adapter options.
- Right-click the adapter you use (Wi-Fi or Ethernet) and choose Properties.
- Uncheck Internet Protocol Version 6 (TCP/IPv6).
- Click OK.
- Disconnect and reconnect, or restart the PC.
- Test the connection. If nothing changed, re-check the box.
Options Compared
| Option | Effect |
|---|---|
| Uncheck IPv6 on one adapter | Affects that adapter only |
| Prefer IPv4 over IPv6 (registry) | Microsoft’s suggested alternative to disabling |
| Leave IPv6 on | Recommended default |
Troubleshooting
- Internet slower after disabling: turn IPv6 back on.
- Setting keeps coming back: VPN or network software may re-enable it.
- Home network features stop working: some sharing features rely on IPv6.
- Related: checking your IP address and changing DNS servers.
Frequently Asked Questions
Should I disable IPv6?
Usually not. Use it as a troubleshooting step.
Will it make my internet faster?
Rarely. It can help with specific router or VPN issues.
How do I check if IPv6 is working?
Run ipconfig in Terminal and look for an IPv6 address.
Is the process the same on Windows 10?
Yes.
Summary
- Open ncpa.cpl.
- Open adapter Properties.
- Uncheck TCP/IPv6.
- Click OK.
- Re-enable if nothing improves.

Kermit Matthews is a freelance writer based in Philadelphia, Pennsylvania with more than a decade of experience writing technology guides. He has a Bachelor’s and Master’s degree in Computer Science and has spent much of his professional career in IT management.
He specializes in writing content about iPhones, Android devices, Microsoft Office, and many other popular applications and devices.