Windows 11 only loads drivers that carry a valid digital signature. That protects you from tampered or malicious drivers, but it can block older hardware, homemade devices, development boards, or drivers you’re testing yourself. You can turn driver signature enforcement off for a single boot, which is the safest option, or put Windows into test mode for longer-term use. This guide covers both, plus how to turn protection back on.
Before you start: Only install unsigned drivers from a source you trust. A malicious driver runs with full system access. Back up important files and know your BitLocker recovery key, since changing boot settings can trigger a recovery prompt.
Quick Answer
Hold Shift and click Restart. Choose Troubleshoot > Advanced options > Startup Settings > Restart, then press 7 or F7 for Disable driver signature enforcement. Install your driver; enforcement returns automatically at the next restart.
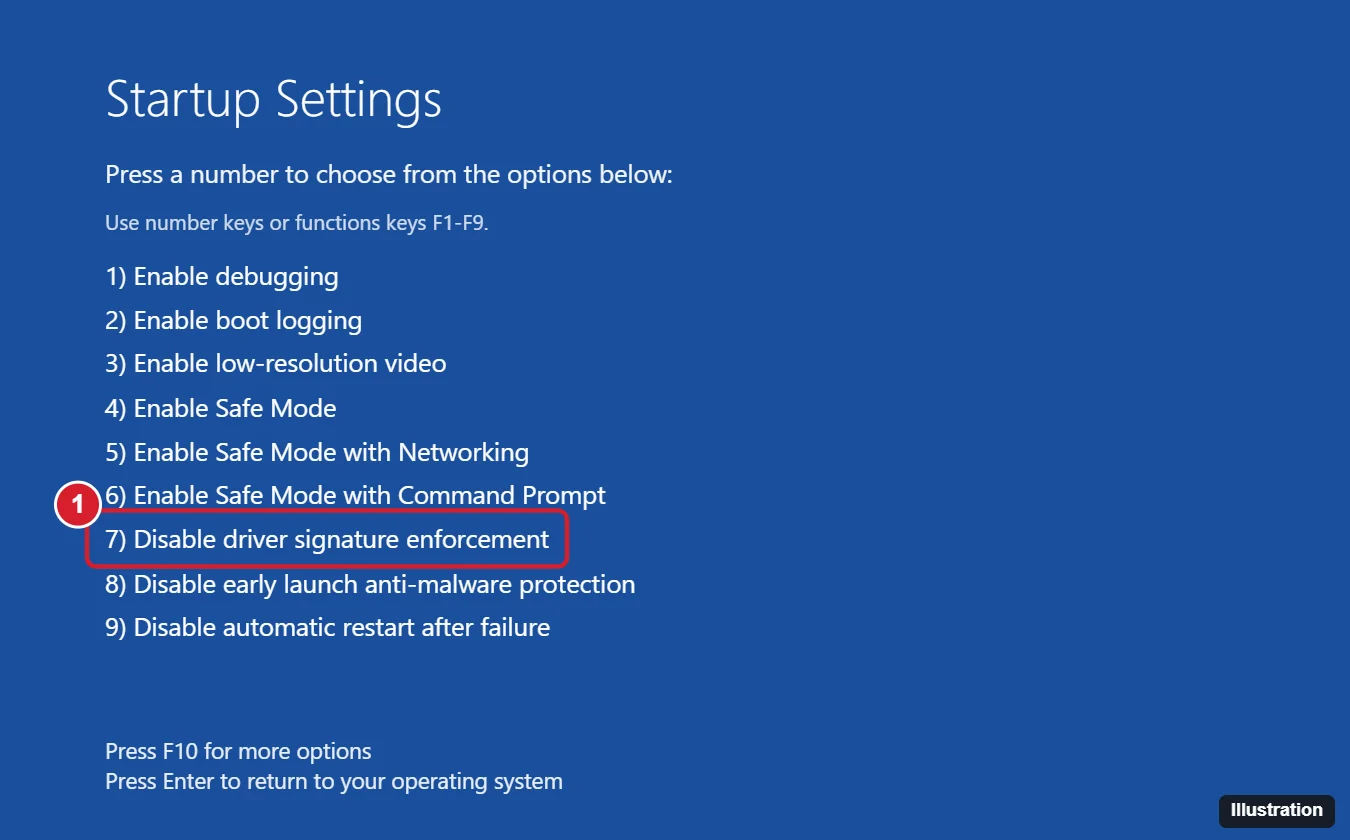
Method 1: Disable It for One Boot (Recommended)
- Save your work. Open Start, click the Power button, then hold Shift and click Restart. (Or go to Settings > System > Recovery and click Restart now next to Advanced startup.)
- On the blue Choose an option screen, click Troubleshoot.
- Click Advanced options, then Startup Settings. If you don’t see it, click See more recovery options.
- Click Restart.
- When the Startup Settings list appears, press 7 or F7.
- Windows starts normally. Install the unsigned driver (for example, right-click its .inf file and choose Install, or use Device Manager > Update driver > Browse my computer).
- If Windows shows a warning that it can’t verify the publisher, choose Install this driver software anyway.
After the next restart, enforcement turns back on. On 64-bit Windows 11, an unsigned kernel driver installed this way may stop loading after that restart, so use Method 2 if you need the driver every day.
Method 2: Turn On Test Mode (Longer Term)
Test mode lets Windows load test-signed drivers on every boot. It requires Secure Boot to be turned off in your PC’s UEFI/BIOS settings first, and Windows shows a “Test Mode” watermark on the desktop while it’s active.
- Turn off Secure Boot in UEFI/BIOS (see our guide to getting into BIOS on Windows 11). If your drive uses BitLocker, suspend protection first in Control Panel > BitLocker Drive Encryption.
- Search for Terminal or Command Prompt, right-click it, and choose Run as administrator.
- Type
bcdedit /set testsigning onand press Enter. You should see “The operation completed successfully.” - Restart the PC and install the driver.
You may see guides suggesting bcdedit /set nointegritychecks on. On current 64-bit versions of Windows this setting is ignored, so it usually doesn’t help.
Turn Driver Signature Enforcement Back On
- Open Terminal or Command Prompt as administrator.
- Run
bcdedit /set testsigning off(andbcdedit /set nointegritychecks offif you changed it). - Restart, then turn Secure Boot back on in UEFI/BIOS and resume BitLocker.
Troubleshooting
- “The value is protected by Secure Boot policy”: Secure Boot is still on. Disable it in UEFI settings, then run the command again.
- Driver still blocked: Memory integrity (Windows Security > Device security > Core isolation) can block incompatible drivers. Turning it off lowers protection, so only do it temporarily and turn it back on later.
- No Startup Settings option: Use the Settings > System > Recovery route, or run
shutdown /r /o /t 0from an admin prompt to reach the recovery menu. - BitLocker recovery screen appears: Enter your recovery key, found at your Microsoft account’s recovery key page or wherever you saved it.
- Better option available? Check the hardware maker’s site for a signed Windows 11 driver before disabling protection.
Frequently Asked Questions
Is it safe to disable driver signature enforcement?
For one boot with a driver you trust, the risk is limited. Leaving test mode on permanently weakens a key Windows defense, so turn it off when you’re done.
Will this affect games with anti-cheat?
Often, yes. Many anti-cheat systems refuse to run in test mode or with Secure Boot off.
How do I remove the Test Mode watermark?
Run bcdedit /set testsigning off and restart. The watermark disappears when test mode is off.
Summary
- Shift + Restart > Troubleshoot > Advanced options > Startup Settings > Restart.
- Press 7 or F7 and install the driver.
- For ongoing use, disable Secure Boot and run
bcdedit /set testsigning on. - Reverse the changes when you no longer need the driver.

Kermit Matthews is a freelance writer based in Philadelphia, Pennsylvania with more than a decade of experience writing technology guides. He has a Bachelor’s and Master’s degree in Computer Science and has spent much of his professional career in IT management.
He specializes in writing content about iPhones, Android devices, Microsoft Office, and many other popular applications and devices.