To sign a Word document on an iPad, open it in the Microsoft Word app, tap the Draw tab, choose a pen, and write your signature on the signature line with your Apple Pencil or finger. If you’d rather use a saved signature, turn the document into a PDF and use the iPad’s built-in Markup tool, which lets you add the same signature to any document with a tap.
Here are both methods, plus how to insert a signature image and what to know about digital signatures.
Method 1: Sign with the Draw tab in Word
- Open the document in the Microsoft Word app. You need to be signed in to edit, and some features require a Microsoft 365 subscription on larger iPads.
- Scroll to the place where you want to sign.
- Tap the Draw tab at the top.
- Tap a pen. Tap it again to change the color (black or dark blue looks most natural) and thickness.
- Write your signature with your Apple Pencil. If you’re using your finger, turn on Draw with Touch first (the hand icon on the Draw tab).
- Tap the lasso tool if you need to move or resize the signature, then drag it into place.
- Tap Home or any other tab to stop drawing. Word saves the change automatically.
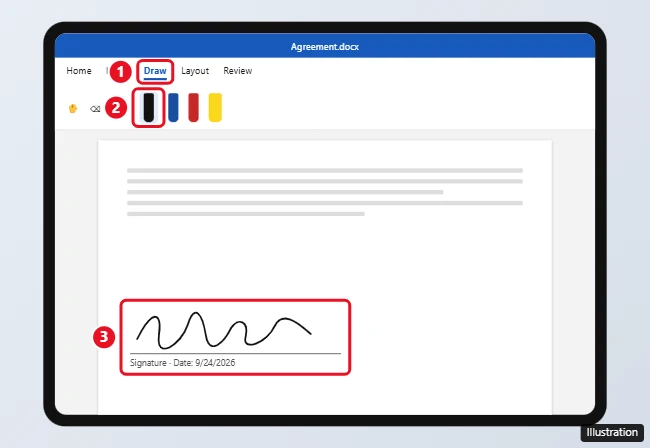
Made a mistake? Tap the Eraser on the Draw tab and tap the ink stroke to remove it, or tap Undo.
Method 2: Sign with Markup (reusable signature)
- In Word, tap the File icon (or the three dots), then Export or Print > PDF, and save the PDF to the Files app. You can also tap Share > Send a Copy > PDF.
- Open the PDF in the Files app.
- Tap the Markup button (the pen tip icon).
- Tap + and choose Add Signature. The first time, draw your signature and tap Done. iPadOS saves it for next time.
- Drag the signature onto the signature line and resize it with the handles.
- Tap Done to save the signed PDF, then share it.
A PDF is usually the better choice for signed documents, because others can’t easily edit it after you sign.
Method 3: Insert a picture of your signature
- Sign a white sheet of paper with a dark pen and take a clear photo of it, or save a signature image you already have.
- In Word, tap where the signature should go, then tap Insert > Pictures and choose the photo.
- Tap Picture > Crop to trim it, and drag the corners to resize.
- Tap Wrap Text > In Front of Text to place it exactly on the line.
What about digital signatures?
A drawn signature is a visual signature. A digital signature uses a certificate to prove who signed and that the file wasn’t changed. Word for iPad can’t add certificate-based digital signatures. For legally binding e-signatures, use a service like DocuSign, Adobe Acrobat Sign, or Dropbox Sign, which work on iPad and track who signed and when.
Related: How to Sign a Word Document Electronically.
Frequently asked questions
Why don’t I see the Draw tab in Word on my iPad?
Update the Word app from the App Store, and make sure you’re signed in with a Microsoft account. On iPads with screens larger than 10.1 inches, editing requires a Microsoft 365 subscription.
Can I sign with my finger?
Yes. On the Draw tab, turn on Draw with Touch, or use Markup, which works with a finger by default.
Will my signature show up when I send the Word file?
Yes. Ink drawn in Word is saved in the document and shows in Word on other devices. Converting to PDF is the most reliable way to make it look the same everywhere.
Can I sign a Word document on an iPhone?
Yes. The same Draw tab and Markup steps work in Word and Files on iPhone.

Kermit Matthews is a freelance writer based in Philadelphia, Pennsylvania with more than a decade of experience writing technology guides. He has a Bachelor’s and Master’s degree in Computer Science and has spent much of his professional career in IT management.
He specializes in writing content about iPhones, Android devices, Microsoft Office, and many other popular applications and devices.