Windows 10 doesn’t keep a print history by default. To check what’s printing right now, open the printer’s queue in Settings > Devices > Printers & scanners, click the printer, and choose Open queue. To keep a record of past print jobs, turn on the print log in Event Viewer under Applications and Services Logs > Microsoft > Windows > PrintService > Operational. After that, every document you print is logged with its name, time, printer, and page count.
Here’s how to use each option, plus how to keep copies of printed documents and check the printer’s own history.
Print history options at a glance
| Option | What it shows | Shows past jobs? |
|---|---|---|
| Print queue | Documents waiting to print or printing now | No, unless “Keep printed documents” is on |
| Event Viewer print log | Document name, user, printer, pages, time | Yes, from the time you turn it on |
| Printer’s web page or display | Job log stored on the printer | Often, depending on the model |
Method 1: Check the print queue
- Press Windows + I and click Devices > Printers & scanners.
- Click your printer and choose Open queue.
- The window lists documents that are waiting or printing, with their owner, pages, and time submitted.
Keep printed documents in the queue
- In Printers & scanners, click your printer, then Manage > Printer properties.
- Open the Advanced tab and check Keep printed documents.
- Click OK.
Printed jobs now stay in the queue so you can see them and reprint them. The list clears when the print spooler restarts, such as after a reboot, and it uses some disk space.
Method 2: Turn on the print log in Event Viewer
- Right-click Start and choose Event Viewer.
- In the left pane, expand Applications and Services Logs > Microsoft > Windows > PrintService.
- Click Operational.
- In the Actions pane on the right, click Enable Log.
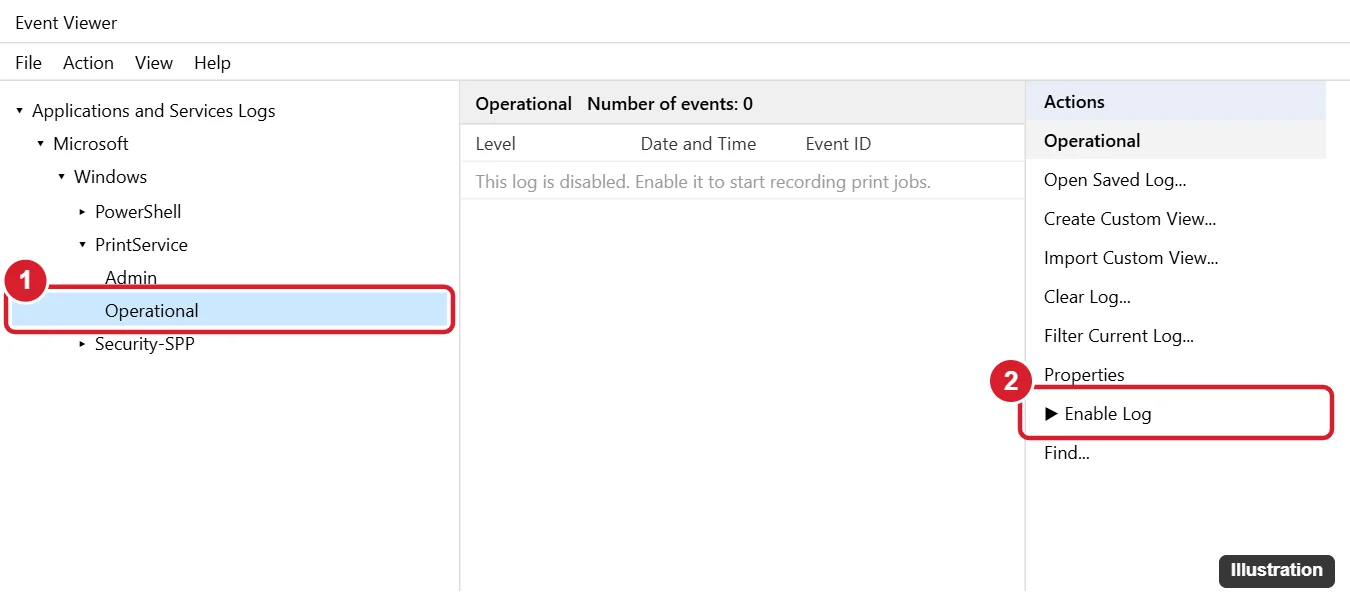
The log only records jobs printed after you enable it. Earlier jobs can’t be recovered this way.
How to view your print history
- Go back to PrintService > Operational in Event Viewer.
- Click Filter Current Log in the Actions pane, type 307 in the Event IDs box, and click OK. Event 307 means a document printed.
- Click an event to see the details, including the document name, the user, the printer, and the number of pages.
To keep more history, right-click Operational, choose Properties, and raise the Maximum log size. Choose Archive the log when full if you don’t want old entries overwritten.
Method 3: Check the printer’s own history
Many office and network printers keep a job log. Type the printer’s IP address into a web browser to open its settings page and look for Job Log, Job History, or Usage. Some printers also show recent jobs on their touchscreen or can print a usage report. Check the manual for your model.
Privacy note
Print logs include document names, which can reveal private information. On shared PCs, only turn on logging if everyone knows about it, and clear the log from Event Viewer when you no longer need it.
Jobs stuck? Read how to clear the printer queue.
Frequently asked questions
Can I see what was printed before I turned on logging?
Usually not on the PC. The printer’s own job log or your organization’s print server may have a record.
Does this work in Windows 11?
Yes. Event Viewer works the same way. The print queue is in Settings > Bluetooth & devices > Printers & scanners.
Can I see the contents of printed documents?
No. The log shows details like the file name and page count, not what was on the page. Only “Keep printed documents” lets you reprint recent jobs.

Kermit Matthews is a freelance writer based in Philadelphia, Pennsylvania with more than a decade of experience writing technology guides. He has a Bachelor’s and Master’s degree in Computer Science and has spent much of his professional career in IT management.
He specializes in writing content about iPhones, Android devices, Microsoft Office, and many other popular applications and devices.