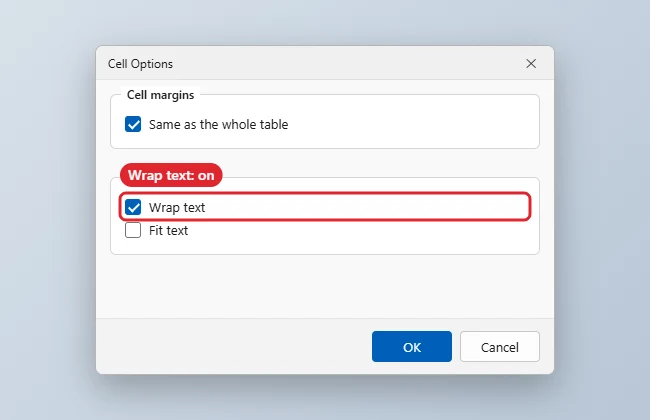
Text in a Word table wraps automatically when it reaches the edge of a cell. If it runs off the page or won’t wrap, the column is set too wide or a cell option is off: right-click the table, choose Table Properties > Cell > Options, make sure Wrap text is ticked and Fit text is not, then use Layout > AutoFit > AutoFit Window so the table fits the page.
Quick Answer
Table Properties > Cell > Options > tick Wrap text. Then Layout > AutoFit > AutoFit Window.
Steps to Make Text Wrap
- Select the cells, or click in the table to change it all.
- Right-click and choose Table Properties.
- On the Cell tab, click Options.
- Tick Wrap text and untick Fit text, then OK.
- On Layout, choose AutoFit > AutoFit Window to keep the table inside the margins.
Fixes for Table Text
| Problem | Fix |
|---|---|
| Text runs past the page | AutoFit Window |
| Text squashed small | Untick Fit text |
| Long URL won’t break | Insert a space or line break, or narrow the font |
| Row won’t grow | Table Properties > Row > set height to At least |
| Text around the table | Table Properties > Table > Text wrapping: Around |
Troubleshooting
- Table off the page: See fixing a table that’s off the page.
- Vertical text in cells: See making text vertical in Word.
- Creating tables: See inserting a table in Word.
Frequently Asked Questions
What’s the difference between Wrap text and text wrapping?
Wrap text keeps text inside a cell; table text wrapping controls how body text flows around the whole table.
Why is the row height fixed?
Row height may be set to Exactly. Change it to At least.
Does this work in Word for Mac?
Yes, via Table Properties.
Summary
- Open Table Properties > Cell > Options.
- Tick Wrap text.
- Untick Fit text.
- AutoFit to the window.

Kermit Matthews is a freelance writer based in Philadelphia, Pennsylvania with more than a decade of experience writing technology guides. He has a Bachelor’s and Master’s degree in Computer Science and has spent much of his professional career in IT management.
He specializes in writing content about iPhones, Android devices, Microsoft Office, and many other popular applications and devices.