Rotating pictures on iPhone 14 is simple. Open the Photos app, select your image, tap on ‘Edit’, find the crop tool, and use the rotation icon to adjust the photo’s orientation. Once satisfied, save your changes.
Our guide continues below with more information about using the picture editing tools, including pros and cons of this action.
You can also check out this video about how to rotate a picture on iPhone 14 for more on this topic.
Introduction
We’ve all been there: you snap a perfect picture only to realize it’s tilted just a tad bit off. Maybe you were on the move, or perhaps the angle was a bit wonky. No worries! With the iPhone 14, rotating that photo to make it look just right is as easy as pie. Ready to learn how? Let’s dive in!
Related: How to Hide Photos on iPhone 14
Rotating Photos on iPhone 14
The iPhone 14 boasts an impressive camera, and the built-in Photos app is equally impressive. It’s like a mini photo studio in your pocket. Before we jump into the how-to, it’s worth noting the versatility of this app. So whether you’re editing a memory from last summer’s vacation or a silly selfie, trust in the process.
Step 1: Open the Photos App
To start, tap on the Photos icon on your iPhone 14’s home screen. This is where all your memories are stored, and it’s where the magic begins.
Step 2: Choose Your Photo
Once inside, scroll through your album and select the picture you wish to rotate. Tap on it to bring it into full view.
Step 3: Tap on ‘Edit’
At the top right corner, you’ll see an ‘Edit’ option. Give it a tap. This is your gateway to tweaking your photo.
Step 4: Find the Crop Tool
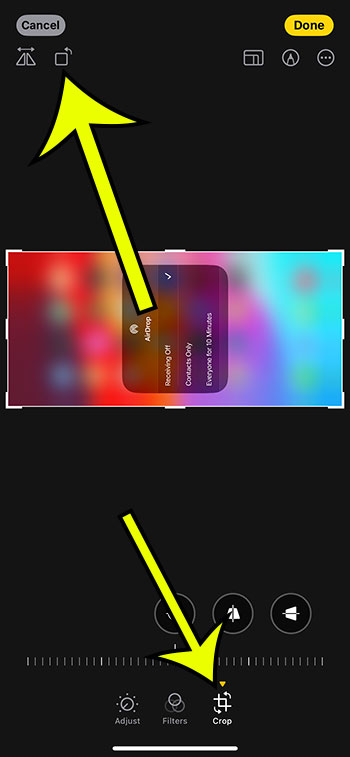
Look for the cropping icon – it looks like a square with two arrows circling it. Found it? Great! Tap on it.
Step 5: Rotate Away!
At the top left corner, there’s a rotation icon. Every time you tap it, your photo rotates 90 degrees. Keep tapping until you get the desired orientation. Once satisfied, tap on ‘Done.’
The Pros of Rotating Photos on iPhone 14
- Simplicity at its Best: The whole process is straightforward. Even if you’re new to iPhones, you’ll find it a breeze.
- High-Quality Results: Despite rotating, the iPhone 14 ensures your photo retains its quality. No pixelation here!
The Cons of Rotating Photos on iPhone 14
- Accidental Over-Rotation: It’s easy to tap one time too many. If that happens, you’ll have to rotate again to get it right.
- No Custom Angles: The built-in app only allows 90-degree rotations. For specific angles, you might need third-party apps.
Video About Rotating iPhone 14 Pictures
Wrapping it Up: Rotation Perfection Achieved!
Rotating pictures on the iPhone 14 is a piece of cake, right? The built-in Photos app offers a user-friendly experience ensuring your memories look just the way you want them to. So the next time your image is slightly skewed, don’t sweat it. Rotate, save, and share – all in a matter of seconds.
FAQs:
- Can I undo the rotation if I’m not happy with it?
- Absolutely! Just tap on ‘Revert’ in the editing mode to bring your photo back to its original state.
- Is there a way to rotate pictures automatically?
- The iPhone 14 doesn’t have an auto-rotate for individual photos, but the camera app often corrects orientation automatically when shooting.
- What if I need to rotate a picture by a specific degree?
- For precise angles, you might want to explore third-party apps on the App Store.
- Does rotating a photo reduce its quality?
- No, the iPhone 14 ensures your rotated images remain crisp and clear.
- Can I rotate videos in the same way?
- Yes, the editing steps are quite similar for videos too.

Kermit Matthews is a freelance writer based in Philadelphia, Pennsylvania with more than a decade of experience writing technology guides. He has a Bachelor’s and Master’s degree in Computer Science and has spent much of his professional career in IT management.
He specializes in writing content about iPhones, Android devices, Microsoft Office, and many other popular applications and devices.
