Word draws a red squiggly line under words it thinks are misspelled. That’s handy when you’re writing, but it gets in the way for names, technical terms, other languages, or a document you’re about to present or screenshot. You can fix or ignore individual words, hide the lines in one document, turn off the check for specific text, or turn spell check off entirely. This guide covers every option in Word for Windows and Mac, plus the other red lines Word shows, such as Track Changes marks.
Quick Answer
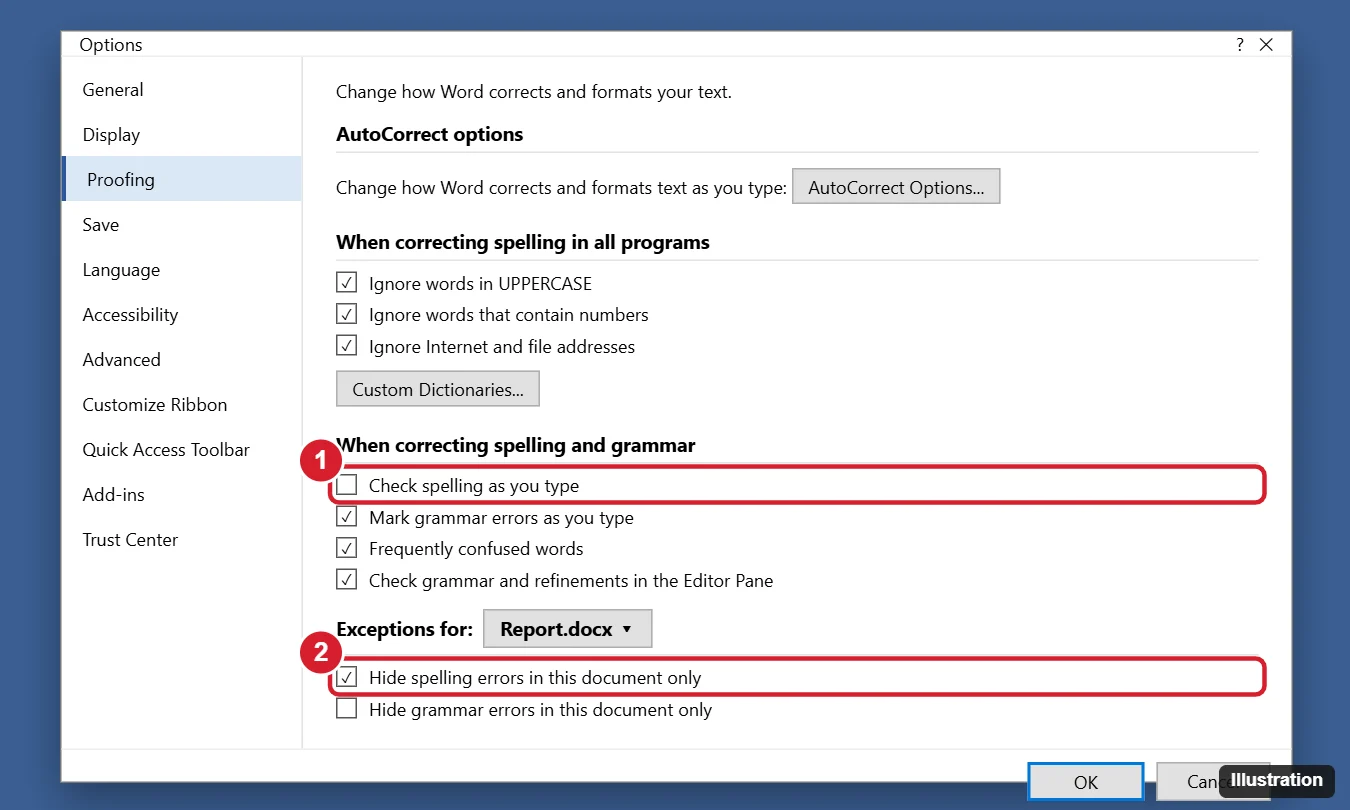
Right-click the underlined word and choose a suggestion, Ignore All, or Add to Dictionary. To hide all red lines in the current document, go to File > Options > Proofing and check Hide spelling errors in this document only. To stop red lines everywhere, uncheck Check spelling as you type in the same place. On a Mac, go to Word > Preferences > Spelling & Grammar.
What the Different Lines Mean
| Line | Meaning |
|---|---|
| Red squiggly underline | Possible spelling error |
| Blue double underline | Grammar, clarity, or style suggestion from Editor |
| Purple dotted underline | Refinement suggestion, such as conciseness (varies by version) |
| Red or colored text with strikethrough, or a vertical bar in the margin | Track Changes. These are edits, not spelling errors. |
| Solid red underline you added | Underline formatting. Remove it with Ctrl + U. |
Method 1: Fix or Ignore One Word
- Right-click the word with the red line.
- Choose one of these:
- A suggested spelling to correct it.
- Ignore All to stop flagging that word in this document.
- Add to Dictionary to never flag it again in any document. This is good for names and brand terms.
To check the whole document at once, press F7 or go to Review > Editor (or Spelling & Grammar).
Method 2: Hide Red Lines in One Document
- Go to File > Options > Proofing.
- Under Exceptions for, choose the current document.
- Check Hide spelling errors in this document only. Check Hide grammar errors in this document only too if you want.
- Click OK.
The setting is saved with the file, so the lines stay hidden for anyone who opens it, while other documents keep spell check.
Method 3: Skip Spell Check for Selected Text
Useful for code, addresses, foreign-language quotes, or reference lists:
- Select the text.
- Go to Review > Language > Set Proofing Language.
- Check Do not check spelling or grammar and click OK.
If a passage is in another language, choose that language instead, so Word checks it correctly instead of flagging every word.
To apply this to a style, such as a “Code” style, modify the style, choose Format > Language, and check Do not check spelling or grammar.
Method 4: Turn Off Spell Check Everywhere
Windows
- Go to File > Options > Proofing.
- Under When correcting spelling and grammar in Word, uncheck Check spelling as you type. Uncheck Mark grammar errors as you type to remove blue lines too.
- Click OK.
Mac
- Go to Word > Preferences > Spelling & Grammar.
- Uncheck Check spelling as you type (and Check grammar as you type if you want).
Word for the web
Go to Review > Editor (or Spelling & Grammar) and look for an option to turn off checking, or set the proofing language to Do not check spelling or grammar for selected text. Options vary by version.
Red Lines from Track Changes
If words have red strikethroughs, colored underlines, or there are vertical lines in the margin, Track Changes is showing edits:
- Go to Review > Accept > Accept All Changes (or Reject) to finalize edits.
- Turn off Track Changes on the Review tab to stop marking new edits.
- Choose No Markup in the display menu to hide markup temporarily without accepting it.
If you meant to cross words out, see our guide to strikethrough formatting.
Troubleshooting
Every word has a red line
The text is set to the wrong proofing language. Select all (Ctrl + A), go to Review > Language > Set Proofing Language, choose your language, and uncheck Do not check spelling or grammar.
Red lines don’t appear at all
Spell check may be off, the document may have “Hide spelling errors” turned on, or the text may be marked “Do not check spelling.” Check all three places above.
I added a word to the dictionary by mistake
Go to File > Options > Proofing > Custom Dictionaries > Edit Word List, select the word, and click Delete.
Frequently Asked Questions
Do red lines print?
No. Spelling underlines only appear on screen. They don’t print or appear in PDFs.
Why does Word flag a correctly spelled name?
It isn’t in Word’s dictionary. Add it with Add to Dictionary.
Will hiding red lines turn off autocorrect?
No. AutoCorrect is separate, under File > Options > Proofing > AutoCorrect Options.
Summary
- Right-click a word to correct it, Ignore All, or Add to Dictionary.
- Hide red lines for one document in Proofing > Exceptions.
- Use Set Proofing Language > Do not check spelling or grammar for specific text.
- Uncheck Check spelling as you type to turn it off everywhere.
- Accept or reject changes if the red lines come from Track Changes.

Kermit Matthews is a freelance writer based in Philadelphia, Pennsylvania with more than a decade of experience writing technology guides. He has a Bachelor’s and Master’s degree in Computer Science and has spent much of his professional career in IT management.
He specializes in writing content about iPhones, Android devices, Microsoft Office, and many other popular applications and devices.